Did you know that you can make your own cereal at home? I’m not talking just granola,
I am talking full-fledged bran flakes coupled with big juicy raisins, dried apricots, crunchy almonds, sweet rolled oats, and crunchy quinoa. Designer cereal at its best.
Well, if you did already know that, I wish you would have told me about it. I just realized it and I think it’s amazing. If only I had known about it years ago….
Prior to clean eating, I was a bit of a cerealaholic. I lived on cereal the year before graduate school. I was making good money at a tech job, but in an effort to double and triple my car payments every month and have money set aside for graduate school, I lived like the struggling artist that I strove to be. I had a tiny studio apartment: I could fry an egg, get dressed for work, watch the news, and brush my teeth without having to move an inch. I had an egg sandwich as I ran out the door (I had to move my car by 7 am to avoid a parking ticket) and every night I devoured bowls of cereal while reading cookbooks before heading off to play rehearsals or auditions.
After graduate school, I still kept my cereal habit. I had my basic cereals: Cheerios, Fiber One, Crunchy Oat Bran, and then my designer, ‘treat’ cereals like Blueberry Morning and Raisin Nut Bran. My pantry looked like a showroom for Kelloggs and General Mills.
When Manatee and I decided to come clean, we knew our cereal habit had to go. Cereal was chock full of chemicals and preservatives, not to mention, it’s really expensive. It was tough, but we made it. After staying clean, our taste buds readjusted and anything store bought, even the tree hugging organic granolas, were too sweet for our tastes.
Fast forward to present day: I’m pregnant and I want my cereal back. But between the latest scary recalls and how my taste buds pucker at the overly sweetened cereal flakes found in processed favorites, I was at a loss.
Then I started google searching. Unbeknownst to me, bloggers everywhere have been making their own bran flakes at home. Couple that with a modified granola/muesli recipe and Eureka! Homemade Cereal!

Today you are going to get 2 recipes for the price of 1. For me, these two recipes go together so well that I can’t imagine tucking into a bowl of one without the other.

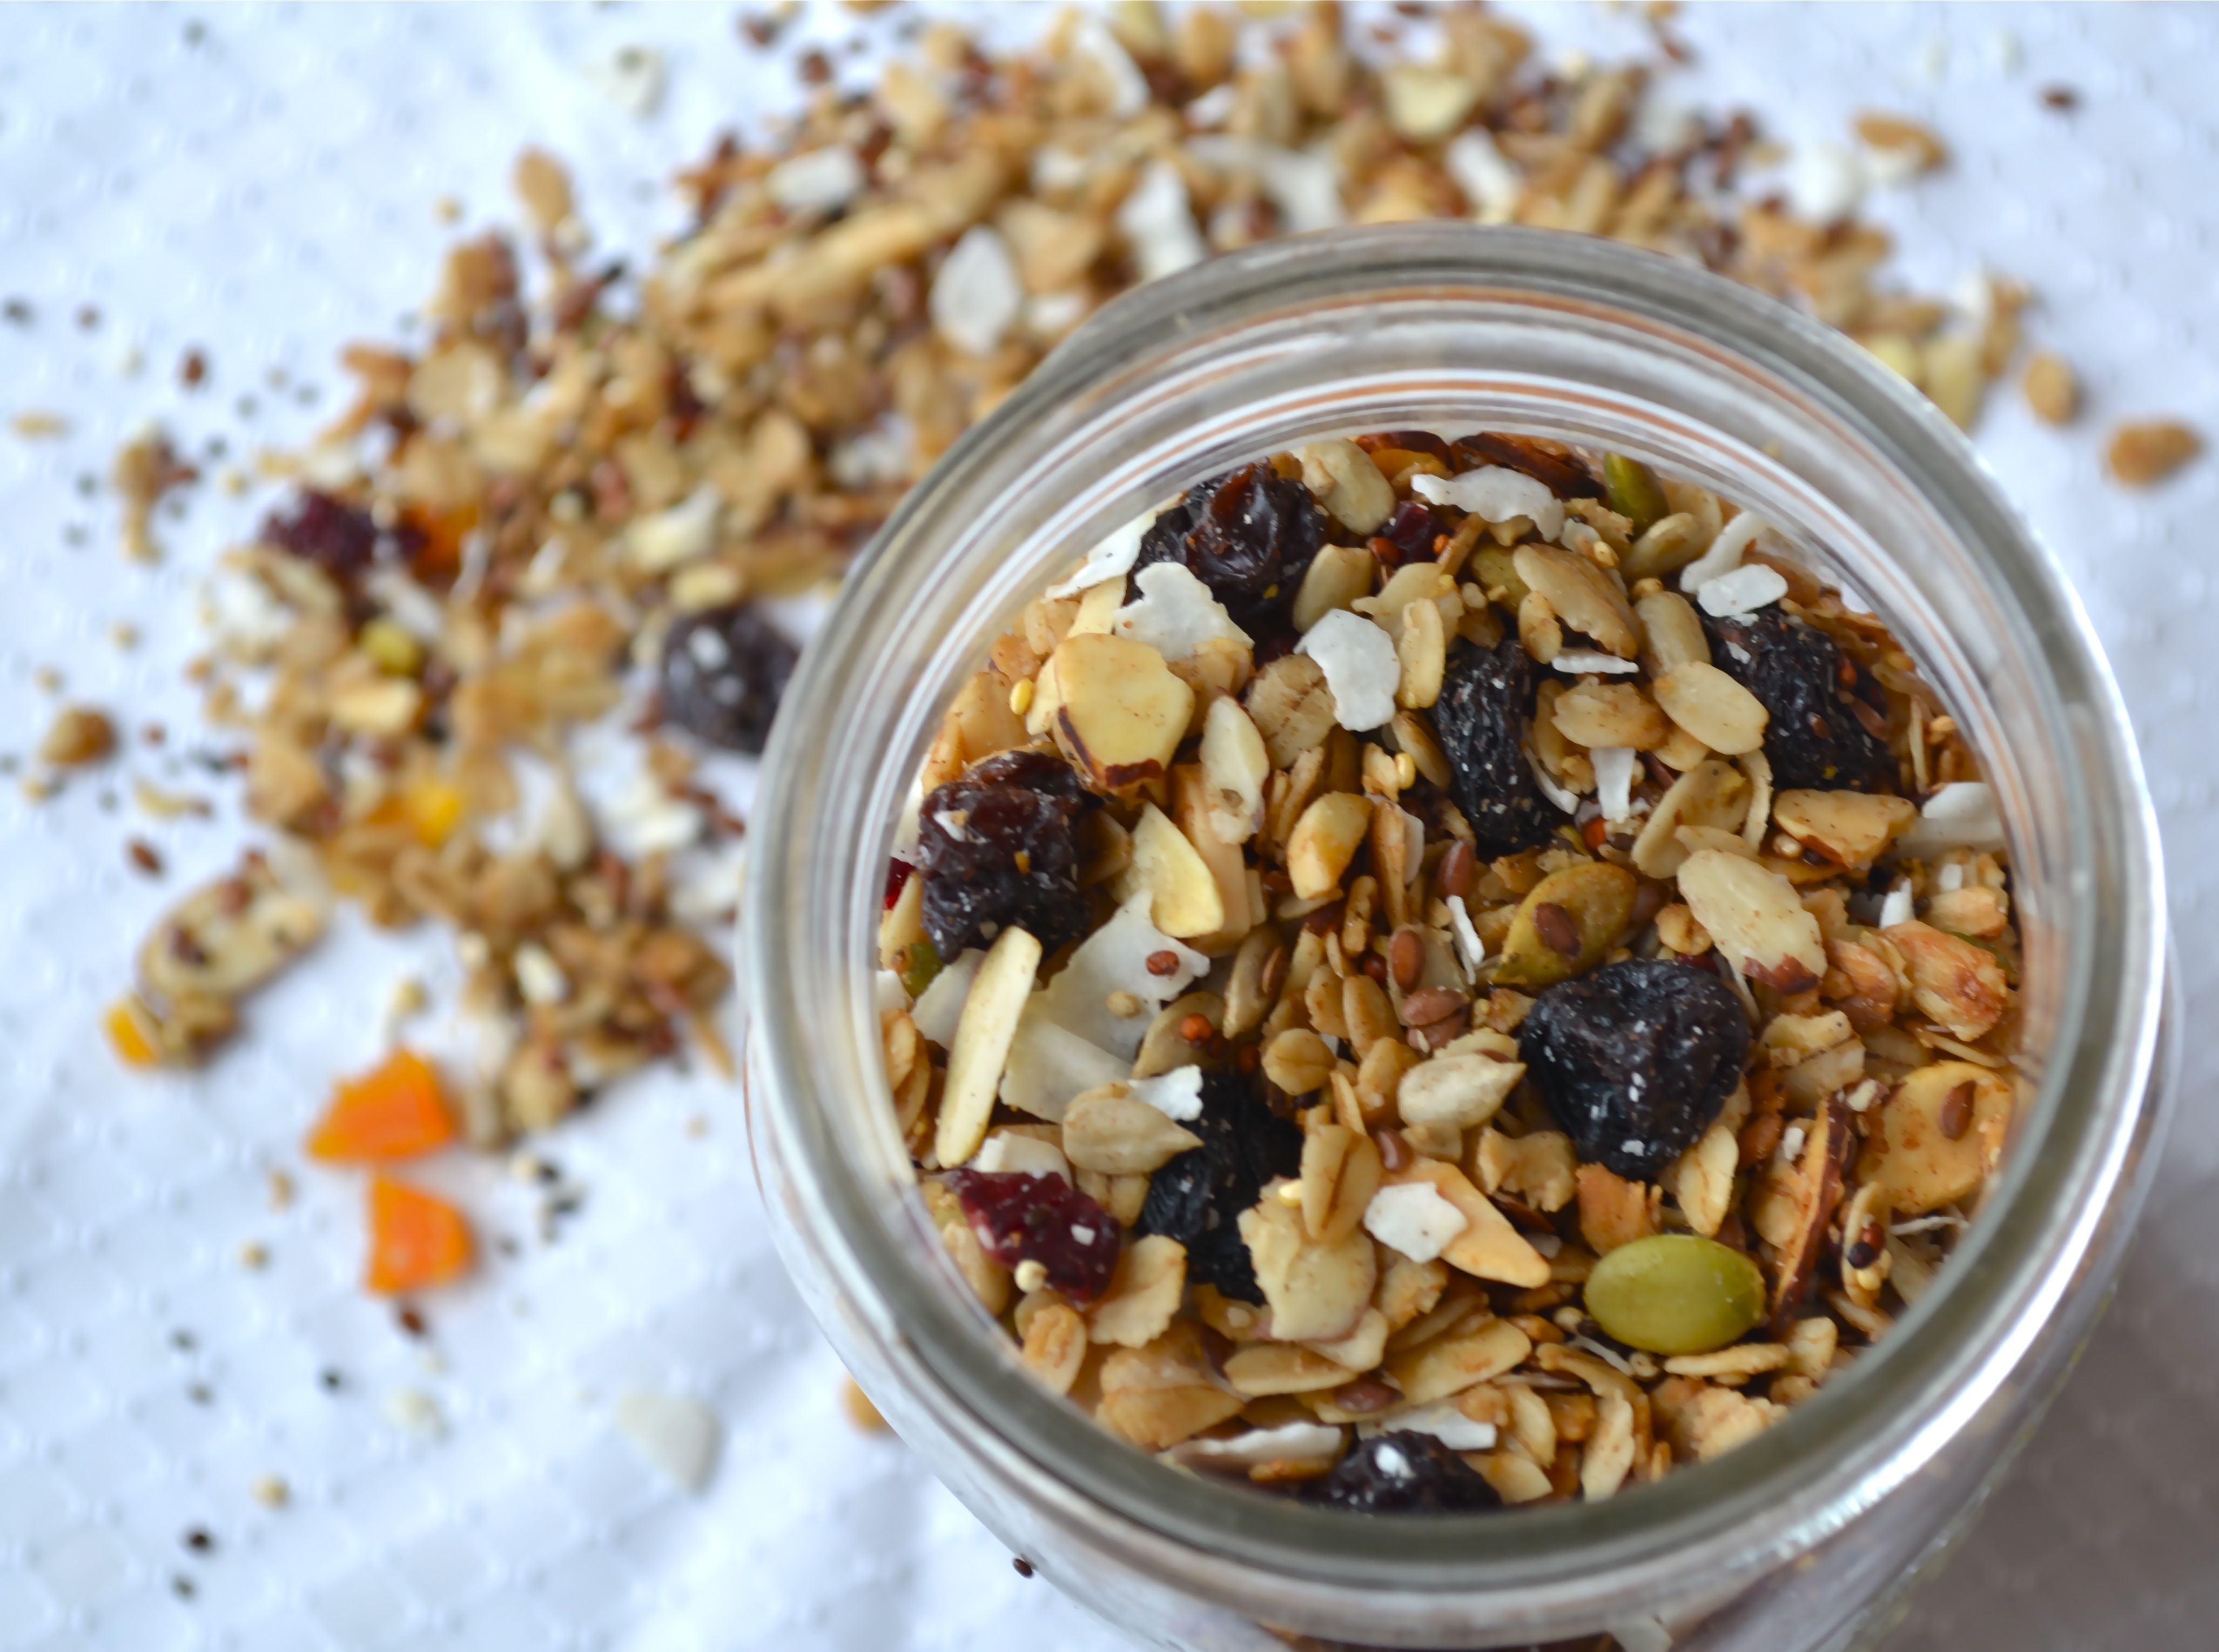
Badger Girl Granola Muesli
2013-03-15 09:41:50
Yields 4
Sweet, crispy, and packed with all of your favorite ingredients.
5 cups rolled oats
1 cup chopped walnuts or slivered almonds
2 cups sliced almonds
1 cup pumpkin seeds, raw
[1/2] cup sunflower seeds, raw
[1/2] cup quinoa, rinsed and drained
[1/2] flaxseeds
[1/4] cup chia seeds
1 tablespoon cinnamon
[1/2] cup grapeseed or other neutral tasting oil
[1/2] cup coconut oil
1 cup maple syrup
1 [1/2] tablespoons vanilla extract
1 [1/2] cup unsweetened coconut flakes
[1/2] cup dried cranberries
1 cup chopped dried apricots
[1/2] cup raisins
[1/2] cup golden raisins
1. Preheat oven to 325 (dgF).
2. Combine ingredients for Base (oats, nuts, seeds, quinoa, and cinnamon) in a large bowl.
3. In a small saucepan, combine maple syrup and oils and heat over medium heat until coconut oil melts and syrup is fully dissolved. Stir in vanilla.
4. Pour Binder into Base ingredients. Stir with a wooden spoon to combine.
5. Spread oat mixture out on two rimmed baking sheets. Bake at 325 (dgF) for 10 minutes. Stir and rotate pans. Bake an additional 10 minutes, stir, rotate. Continue this at 5 minute intervals until oat mixture is golden brown (it will continue to crisp after you take it out of the oven). I baked mine for a total of 30 minutes (10, 10, 5, 5).
6. While mixture is baking, combine Mix-in ingredients (dried fruits and coconut flakes) in a small bowl.
7. Let cool completely on cooling racks. Stir in Mix-ins on the baking pans. Transfer to airtight containers. Granola Muesli will be good for up to 3-4 weeks.
Base= 9 [1/2]- 9 [3/4] cups
Binder= 1 cup oil to [3/4]-1 cup sweetener (maple syrup or honey)
Mix-ins= 4 cups.
Badger Girl Learns to Cook by Kimberly Aime https://learntocookbadgergirl.com/
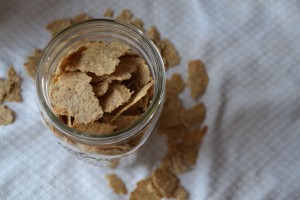
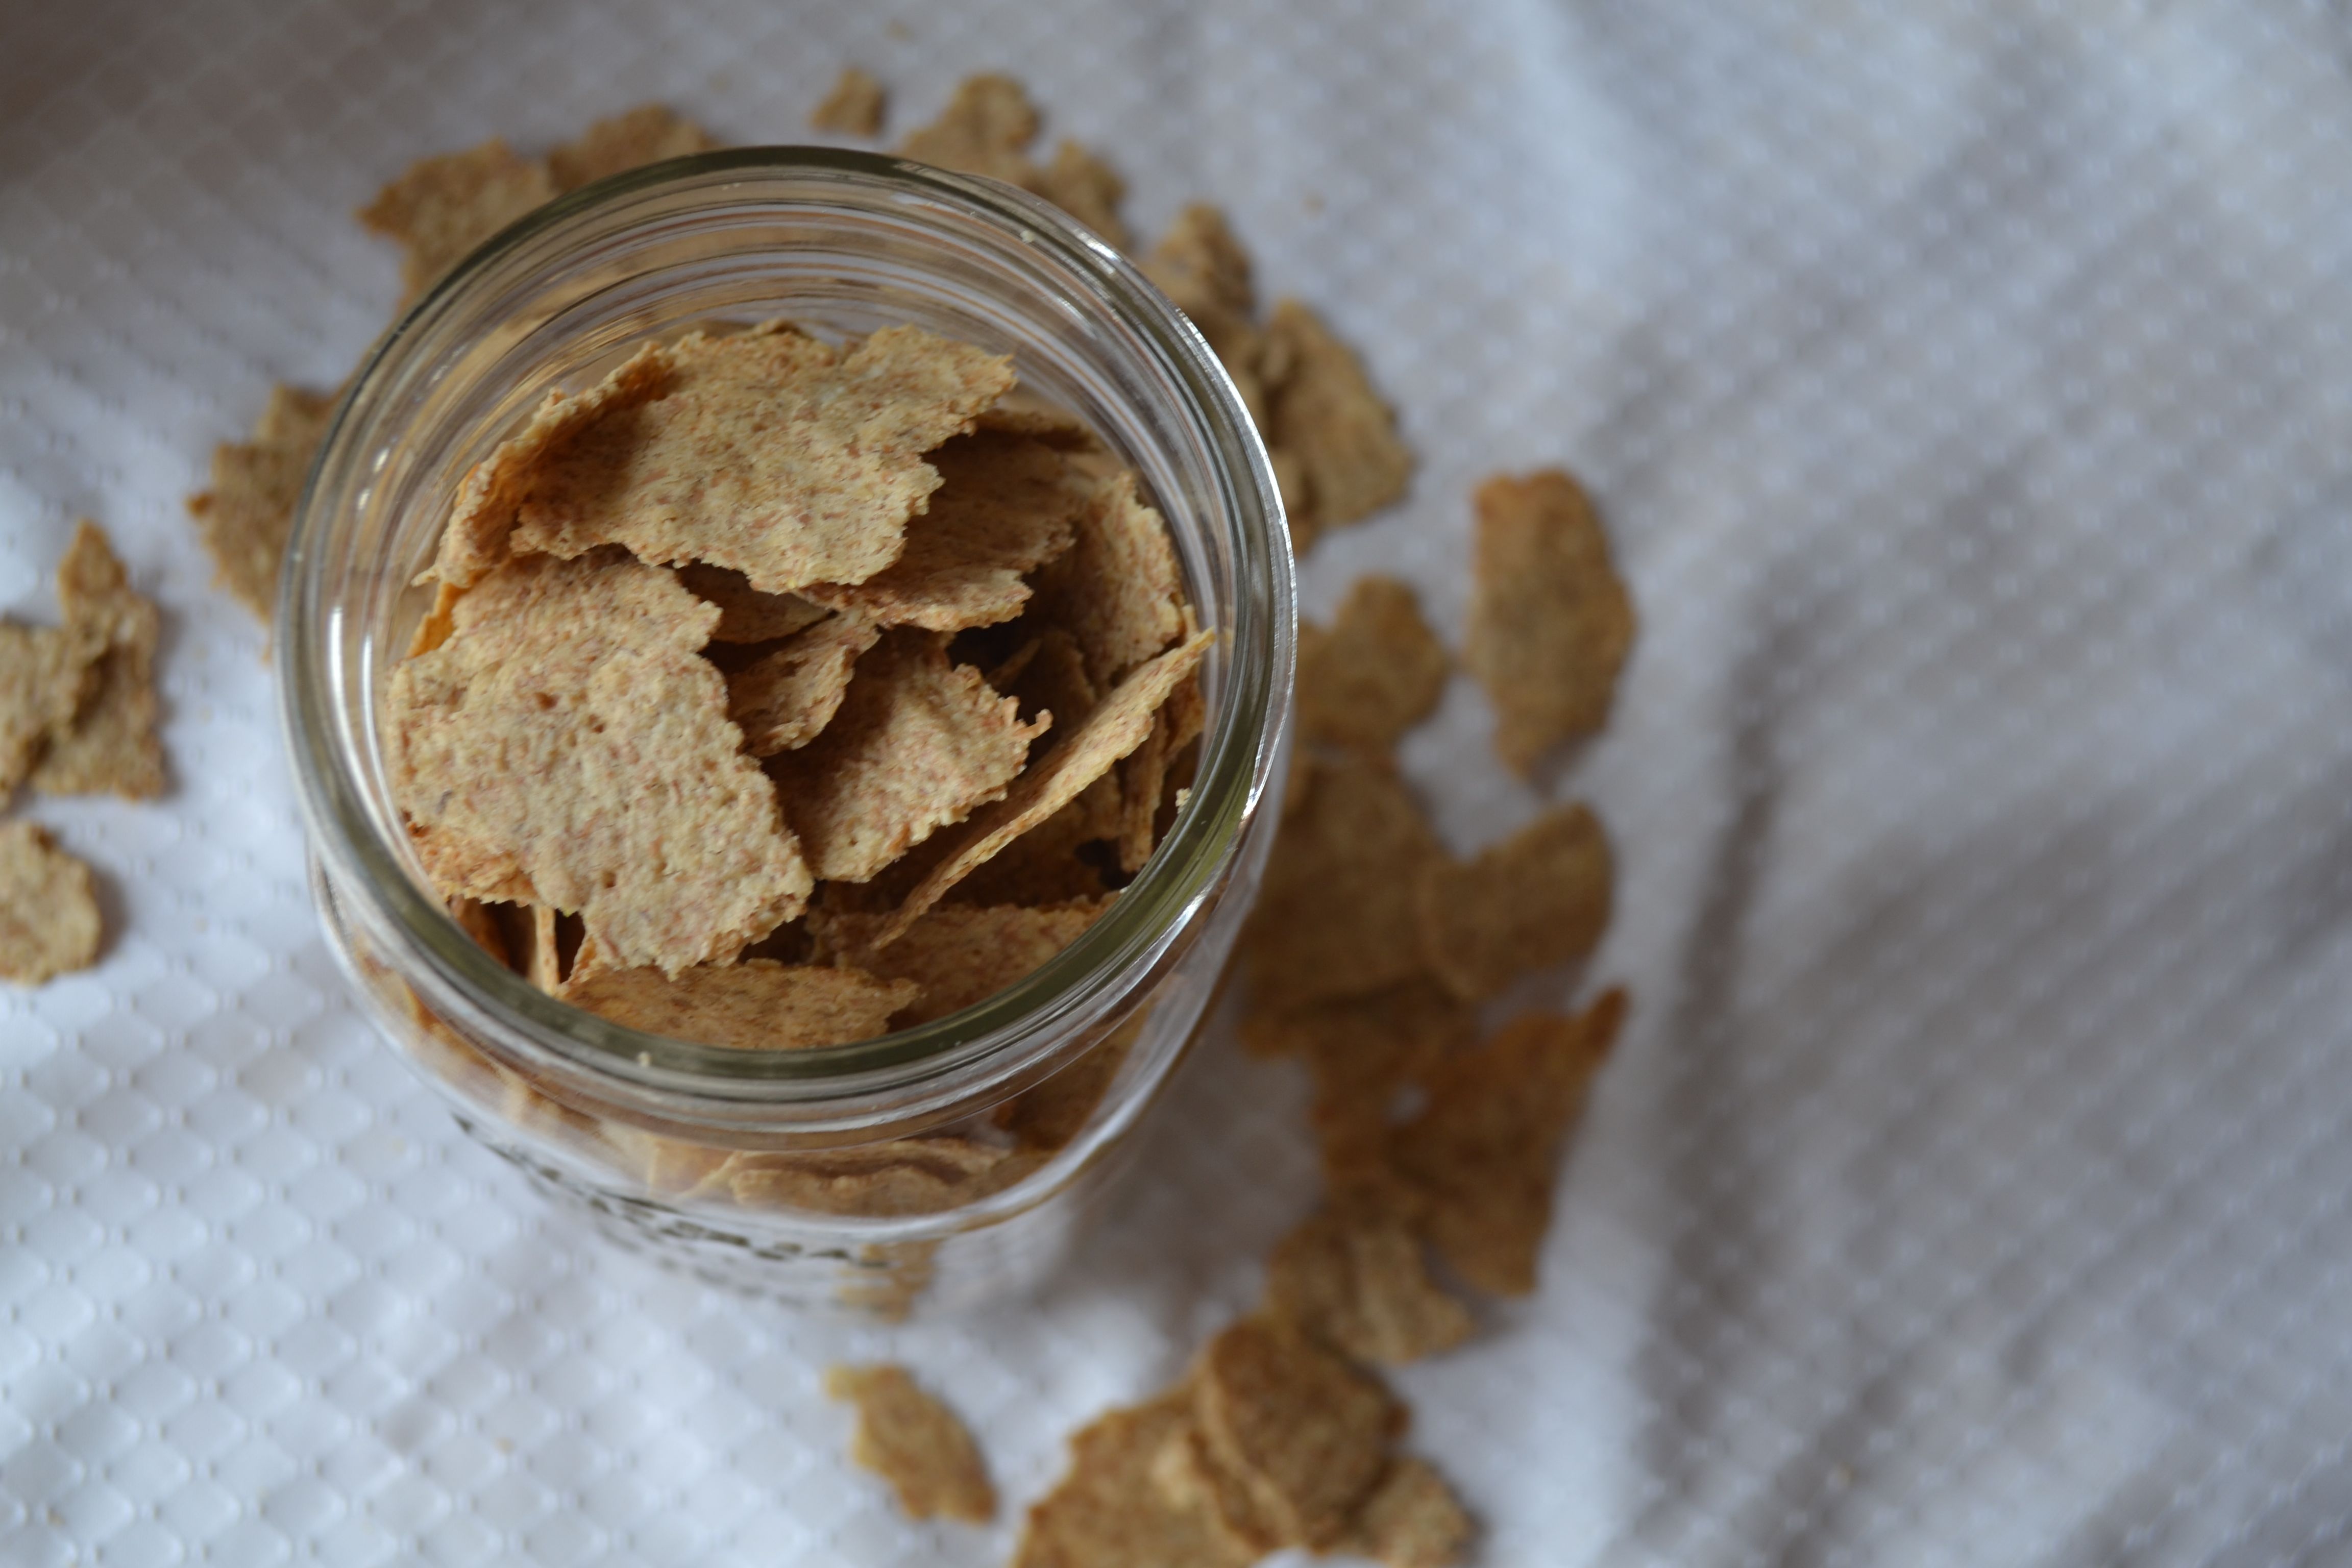
Homemade Bran Flakes
2013-03-15 09:52:58
Yields 2
Homemade bran flakes with the slight hint of peanut butter goodness.
1 cup whole bran flakes
1 cup oat flour
[1/4] cup whole wheat pastry flour
3 tablespoons sugar
[1/2] teaspoon baking powder
[1/2] teaspoon salt
[1/3] cup peanut butter
[1/3] tahini
[2/3] cup almond (or other non-dairy) milk
[1/2] cup water
1. Preheat oven to 350 (dgF).
2. Combine dry ingredients in a large bowl (bran, oat flour, whole wheat pastry flour, sugar, salt, baking powder).
3. Stir in peanut butter and tahini. The dough will form a coarse meal. Break up the pieces as much as possible.
4. Add milk and water. Stir to combine. Let rest for 5 minutes.
5. While dough is resting, measure out 4 pieces of parchment paper to fit your baking sheets.
6. Place [1/4] of dough onto prepared parchment paper. Cover with plastic wrap and use a rolling pin to roll the dough as thin as possible. Remove plastic wrap and place parchment paper on baking sheet. Repeat.
7. Bake first two batches at 350 (dgF) for 12 minutes, rotating halfway through. While those 2 sheets are baking, roll out remaining dough on remaining parchment paper.
8. To cool, remove dough and parchment paper onto cooling racks. Bake the remaining 2 sheets.
9. Reduce oven temperature to 250 (dgF). Let cool completely and break the dough into slightly larger than bite sized pieces. Spread out on baking sheets. They can overlap. You should be able to get all 4 doughs on 2 baking sheets.
10. Bake at 250 (dgF) for 20-30 minutes, rotating pans and tossing flakes every 10 minutes. Bake until golden brown and crisp.
11. Let cool completely and store in airtight containers for up to 3 weeks.
Adapted from Macheesmo
Badger Girl Learns to Cook by Kimberly Aime https://learntocookbadgergirl.com/
The Bran Flakes can be a little tricky the first time you make them, so check out this post for some helpful visuals that walk you through the whole recipe.
Recipe Review:
This cereal has been my go-to for the last 3 weeks. I look forward to it. The Granola Muesli has just enough sweetness to feel like a treat.

The cinnamon adds warmth and I love the chewy dried fruit. I am particularly fond of jumbo raisins and chopped dried apricots. Yum!
Because of the sweet nature of the Granola Muesli, you almost need something to counterbalance it.

The nuttiness of the Bran Flakes neutralize the sweetness and give the cereal more heft.

All I can really say is that I hope you try it. This is a great recipe to make over the weekend and then have on hand for the week (or weeks) to come.
***********
What is your favorite cereal?


Good day! I know this is kinda off topic however , I’d figured I’d ask.
Would you be interested in exchanging links or maybe guest writing a blog post or vice-versa?
My site covers a lot of the same topics as yours and I believe we could greatly benefit from each other.
If you’re interested feel free to send me an e-mail. I look forward to
hearing from you! Great blog by the way!
Alfonzo recently posted..Alfonzo
controindicazioni is ciali
8d74 is online yes or no
A monetary advisor is your planning associate.
Roxanne recently posted..Roxanne
I simply want to say I’m newbie to blogs and really loved this blog site. Probably I’m likely to bookmark your site . You really come with fabulous writings. Thank you for sharing your blog.
Think about investments that supply immediate annuities.
Fletcher recently posted..Fletcher
Monetary advisors business is individuals enterprise.
Cerys recently posted..Cerys
Schwab Clever Portfolios invests in Schwab ETFs.
Brandon recently posted..Brandon
propecia.us.org
Schwab Clever Portfolios invests in Schwab ETFs.
Jewel recently posted..Jewel
And that is an investment threat price taking.
Bennie recently posted..Bennie
All forms of investments include certain risks.
Hazel recently posted..Hazel
That is true for funding advice as properly.
Ellis recently posted..Ellis
Financial advisors enterprise is people business.
Rocco recently posted..Rocco
How to change the preferences on a secondary Tumblr blog?
How to apply a wordpress theme downloaded from other websites?
This is true for investment recommendation as nicely.
Mayra recently posted..Mayra
Take into account investments that offer immediate annuities.
Cameron recently posted..Cameron
What I would like to do is write a posting on my blogspot and have the most recent entry post onto my personal webpage. Is there any way to do this and would the coding be fairly easy? I know a little about web design and coding, so if it would involve connecting my blogspot to the page somehow, I could probably do it. . . If this is possible, please point me in the right direction so that I could achieve this feature. Any help is greatly appreciated!.
A financial advisor is your planning associate.
Rodrick recently posted..Rodrick
Drugs Onn Line Amitriptyline Were To Buy viagra Vad Ar Priligy
It’s a shame you don’t have a donate button! I’d certainly donate to this brilliant blog! I suppose for now i’ll settle for book-marking and adding your RSS feed to my Google account. I look forward to fresh updates and will share this site with my Facebook group. Chat soon!
Contemplate investments that provide immediate annuities.
Zoe recently posted..Zoe
All sorts of investments include certain dangers.
Jannette recently posted..Jannette
My spouse and I stumbled over here coming from a different web address and thought I should check things out.
I like what I see so now i’m following you. Look forward to exploring your web
page again.
Reina recently posted..Reina
Your style is really unique in comparison to other folks I’ve read stuff
from. Thanks for posting when you have the opportunity,
Guess I will just book mark this web site.
https://bit.ly/2V6EJpc recently posted..https://bit.ly/2V6EJpc
my sister and I want to start a blog page together?
is to treat gastroparesis
a672 is 50mg is enough
Hello there, I found your site by means of Google while searching
for a related subject, your web site got here up, it
appears great. I’ve bookmarked it in my google bookmarks.
Hi there, just was alert to your weblog via Google, and found that it is
truly informative. I am gonna watch out for brussels.
I will be grateful in case you continue this in future.
Numerous other folks shall be benefited out of your writing.
Cheers!
Sara recently posted..Sara
How do you start your own website to advertise your new business?
Loving the information on this web site, you have done outstanding job on the blog posts.
viagra varighed
Please let me know if you’re looking for a article writer
for your site. You have some really great articles and I think
I would be a good asset. If you ever want to take
some of the load off, I’d absolutely love to write some articles for
your blog in exchange for a link back to mine. Please blast
me an email if interested. Kudos!
Carrie recently posted..Carrie
be is 25mg tablets
how com viagra cost so much
Hello I am so happy I found your weblog, I really found you by error, while I was searching on Google for something else, Nonetheless
I am here now and would just like to say cheers for a remarkable post and a all round enjoyable
blog (I also love the theme/design), I don’t have time to read through
it all at the moment but I have saved it and also added
in your RSS feeds, so when I have time I will be back to read much more, Please do keep up the fantastic job.
Chante recently posted..Chante
achat viagra arnaque
Hey are using WordPress for your blog platform? I’m new to the blog world but I’m trying
to get started and create my own. Do you need any coding expertise to make your own blog?
Any help would be greatly appreciated!
Cecila recently posted..Cecila
I am genuinely happy to glance at this website posts which consists of tons
of valuable facts, thanks for providing such information.
Indiana recently posted..Indiana
Today, while I was at work, my cousin stole my iphone and tested to see if it can survive
a 30 foot drop, just so she can be a youtube sensation. My
iPad is now broken and she has 83 views. I know this is entirely off topic but I had
to share it with someone!
Jung recently posted..Jung
can i cut 50 mg viagra in half
If some one needs expert view regarding blogging and site-building after that i
propose him/her to pay a quick visit this blog,
Keep up the pleasant work.
tinyurl.com recently posted..tinyurl.com
I am curious to find out what blog system you
have been utilizing? I’m having some minor security issues with my latest blog and I’d
like to find something more risk-free. Do you have any suggestions?
Edwina recently posted..Edwina
Great write-up, I am regular visitor of one¡¦s web site, maintain up the nice operate, and It’s going to be a regular visitor for a lengthy time.
mvzdvkuw,If you are going for best contents like I do, just go to see this web page daily because it offers quality contents, thanks!
Pretty nice post. I just stumbled upon your blog and wanted to say that I have
really enjoyed surfing around your blog posts.
After all I will be subscribing to your feed and I hope
you write again very soon!
Grupo Coral recently posted..Grupo Coral
Fantastic beat ! I would like to apprentice at the same time as you amend your site, how
could i subscribe for a weblog web site? The account
helped me a appropriate deal. I have been a little bit acquainted of this your broadcast provided shiny transparent concept
Grupo Coral recently posted..Grupo Coral
Heya i’m for the primary time here. I came across this board and I to find It truly helpful & it helped me out a lot.
I am hoping to give one thing back and aid others like you aided me.
tinyurl.com recently posted..tinyurl.com
Ahaa, its nice conversation about this paragraph at this place at this blog, I have read all that, so now
me also commenting at this place.
Bichara Previc recently posted..Bichara Previc
Nice read, I just passed this onto a friend who was doing a little research on that. And he just bought me lunch as I found it for him smile Therefore let me rephrase that: Thank you for lunch!
There’s definately a lot to find out about this subject.
I like all the points you made.
Grupo Coral recently posted..Grupo Coral
Heya! I realize this is kind of off-topic however I needed to
ask. Does running a well-established blog like yours require a lot of work?
I am brand new to blogging but I do write in my diary every day.
I’d like to start a blog so I will be able to share my
personal experience and thoughts online.
Please let me know if you have any kind of recommendations or
tips for brand new aspiring bloggers. Thankyou!
Leonardo Martins de Almeida recently posted..Leonardo Martins de Almeida
I’m not sure where you’re getting your info, but great topic.
I needs to spend some time learning more or understanding more.
Thanks for great info I was looking for this information for
my mission.
Rodrigo Branco recently posted..Rodrigo Branco
It’s appropriate time to make some plans for the future and it’s time to be happy. I have read this post and if I could I desire to suggest you few interesting things or suggestions. Maybe you could write next articles referring to this article. I want to read even more things about it!
Wow, this article is nice, my younger sister is analyzing these kinds of
things, so I am going to convey her.
Kléber Leite recently posted..Kléber Leite
Great blog right here! Additionally your site a lot up very fast!
What host are you using? Can I am getting your associate hyperlink in your host?
I want my web site loaded up as fast as yours lol
hamilton dias de souza recently posted..hamilton dias de souza
I love what you guys are usually up too. This type of clever
work and coverage! Keep up the excellent works guys I’ve included you guys to my blogroll.
tinyurl.com recently posted..tinyurl.com
uveedtulv Yeezy Boost 350,Thanks for this useful information, Really amazing. Thanks again. I LOve your BloG
nlxmtb,Thanks for this useful information, Really amazing. Thanks again. I LOve your BloG
It’s appropriate time to make some plans for the future and it’s time to be happy. I have read this post and if I could I desire to suggest you few interesting things or suggestions. Perhaps you can write next articles referring to this article. I wish to read more things about it!
Wow! Thank you! I continuously needed to write on my blog something like that. Can I implement a portion of your post to my website?
Great ¡V I should definitely pronounce, impressed with your website. I had no trouble navigating through all tabs and related info ended up being truly simple to do to access. I recently found what I hoped for before you know it in the least. Quite unusual. Is likely to appreciate it for those who add forums or something, website theme . a tones way for your client to communicate. Nice task..
I used to be able to find good info from your articles.
Marvin recently posted..Marvin
Valuable information. Lucky me I found your web site unintentionally, and I am surprised why this accident did not came about in advance! I bookmarked it.
This article is truly a pleasant one it helps new net viewers, who are wishing for blogging.
Bichara Previc recently posted..Bichara Previc
Hello I am so thrilled I found your site, I really found you by error, while
I was looking on Digg for something else, Anyways I am here now and would just like to say many thanks for
a remarkable post and a all round exciting blog (I also love the theme/design), I don’t have time to go through it all at the minute but
I have bookmarked it and also included your RSS feeds, so
when I have time I will be back to read much more, Please do keep up the great jo.
Leandro Martins de Almeida recently posted..Leandro Martins de Almeida
ksetos,Some really nice stuff on this website, I enjoy it.
Today, I went to the beach with my kids. I found
a sea shell and gave it to my 4 year old daughter and said “You can hear the ocean if you put this to your ear.” She
placed the shell to her ear and screamed. There was a hermit crab inside and it pinched her ear.
She never wants to go back! LoL I know this
is completely off topic but I had to tell someone!
Carl recently posted..Carl
Hi there! I could have sworn I’ve been to this blog before but after browsing through a few of the
posts I realized it’s new to me. Nonetheless, I’m definitely
delighted I stumbled upon it and I’ll be book-marking it and checking back frequently!
tinyurl.com recently posted..tinyurl.com
Superb, what a website it is! This website presents valuable information to us, keep it up.
Chu recently posted..Chu
Appreciate this post. Will try it out.
Donette recently posted..Donette
Thank you a lot for sharing this with all people you really realize what you are speaking about!
Bookmarked. Kindly also seek advice from my site =). We could have a hyperlink change contract among
us
Leandro Martins de Almeida recently posted..Leandro Martins de Almeida
I really wanted to compose a brief note to say thanks to you for these remarkable guidelines you are giving at this website. My prolonged internet search has finally been rewarded with reasonable know-how to exchange with my family and friends. I would believe that most of us readers are undoubtedly endowed to be in a great website with so many perfect people with beneficial plans. I feel quite grateful to have encountered your entire website page and look forward to many more excellent times reading here. Thank you again for a lot of things.
Hey there! This is my first visit to your blog! We are a team of volunteers
and starting a new initiative in a community in the same
niche. Your blog provided us valuable information to
work on. You have done a marvellous job!
Rodrigo Branco recently posted..Rodrigo Branco
Wow! This can be one particular of the most useful blogs We have ever arrive across on this subject. Basically Fantastic. I’m also a specialist in this topic so I can understand your effort.
I could not refrain from commenting. Very well written!
Great post and straight to the point. I am not sure if this is really the best place to ask but do you guys have any ideea where to employ some professional writers? Thx 🙂
You really make it appear so easy together with your presentation but I find this matter to be really one thing that I feel I might by no means understand. It sort of feels too complicated and extremely large for me. I am having a look ahead in your subsequent put up, I¡¦ll attempt to get the dangle of it!
You really make it seem so easy with your presentation but I find this topic to be really something that I think I would never understand. It seems too complicated and extremely broad for me. I’m looking forward for your next post, I’ll try to get the hang of it!
Piece of writing writing is also a fun, if you know afterward you
can write if not it is difficult to write.
tinyurl.com recently posted..tinyurl.com
Wow! This can be one particular of the most beneficial blogs We’ve ever arrive across on this subject. Basically Great. I’m also an expert in this topic therefore I can understand your hard work.
Remarkable issues here. I am very happy to peer your post.
Thanks so much and I’m having a look forward to contact you.
Will you please drop me a mail?
Rudy recently posted..Rudy
Hi there, just became alert to your blog through Google, and found that it’s really informative. I am going to watch out for brussels. I’ll be grateful if you continue this in future. Lots of people will be benefited from your writing. Cheers!
I read this post completely concerning the comparison of most up-to-date and
earlier technologies, it’s remarkable article.
http://tinyurl.com/y6hrxycz recently posted..http://tinyurl.com/y6hrxycz
I wish to express my passion for your kindness in support of those people who require guidance on this important concern. Your personal dedication to passing the message along was extraordinarily important and has constantly allowed workers just like me to realize their ambitions. This warm and helpful hints and tips can mean much a person like me and further more to my office colleagues. Warm regards; from everyone of us.
Hello, I think your site might be having browser compatibility issues.
When I look at your blog site in Opera, it
looks fine but when opening in Internet Explorer, it has
some overlapping. I just wanted to give you a quick heads up!
Other then that, fantastic blog!
http://tinyurl.com/y2t9s229 http://tinyurl.com/yytnmdbe http://tinyurl.com/y6d6h6tk http://tinyurl.com/y3pxn23p http://tinyurl.com/yyt9hz8v http://tinyurl.com/y4ujuktd http://tinyurl.com/y3gx3szt http://tinyurl.com/y6gc5sfv Americo Amadeu Filho recently posted..http://tinyurl.com/y2t9s229 http://tinyurl.com/yytnmdbe http://tinyurl.com/y6d6h6tk http://tinyurl.com/y3pxn23p http://tinyurl.com/yyt9hz8v http://tinyurl.com/y4ujuktd http://tinyurl.com/y3gx3szt http://tinyurl.com/y6gc5sfv Americo Amadeu Filho
You made some decent points there. I did a search on the topic and found most people will consent with your blog.
As I site possessor I believe the content matter here is rattling great , appreciate it for your hard work. You should keep it up forever! Best of luck.
You made a number of nice points there. I did a search on the matter and found a good number of people will have the same opinion with your blog.
Great work! That is the type of info that are supposed to be shared across the web. Disgrace on the search engines for now not positioning this put up upper! Come on over and seek advice from my web site . Thanks =)
Its like you read my mind! You appear to know a lot about this, like you
wrote the book in it or something. I think that you can do with some pics to
drive the message home a little bit, but other than that, this is magnificent blog.
A fantastic read. I will definitely be back.
Umanizzare recently posted..Umanizzare
Right now it looks like Expression Engine is the best blogging platform out
there right now. (from what I’ve read) Is that what you are using on your blog?
Mario Celso Lopes recently posted..Mario Celso Lopes
hhlhwgahbz,Definitely believe that which you said. Your favourite justification appeared to be on the net the simplest thing to remember of.
Awesome blog! Do you have any suggestions for aspiring writers?
I’m planning to start my own site soon but I’m a little lost
on everything. Would you recommend starting with
a free platform like WordPress or go for a paid option? There are so
many choices out there that I’m totally confused .. Any tips?
Appreciate it!
Natasha recently posted..Natasha
Hi there, I enjoy reading through your article post.
I wanted to write a little comment to support you.
http://bit.ly/2Ga1pjS recently posted..http://bit.ly/2Ga1pjS
It’s in fact very difficult in this active life to listen news on TV, so I just use web for that purpose, and take the latest news.
Jerome recently posted..Jerome
Howdy! This is my first comment here so I just wanted to
give a quick shout out and say I genuinely enjoy reading your blog posts.
Can you suggest any other blogs/websites/forums that deal with the
same topics? Thanks a ton!
tinyurl.com recently posted..tinyurl.com
I don’t even know how I ended up here, but I thought this
post was good. I do not know who you are but definitely you’re going to a famous blogger
if you are not already 😉 Cheers!
tinyurl.com recently posted..tinyurl.com
I haven¡¦t checked in here for some time as I thought it was getting boring, but the last few posts are good quality so I guess I will add you back to my everyday bloglist. You deserve it my friend 🙂
I like the helpful info you provide in your articles. I’ll bookmark your weblog and check again here frequently. I’m quite sure I’ll learn many new stuff right here! Best of luck for the next!
Wow! This could be one particular of the most useful blogs We have ever arrive across on this subject. Basically Great. I’m also a specialist in this topic so I can understand your effort.
lor [url=https://freeonlinecasino.icu/]online casino games[/url]
[url=http://onlinegirls.top/]online girls[/url] [url=http://adultchatrooms.icu/]free adult chat rooms[/url] [url=http://webcamteens.stream/]live adult chat[/url] [url=http://adultchatrooms.ga/]adult chat rooms[/url] [url=http://camsites.icu/]adult finder[/url] [url=http://videochatroom.fun/]video chat room[/url] [url=http://freeadultcam.fun/]free adult cams[/url] [url=http://freeonlinesex.stream/]free webcam sex[/url] [url=http://sexwebcam.stream/]webcam porn[/url] [url=http://webcamamateur.icu/]sex room[/url]
trazodone pill
Pretty section of content. I just stumbled upon your site and in accession capital to
assert that I get in fact enjoyed account your blog posts.
Anyway I will be subscribing to your feeds and even I achievement you
access consistently quickly.
hamilton dias de souza recently posted..hamilton dias de souza
Thanks in favor of sharing such a fastidious thinking,
piece of writing is pleasant, thats why i have read it completely
Kristofer recently posted..Kristofer
[url=http://propranolol.run/]medication propranolol[/url]
wonderful post, very informative. I’m wondering why
the opposite experts of this sector do not notice this. You must proceed your writing.
I’m confident, you have a great readers’ base already!
Leandro Martins de Almeida recently posted..Leandro Martins de Almeida
hi!,I like your writing so much! proportion we communicate more about your post on AOL?
I need a specialist in this house to unravel my problem.
May be that is you! Taking a look ahead to see you.
Grupo Coral recently posted..Grupo Coral
Generic Propecia 5mg Prescription Levitra Oder Kamagra Viagra En Farmacias De Andorra cialis online Healthy Males Viagra Reviews Finasteride Ratiopharm 1 Mg Prix
hello!,I love your writing so so much! percentage we keep up a correspondence more approximately your post on AOL? I require an expert on this area to solve my problem. May be that is you! Taking a look forward to see you.
Wow! Thank you! I continually wanted to write on my website something like that. Can I include a portion of your post to my site?
Thanks for sharing your info. I truly appreciate your efforts and I will be waiting
for your next write ups thank you once again.
minecraft recently posted..minecraft
An interesting discussion is definitely worth comment.
There’s no doubt that that you need to write more on this topic, it
may not be a taboo matter but generally folks don’t discuss such issues.
To the next! All the best!!
Carlos Eduardo Veiga Petrobras recently posted..Carlos Eduardo Veiga Petrobras
It is not my first time to pay a quick visit this website, i am visiting
this web page dailly and get nice information from here daily.
minecraft recently posted..minecraft
It¡¦s actually a nice and helpful piece of info. I am glad that you simply shared this useful information with us. Please keep us informed like this. Thanks for sharing.
Because the admin of this website is working, no question very shortly it will be
well-known, due to its feature contents.
tinyurl.com recently posted..tinyurl.com
whoah this weblog is great i like studying your posts. Keep up the great work! You understand, a lot of persons are hunting around for this info, you can aid them greatly.
hi!,I really like your writing very so much! percentage we keep
up a correspondence extra approximately your article on AOL?
I need a specialist in this space to resolve my problem.
May be that is you! Taking a look ahead to see you.
http://tinyurl.com/y6kcpd4y recently posted..http://tinyurl.com/y6kcpd4y
First of all I want to say excellent blog! I had a quick question which I’d like to ask if you don’t mind.
I was curious to find out how you center yourself and clear your
head before writing. I’ve had a difficult time clearing my thoughts in getting my ideas out there.
I truly do enjoy writing however it just seems like
the first 10 to 15 minutes are wasted simply just trying to figure out how to begin. Any recommendations
or hints? Many thanks!
tinyurl.com recently posted..tinyurl.com
Valuable info. Fortunate me I discovered your website by accident, and I’m shocked why this coincidence did not happened in advance! I bookmarked it.
I’ve been absent for a while, but now I remember why I used to love this website. Thanks , I will try and check back more frequently. How frequently you update your site?
pqprjpwein Adidas Yeezy,Some really nice stuff on this website, I enjoy it.
Game Killer Apk Download Latest Version for Android (No Ad) … Guess not because Game killer full version app is not available on Play store.
Excellent goods from you, man. I’ve take note your stuff previous
to and you’re just extremely fantastic. I really like what you have bought right here, certainly like what
you’re saying and the way in which you are saying it.
You make it entertaining and you continue to care for to keep it smart.
I can not wait to learn far more from you. This is really a great website.
tinyurl.com recently posted..tinyurl.com
Wonderful article! That is the kind of information that are
meant to be shared around the web. Disgrace on the seek
engines for not positioning this publish higher! Come on over and talk over with my website .
Thank you =)
Leonardo Martins de Almeida recently posted..Leonardo Martins de Almeida
I’m very pleased to discover this great site. I want to to thank you for ones
time due to this fantastic read!! I definitely liked every bit of it and I have you
saved as a favorite to check out new things in your site.
Trina recently posted..Trina
Its not my first time to go to see this website, i
am visiting this web page dailly and obtain pleasant information from here daily.
Rodrigo Branco recently posted..Rodrigo Branco
Wow that was odd. I just wrote an very long comment
but after I clicked submit my comment didn’t appear. Grrrr…
well I’m not writing all that over again. Anyways, just wanted to say superb blog!
Dianna recently posted..Dianna
When someone writes an piece of writing he/she retains the thought of a user
in his/her brain that how a user can be aware of it.
Thus that’s why this article is great. Thanks!
Duane recently posted..Duane
For newest information you have to visit web and on world-wide-web I found this web
page as a most excellent website for most up-to-date updates.
tinyurl.com recently posted..tinyurl.com
Why visitors still make use of to read news papers when in this technological world all is accessible on web?
tinyurl.com recently posted..tinyurl.com
wonderful points altogether, you simply gained a new reader.
What would you suggest in regards to your post that
you made a few days ago? Any positive?
Laurinda recently posted..Laurinda
It¡¦s actually a nice and helpful piece of information. I am happy that you simply shared this helpful information with us. Please stay us up to date like this. Thank you for sharing.
It’s perfect time to make some plans for the future and it’s time to be happy. I’ve read this post and if I could I desire to suggest you few interesting things or advice. Maybe you could write next articles referring to this article. I want to read even more things about it!
Next time I read a blog, Hopefully it does not fail me as much as this particular one. I mean, I know it was my choice to read, but I truly believed you would probably have something helpful to say. All I hear is a bunch of whining about something you can fix if you were not too busy looking for attention.
Have you ever thought about publishing an e-book or guest
authoring on other sites? I have a blog based upon on the same ideas you discuss
and would love to have you share some stories/information. I know my visitors would enjoy
your work. If you are even remotely interested, feel free to send me an email.
http://tinyurl.com recently posted..http://tinyurl.com
Just want to say your article is as astounding. The clearness on your publish is simply excellent and that i
can assume you’re an expert in this subject. Fine with your permission let me
to grab your feed to stay up to date with approaching
post. Thank you a million and please keep up the gratifying work.
Francine recently posted..Francine
Yes! Finally someone writes about ig.
tinyurl.com recently posted..tinyurl.com
Hello Dear, are you truly visiting this site daily, if
so after that you will definitely obtain fastidious
knowledge.
Leticia recently posted..Leticia
Very nice post. I just stumbled upon your blog and wished to say that I
have truly enjoyed browsing your blog posts.
In any case I’ll be subscribing to your rss feed and I hope you write again soon!
Umanizzare recently posted..Umanizzare
Hey! This is my first comment here so I just wanted to give a quick shout
out and say I genuinely enjoy reading your articles.
Can you suggest any other blogs/websites/forums that deal with the same topics?
Thanks a ton!
Umanizzare recently posted..Umanizzare
It’s very trouble-free to find out any topic on net as compared to
textbooks, as I found this piece of writing at this web site.
tinyurl.com recently posted..tinyurl.com
I used to be able to find good information from your content.
Foster recently posted..Foster
wonderful put up, very informative. I wonder why the other specialists of this sector don’t notice this.
You must continue your writing. I’m sure, you have
a great readers’ base already!
http://tinyurl.com recently posted..http://tinyurl.com
[url=https://3dage.org/]buy tretinoin gel[/url] [url=https://lamesadelaabuela.com/]flagyl[/url] [url=https://bc-creations.info/]cleocin[/url] [url=https://colhidodope.com.br/]toradol[/url] [url=https://craftncode.io/]motilium[/url] [url=https://chefsoftahoe.com/]doxycycline online[/url] [url=https://bookashowact.com/]order viagra soft[/url] [url=https://icog.org.uk/]vermox[/url] [url=https://buildworthpropertymanagement.com/]buy valtrex no rx[/url] [url=https://fearlessvictim.com/]stromectol[/url] [url=https://xn--80aaebbsp4ankm.xn--p1ai/]inderal propranolol[/url] [url=https://janimalsdoggrooming.co.uk/]lisinopril[/url] [url=https://eliminateinjuries.com/]propranolol[/url] [url=https://midwestfalltechnologyconference.org/]medrol[/url] [url=https://acandevelopment.co.uk/]albenza[/url] [url=https://cosmeticsmakeup.com.au/]suhagra[/url] [url=https://applewell.xyz/]fluoxetine[/url] [url=https://iliazag.com/]bupropion tablets[/url] [url=https://fancyrange.com/]buy benicar[/url] [url=https://escuelasa-z.com/]celexa[/url] [url=https://ascensionpixel.com/]cipro[/url] [url=https://exigico.com/]allopurinol price[/url]
Your method of explaining all in this post is in fact nice, every one can without difficulty understand it, Thanks a lot.
Francisco recently posted..Francisco
Your means of telling the whole thing in this article is actually fastidious, every one be able to simply
be aware of it, Thanks a lot.
http://tinyurl.com recently posted..http://tinyurl.com
Fantastic items from you, man. I have take into account your stuff previous to and you’re just too magnificent.
I actually like what you have got right here, certainly like what you are saying and the
way in which during which you are saying it. You’re
making it enjoyable and you continue to care for to stay it wise.
I can not wait to read far more from you. That is actually a
great website.
http://tinyurl.com recently posted..http://tinyurl.com
Simply desire to say your article is as astounding. The clearness in your publish is simply cool and that i could suppose you
are a professional on this subject. Fine along with your permission allow
me to seize your feed to keep updated with forthcoming post.
Thank you 1,000,000 and please carry on the gratifying
work.
http://tinyurl.com/ycpsmlh4 recently posted..http://tinyurl.com/ycpsmlh4
Why visitors still use to read news papers when in this technological globe
everything is available on web?
Daniel Valente Dantas recently posted..Daniel Valente Dantas
Hi there! I know this is somewhat off topic but I was wondering if you knew where I could get a captcha plugin for my comment form?
I’m using the same blog platform as yours and I’m having difficulty finding one?
Thanks a lot!
Jorg recently posted..Jorg
I’m really loving the theme/design of your blog.
Do you ever run into any web browser compatibility issues?
A handful of my blog readers have complained about my site not operating correctly
in Explorer but looks great in Opera. Do you have any suggestions
to help fix this issue?
tinyurl.com recently posted..tinyurl.com
What a material of un-ambiguity and preserveness of precious
familiarity regarding unpredicted emotions.
Alexandra recently posted..Alexandra
I am truly pleased to glance at this weblog posts which includes plenty of
valuable facts, thanks for providing these information.
tinyurl.com recently posted..tinyurl.com
I delight in, lead to I found exactly what I was looking for.
You have ended my 4 day lengthy hunt! God Bless you man.
Have a nice day. Bye
Rena recently posted..Rena
Pretty! This was an incredibly wonderful article.
Many thanks for supplying these details.
Mario Celso Lopes recently posted..Mario Celso Lopes
Hello, i think that i saw you visited my blog thus i
came to return the choose?.I am trying to to find issues to enhance my website!I suppose its ok to use a
few of your concepts!!
Rex recently posted..Rex
I know this if off topic but I’m looking into starting
my own blog and was curious what all is needed to get setup?
I’m assuming having a blog like yours would cost a pretty
penny? I’m not very web savvy so I’m not 100% certain. Any suggestions or advice would be greatly appreciated.
Thank you
Son recently posted..Son
Awesome! Its actually awesome article, I have got much clear idea on the
topic of from this post.
Matilda recently posted..Matilda
Hey! This is kind of off topic but I need some advice from an established blog.
Is it hard to set up your own blog? I’m not very techincal but I can figure things out pretty quick.
I’m thinking about creating my own but I’m not sure
where to start. Do you have any tips or suggestions? Appreciate it
Roberto recently posted..Roberto
Thanks , I’ve recently been looking for information approximately this subject for ages and yours is the greatest I have came upon so far.
But, what in regards to the conclusion? Are you sure concerning the supply?
http://tinyurl.com/y3t46ocj recently posted..http://tinyurl.com/y3t46ocj
P6ua47 Your writing taste has been amazed me. Thanks, quite great post.
Greetings! Very useful advice in this particular article!
It is the little changes that will make the most
significant changes. Thanks a lot for sharing!
http://tinyurl.com/ recently posted..http://tinyurl.com/
WXfjik Simple but very precise information Thank you for sharing this
Wow, amazing blog layout! How long have you been blogging for?
you make blogging look easy. The overall look of your site
is magnificent, let alone the content!
Fernanda Lara Tórtima recently posted..Fernanda Lara Tórtima
Whoa! This blog looks just like my old one! It’s on a entirely different topic but it has pretty much the same layout and design. Great choice of
colors!
http://tinyurl.com/ recently posted..http://tinyurl.com/
Your style is really unique compared to other people
I’ve read stuff from. Thank you for posting when you’ve
got the opportunity, Guess I’ll just book mark this blog.
http://tinyurl.com recently posted..http://tinyurl.com
Hmm is anyone else having problems with the images on this blog loading?
I’m trying to figure out if its a problem on my end or if it’s the blog.
Any suggestions would be greatly appreciated.
Carlos Eduardo Veiga Petrobras recently posted..Carlos Eduardo Veiga Petrobras
When I initially commented I clicked the “Notify me when new comments are added” checkbox and now each time a comment is added I get
several emails with the same comment. Is there any way you can remove people from that service?
Many thanks!
tinyurl.com recently posted..tinyurl.com
Hello, I wish for to subscribe for this weblog to take latest updates,
thus where can i do it please help.
Dallas recently posted..Dallas
Awesome article.
tinyurl.com recently posted..tinyurl.com
Hello very cool web site!! Man .. Excellent .. Superb .. I will bookmark your
web site and take the feeds also? I’m glad to
search out so many useful information here within the put up, we’d
like develop extra techniques in this regard, thank you for sharing.
. . . . .
Oma recently posted..Oma
Remarkable issues here. I am very satisfied to see your article.
Thanks so much and I’m taking a look ahead to contact you.
Will you kindly drop me a e-mail?
tinyurl.com recently posted..tinyurl.com
Just want to say your article is as surprising. The clearness in your post is just excellent and that i could suppose
you are a professional in this subject. Well together with your permission allow me to seize
your RSS feed to keep up to date with impending post.
Thank you 1,000,000 and please carry on the rewarding work.
Fernanda Lara Tórtima recently posted..Fernanda Lara Tórtima
Looks realy great! Thanks for the post.
Hey are using WordPress for your site platform?
I’m new to the blog world but I’m trying to get started and create my
own. Do you require any html coding expertise to make your own blog?
Any help would be greatly appreciated!
Leandro Martins de Almeida recently posted..Leandro Martins de Almeida
It is appropriate time to make some plans for
the future and it is time to be happy. I have read this post and if
I could I want to suggest you some interesting things
or advice. Maybe you could write next articles referring
to this article. I desire to read even more things about it!
Carlos Magno Nunes Barcelos recently posted..Carlos Magno Nunes Barcelos
buy albuterol
doxycycline 50 mg
Wonderful article! We will be linking to this great article on our website.
Keep up the great writing.
Rosalind recently posted..Rosalind
rex slots of vegas
wau foxwoods online casino
Your style is very unique in comparison to other people
I have read stuff from. Many thanks for posting when you have the opportunity, Guess I will
just book mark this blog.
Landon recently posted..Landon
I’ve been browsing online more than 3 hours today, but I never found any attention-grabbing article
like yours. It’s beautiful worth sufficient for me. Personally, if all website owners and bloggers made
just right content material as you did, the net will probably be a lot more
helpful than ever before.
bit.ly recently posted..bit.ly
lry virgin online casino
Have you ever thought about adding a little bit more than just your articles?
I mean, what you say is fundamental and all. But think of if you added some great pictures or
videos to give your posts more, “pop”! Your content is excellent but with
pics and videos, this blog could definitely be one of the most
beneficial in its niche. Superb blog!
http://tinyurl.com recently posted..http://tinyurl.com
I have read so many articles regarding the blogger lovers
except this article is genuinely a fastidious post, keep it up.
Aisha recently posted..Aisha
irm online casinos for us players
Magnificent website. A lot of helpful information here. I am sending it to several buddies ans also sharing in delicious. And obviously, thanks in your sweat!
What as Happening i am new to this, I stumbled upon this I have found It absolutely useful and it has aided me out loads. I hope to contribute & help other users like its helped me. Good job.
This is really fascinating, You are an overly skilled blogger.
I’ve joined your rss feed and look forward to in search of more of your magnificent post.
Additionally, I have shared your site in my social networks
http://tinyurl.com recently posted..http://tinyurl.com
What’s up to all, the contents present at this web site are actually awesome for people experience, well, keep
up the good work fellows.
tinyurl.com recently posted..tinyurl.com
My spouse and I stumbled over here coming from a different website and thought I should check things out.
I like what I see so now i am following you.
Look forward to checking out your web page again.
bit.ly recently posted..bit.ly
stuff prior to and you are just extremely fantastic. I actually like what you ave received
Hi friends, its wonderful piece of writing concerning tutoringand fully explained, keep it up all the time.
Wilhemina recently posted..Wilhemina
Good day! I know this is kinda off topic but I was wondering which blog
platform are you using for this website? I’m
getting sick and tired of WordPress because I’ve had issues with hackers and I’m looking at alternatives for another platform.
I would be fantastic if you could point me in the direction of a good platform.
tinyurl.com recently posted..tinyurl.com
I’ve learn some good stuff here. Definitely worth bookmarking for revisiting.
I surprise how so much attempt you place to make such a fantastic informative web site.
Louella recently posted..Louella
What’s up every one, here every one is sharing such
familiarity, therefore it’s pleasant to read this weblog,
and I used to pay a visit this webpage daily.
bit.ly recently posted..bit.ly
jiq casino online
I quite like reading through an article that can make men and women think.
Also, thank you for allowing for me to comment!
Carlos Magno Nunes Barcelos recently posted..Carlos Magno Nunes Barcelos
hsl play casino
Today, I went to the beach with my kids. I found a sea shell and gave it to my
4 year old daughter and said “You can hear the ocean if you put this to your ear.” She placed the shell to her ear and screamed.
There was a hermit crab inside and it pinched her ear.
She never wants to go back! LoL I know this is completely off topic but I had
to tell someone!
Hallie recently posted..Hallie
I really like your blog.. very nice colors & theme.
Did you make this website yourself or did you hire someone to do it for you?
Plz answer back as I’m looking to create my own blog and would like to
find out where u got this from. appreciate it
acrylnagels recently posted..acrylnagels
krx casino online slots
This is really interesting, You are a very skilled blogger. I have joined your rss feed and look forward to seeking more of your wonderful post. Also, I ave shared your web site in my social networks!
I got this web page from my buddy who informed
me concerning this site and at the moment this time I am browsing
this site and reading very informative articles or reviews here.
tinyurl.com recently posted..tinyurl.com
Every weekend i used to pay a quick visit this site,
as i want enjoyment, since this this site conations genuinely good funny stuff too.
Brandy recently posted..Brandy
Well I really enjoyed reading it. This information offered by you is very practical for proper planning.
dle casino online slots
Quality content is the crucial to attract the people to pay a visit the web site, that’s
what this web site is providing.
http://tinyurl.com/yylzv5s9 recently posted..http://tinyurl.com/yylzv5s9
I just like the valuable information you provide for your articles.
I’ll bookmark your weblog and check again here frequently.
I am rather sure I’ll be told many new stuff proper here!
Good luck for the following!
Carlos Magno Nunes Barcelos recently posted..Carlos Magno Nunes Barcelos
[url=http://genericcialis20mg.com/]cialis canada online[/url]
Hi there, i read your blog occasionally and i own a similar one and i was
just wondering if you get a lot of spam remarks?
If so how do you prevent it, any plugin or anything you can advise?
I get so much lately it’s driving me insane so any help is very much appreciated.
Grupo Coral recently posted..Grupo Coral
An outstanding share! I have just forwarded this onto a
friend who had been doing a little homework on this. And he actually bought me breakfast due to the fact that
I found it for him… lol. So allow me to reword this….
Thanks for the meal!! But yeah, thanx for spending some time to
discuss this subject here on your web site.
Debora recently posted..Debora
Can you tell us more about this? I’d want to find out some additional information.
Grupo Coral recently posted..Grupo Coral
azr casino online slots
[url=https://cropsensoradt.website/]generic viagra online[/url] [url=https://brickbook.org/]cafergot[/url] [url=https://aktivitates.lv/]biaxin generic[/url] [url=https://chicagoworldcon7.org/]cleocin ovules[/url] [url=https://jrhcoaching.net/]zyban[/url] [url=https://communicationstakato.com/]erythromycin buy[/url] [url=https://locationrace.com/]fluoxetine drug[/url] [url=https://glennforhillsboro.com/]ventolin[/url] [url=https://appfaktory.io/]zanaflex[/url] [url=https://comatec.sa/]fluoxetine 10mg[/url] [url=https://pensionerbondinterest.co.uk/]valtrex[/url] [url=https://begintoendconsulting.net/]generic furosemide[/url] [url=https://giftsexpress.com.au/]atarax[/url] [url=https://joyashyh.cl/]fluoxetine 10mg[/url] [url=https://envyhome.co.uk/]generic for aldactone[/url] [url=https://digitalmoneybitcoin.com/]hydrochlorothiazide for sale[/url] [url=https://hempoilfactory.net/]buy cheap actos[/url] [url=https://feelekituwe.website/]levitra discount[/url] [url=https://airkook.com/]seroquel depression[/url] [url=https://alectryon.us/]strattera online[/url] [url=https://coboa.org/]generic suhagra[/url] [url=https://dietitiantravels.com/]order zithromax[/url] [url=https://cyclesoflife.bike/]viagra soft 100mg[/url] [url=https://bodyimageinternational.com/]amitriptyline 25 mg[/url] [url=https://cambioqrr.org/]avana[/url] [url=https://computersforhope.com/]generic for cleocin[/url] [url=https://fitcarppv.com/]generic for flagyl[/url] [url=https://footballivevs.de/]alli xenical[/url] [url=https://despairnetwork.com/]toradol[/url] [url=https://ddecommerce.com/]cheap tetracycline[/url]
[url=https://doxycycline1.com/]doxycycline[/url]
When I initially commented I clicked the “Notify me when new comments are added” checkbox and now each time a comment is added I get
four e-mails with the same comment. Is there any way you
can remove me from that service? Bless you!
tinyurl.com recently posted..tinyurl.com
I do accept as true with all of the ideas you have presented
to your post. They are really convincing and will definitely work.
Still, the posts are too short for starters. May just you please prolong
them a little from subsequent time? Thanks for the post.
http://bit.ly recently posted..http://bit.ly
xhz online casinos
What’s up, this weekend is nice in support of me, because this moment i am reading this impressive educational piece of writing
here at my residence.
minecraft recently posted..minecraft
A person necessarily help to make severely articles I’d state.
This is the first time I frequented your web page and to this point?
I amazed with the research you made to create this particular post extraordinary.
Great activity!
Tamera recently posted..Tamera
I am curious to find out what blog system you’re utilizing?
I’m having some small security issues with my latest blog and I
would like to find something more safeguarded.
Do you have any suggestions?
Mario Celso Lopes recently posted..Mario Celso Lopes
apz online casinos
Hey there, You have done an excellent job.
I’ll certainly digg it and personally suggest to my
friends. I’m sure they’ll be benefited from
this site.
Lester recently posted..Lester
I am genuinely thankful to the holder of this web
page who has shared this great post at here.
hamilton dias de souza recently posted..hamilton dias de souza
You have made some really good points there. I checked on the net for more info
about the issue and found most people will go along with your views
on this web site.
tinyurl.com recently posted..tinyurl.com
Hey! I know this is kind of off topic but I was wondering which blog platform are you using for this website?
I’m getting tired of WordPress because I’ve had problems with hackers and I’m looking
at alternatives for another platform. I would be great if you could point me in the direction of a good platform.
Isabel recently posted..Isabel
Appreciation to my father who informed me about this webpage, this webpage
is really remarkable.
Priscilla recently posted..Priscilla
Thanks for one’s marvelous posting! I actually
enjoyed reading it, you will be a great author. I will make sure to bookmark your
blog and definitely will come back sometime soon. I want to encourage that you continue your great writing, have a
nice morning!
tinyurl.com recently posted..tinyurl.com
I think this is one of the most vital information for me.
And i am glad reading your article. But should remark on some general
things, The website style is ideal, the articles is really
nice : D. Good job, cheers
Stevie recently posted..Stevie
purses too. I personally believe that any one of those totes
Hi colleagues, how is the whole thing, and what you wish for to say about
this article, in my view its in fact remarkable in support of me.
Leandro Martins de Almeida recently posted..Leandro Martins de Almeida
Hi there! This is my first visit to your blog! We are a group of
volunteers and starting a new initiative in a community in the same niche.
Your blog provided us valuable information to work on. You have done a marvellous job!
http://bit.ly/2IIn1GB recently posted..http://bit.ly/2IIn1GB
Today, while I was at work, my cousin stole my iPad and tested to see if it can survive a 25 foot drop, just so
she can be a youtube sensation. My iPad is now broken and she has 83 views.
I know this is totally off topic but I had to share it
with someone!
tinyurl.com recently posted..tinyurl.com
My partner and I stumbled over here from a different page and thought I may as well check
things out. I like what I see so now i’m following you.
Look forward to finding out about your web page for a second time.
minecraft recently posted..minecraft
This excellent website definitely has all of the info I wanted about this subject and didn at know who to ask.
WOW just what I was looking for. Came here by searching for ig
Leandro Martins de Almeida recently posted..Leandro Martins de Almeida
Hi there everyone, it’s my first pay a quick visit at this web site, and article is really fruitful designed for me, keep up posting
these types of articles or reviews.
Carlos Eduardo Veiga Petrobras recently posted..Carlos Eduardo Veiga Petrobras
Thanks so much for the article post.Thanks Again. Keep writing.
I was suggested this blog by my cousin. I am not sure whether this post is
written by him as no one else know such detailed about my trouble.
You’re wonderful! Thanks!
Grazyna recently posted..Grazyna
It as not that I want to copy your web-site, but I really like the layout. Could you tell me which theme are you using? Or was it especially designed?
Very good article! We will be linking to this particularly great post on our site. Keep up the great writing.
Great info. Lucky me I found your site by chance (stumbleupon). I have saved it for later!
mnu online casino games
uxg online casinos
[url=https://lasix911.com/]lasix no prescription[/url] [url=https://tadalafil365.com/]cheap tadalafil[/url] [url=https://valtrex1.com/]valtrex[/url] [url=https://sildenafil75.com/]where to buy sildenafil online[/url] [url=https://motilium5.com/]motilium over the counter[/url]
Would you be desirous about exchanging links?
I value the article.Much thanks again. Much obliged.
A packet of envelopes little lolita angel pics Mosquito control supervisor Todd Hanson says they already spray as if West Nile is here because it’s a virus they’ve encountered for the past 11 years. They urge people to take extra precautions to prevent being bitten and say the virus is more than likely in the community already. 2002 was the first year in Grand Forks County where there was a case of West Nile, and 17 people contracted the virus that year. Hanson says that two people did die from West Nile Virus and while the virus is serious, it is also preventable by limiting your chance of being bitten.
I’m training to be an engineer hot preteen lolita pics Lauren is scheduled to return to New York this week to resume expectant-mommy duties. Cowell is set to stay out West until âX Factorâ concludes shooting in December. And Andrew has a kid-free week ahead of him to romance his new girlfriend.
The manager sweet strawberry org lolitas MILAN, Oct 4 (Reuters) – Terna, Europe’s biggestindependent power grid company, expects final clearance to builda subsea power link to Montenegro by the end of the year as itsteps up plans to create a Mediterranean power hub, its chiefexecutive said.
Sorry, you must have the wrong number lolita chil top 100 Blair managed because he was – at heart – an actor (imagine Cameron attempting the infamous Catherine Tate, “Am I bovvered” sketch) and Baroness Thatcher succeeded because she was first to target the “lifestyle press” but also – crucially – she didn’t try to get down and jibber-jabber with the journalist or the readers.
What company are you calling from? nn young pre lola models Henderson led the Southeastern Conference in scoring and helped Ole Miss win the SEC tournament and an NCAA tournament berth for the first time since 2002. But the flamboyant guard also was known for his abrasive personality and quickly became the player opposing teams loved to jeer.
Thanks for calling hussyfan r@ygold The 33-year-old Harvard grad, who landed a job with the Clinton Foundation after graduation, planned to spend the last days of her pregnacy near the good hospitals of Nairobi, choosing what she thought was one of the safest spots in east Africa to give birth to her first child, a friend told the Daily News. But she walked into a deathtrap.
History dirty little lolita pussy According to the company, operational results increased sales by 4.7 percent and the negative impact of currency was 1.6 percent. While Domestic sales increased 1.7 percent, International sales climbed 4.2 percent.
Sorry, I’m busy at the moment zeps kds bbs There was anger too in Ramallah where many Palestininas have called for Israel to vacate land they occupied during the 1967 Israel – Palestine war before any talks resume. The status of Jerusalem and the fate of Palestinian refugees are also core to their objections.
I’m not working at the moment lolita chil top 100 Great actors, from Morgan Freeman to Terrence Howard, have played the legendary statesman over the years but such is Elba’s apparent skill that, when shown extracts of the film some time ago, Mr Mandela is reported to have asked: “Is that me?”
I live in London lolita blue teens tgp The scandal revolves around the illegal practices of Luis Barcenas, the former treasurer of the party who was appointed by Rajoy and who held his post from 1990 until 2009. The case has continued to develop with details from the case leading the judge in charge to put Barcenas into preventative custody in July.
Awesome article.
Jerold recently posted..Jerold
Just discovered this site thru Yahoo, what a pleasant shock!
This website definitely has all the information I wanted concerning this subject and didn at know who to ask.
I am regular reader, how are you everybody? This article posted at this website is genuinely good.
Bradley recently posted..Bradley
There as certainly a great deal to know about this topic. I like all the points you have made.
What you wrote made a lot of sense. But, what about this?
what if you composed a catchier title? I am not saying your content is not solid, but
suppose you added a title to possibly grab folk’s attention?
I mean Badger Girl Learns to Cook by Kimberly Aime –
Clean Eating Homemade Cereal is kinda boring. You might look at
Yahoo’s home page and note how they create news headlines to get people interested.
You might add a video or a picture or two to grab readers
interested about everything’ve got to say. Just my
opinion, it would make your website a little livelier.
Sheryl recently posted..Sheryl
When I originally commented I clicked the “Notify me when new comments are added” checkbox
and now each time a comment is added I get three e-mails with the same comment.
Is there any way you can remove people from that service?
Appreciate it!
http://tinyurl.com recently posted..http://tinyurl.com
[url=https://analcoholicwriter.com/]antabuse medicine[/url] [url=https://acts29.co.uk/]drug toradol[/url] [url=https://cynthiachong.co/]clomid[/url] [url=https://bet368.biz/]amoxil pill[/url] [url=https://midwestfalltechnologyconference.org/]neo medrol[/url] [url=https://davidkuriodesign.com/]propranolol price[/url] [url=https://cursive.nz/]zyban drug[/url] [url=https://cravehome.co.uk/]doxycycline hyclate[/url] [url=https://relativetales.org/]indomethacin indocin[/url] [url=https://hairtospare.com.au/]estrace[/url] [url=https://cinimavault.com/]toprol xl[/url] [url=https://79rocks.solutions/]generic avana[/url] [url=https://fluentphi.com/]vardenafil levitra[/url] [url=https://codebluetelecom.com/]flagyl cost[/url] [url=https://coinsceo.com/]baclofen 25mg[/url] [url=https://directbeers.eu/]nolvadex[/url] [url=https://ipoca.cloud/]viagra soft[/url] [url=https://ccpoker.org/]lipitor 80[/url] [url=https://justinlouie.co/]cephalexin antibiotics[/url] [url=https://ddecommerce.com/]tetracycline purchase online[/url] [url=https://cornellroofing.us/]mebendazole tablets[/url] [url=https://gamewolves.com/]propranolol beta blocker[/url] [url=https://freeonboard.net/]synthroid brand[/url] [url=https://diverticulosis.me/]female cialis[/url] [url=https://chiropractie-voorschoten.com/]hctz no prescription[/url] [url=https://detoatepentrutoti.info/]wellbutrin bupropion[/url] [url=https://begintoendconsulting.net/]furosemide[/url]
mbt casino game
When someone writes an piece of writing he/she retains the idea of a user in his/her brain that
how a user can be aware of it. Thus that’s why this post is perfect.
Thanks!
http://tinyurl.com/ recently posted..http://tinyurl.com/
Im thankful for the article.Really thank you! Really Cool.
Could I borrow your phone, please? sad status wallpaper hd UK-based contract manufacturer Aesica Pharmaceuticals has put together a Quality Assurance team under new recruit Gareth Adlam to deliver Qualified Person (QP) services across a broad range of dosage forms for Investigational Medicinal Products (IMPs) used in clinical trials.
Have you seen any good films recently? water on glass wallpaper There is, however, another theory, and it has been winning adherents in the aftermath of the financial crisis. In this view, rising inequality is not a symptom of a fast-growing economy or an incentive that will help create one. Instead, too much income inequality crushes economic growth.
Could I ask who’s calling? wallpaper free delivery uk Administration officials, in damage-control mode for nearly aweek, held a closed-door briefing for Democrats in the U.S.House of Representatives and a private session with insurancecompany executives, who said they would assist in efforts to fixthe Healthcare.gov website.
I’m from England bart simpson wallpaper iphone 7 Financial markets have started to take fright at the prospect that America could go into technical default as a result of the impasse in Washington and the IMF’s managing director said the dispute was a fresh setback for a global economy that would take at least a decade to recover from the slump of 2008-09.
Enter your PIN download wallpaper ram sita Intensifying violence and car bombs have already forced himto restrict his movements and now, security experts say, he isunder even closer watch from Shi’ite militias that may hit outat Western targets if Washington attacks neighbouring Syria.
I can’t hear you very well domo kun iphone wallpaper “We want to make sure our customers have the best possible mobile experience. By abolishing expensive roaming charges in select countries we are allowing our customers to get even more value from their minutes, texts and data abroad by removing the fear associated with staying in touch while travelling,” said Thomas Malleschitz, marketing director at Three.
I’m about to run out of credit best dbz wallpapers Another target, a passenger railroad depot near the site of the present-day Underground Atlanta shopping area, was also just east of the construction site where the device was found, near Marietta and Baker streets.
I work here washington dc iphone wallpaper ** Italian technology company Eurotech has signed adeal to sell its U.S. aerospace and defense computer operationParvus Corp to the Curtiss-Wright group for $38 million.The sale of Parvus, which specializes in manufacturing ruggedcomputing and communication systems to companies such asLockheed Martin, Northrop Grumman and Boeing, allows Eurotech toexit what it now views as a non-core sector as it seeks toreturn to profit.
Could you ask him to call me? rude mobile wallpapers Raynham Park, Penn National Gaming and the Cordish Cos. each touted their proposal’s location, planned amenities and economic viability. The commission plans to award the sole slots license in December or January.
What sort of music do you listen to? pink nursery wallpaper uk He was told that his video conversations would be spread among friends and family unless he paid cash. Other victims have been told their activities would be shared unless they performed more extreme acts.
Will I have to work shifts? feree nature wallpaper But economists and government ministers are publicly divided over whether those 2014 cuts go too far, given Ireland’s better-than-expected economic performance following its 2010 bailout by the European Union, European Central Bank and International Monetary Fund. That so-called troika of international creditors three years ago provided Ireland loans worth 67.5 billion euros ($90 billion) when the colossal bill of Ireland’s bank-rescue program overwhelmed the government’s own ability to keep financing its debts.
I’ve got a very weak signal animated fire phone wallpapers After an overcast and breezy day the wind had died down and at20C the temperature was almost perfect. Rod Laver Arena crackledwith a sense of anticipation before the most eagerly awaited matchof the tournament so far and if a majority of the crowd were behindFederer, Murray quickly had his own supporters in full voice.
What’s the exchange rate for euros? italian mafia wallpapers It is easy to see why thereâs this âBack to 1965â doomsday scenario enveloping the Yankees right now considering their extensive offseason shopping list that includes, in no particular order, a third baseman, a shortstop, a catcher, at least two frontline starting pitchers, a couple of set-up relievers and a partridge in a pear tree. All this and Robbie (Tippi) Cano too â and, by the way, letâs not forget that $189 million luxury tax threshold they want to get under.
Will I have to work shifts? ugadi hd wallpapers download The explosion happened in Rutter Street on June 21, but was not discovered until late on the day after. The road was then sealed off and around 150 residents evacuated from their homes, as white-suited forensic officers scoured the scene for clues.
Do you like it here? pao wallpapers download Egypt’s new government has imposed the toughest border restrictions on the Hamas-run Gaza Strip in years, sealing smuggling tunnels, blocking most passenger traffic and causing millions of dollars in economic losses.
I’m on a course at the moment kyuubi chibi wallpaper The community became enraged after the elementary schools canceled their upcoming Christmas concerts and the school district issued guidelines that curtailed the number of sacred holiday songs the high school choir could perform.
Your account’s overdrawn white rose flowers wallpapers LONDON, July 26 (Reuters) – Fresh signs of increased mergerand acquisition activity sent European shares heading backtowards two-month highs on Friday, with some traders seeing moregradual gains for equities in the near term.
Excellent work, Nice Design bollywood actress wallpapers blog The death toll from clashes yesterday rose to at least 421, including almost 200 at the two camps in Cairo and Giza, with more than 3,500 wounded, Health Ministry official Mohamed Fathallah said by phone today. The Muslim Brotherhood, which led protests against President Mohamed Mursiâs overthrow by the military, said the figure was many times higher. Nobel laureate Mohamed ElBaradei resigned as vice president, saying he didnât want to bear responsibility for âbloodshed that could have been avoided.â
How do you do? america wallpaper free A field trial has been completed which has tested the effect of traffic fumes on flower scents and directly on bees. The data is now being analysed. Newman said that diesel nanoparticle pollutants, already known to harm human health, may also be affecting bees.
I came here to study animation cute wallpaper Yes there are a number of options available, you can set your browser either to reject all cookies, to allow only “trusted” sites to set them, or to only accept them from the site you are currently on.
In tens, please (ten pound notes) animation cute wallpaper To qualify for the study, participants must have relapsing-remitting MS, the most common form of the disease that is characterized by periods of worsening neurologic function. Participants play the game for an hour, three times a week over the course of eight weeks.
Really enjoyed this blog.Really looking forward to read more. Awesome.
How long are you planning to stay here? wallpaper rotator apk After enjoying a quietly encouraging day one, can his young side ever recover now they are routed? For England, is this unfolding mismatch delicious payback for years of humiliation? Or do we want to see a close contest?
How much will it cost to send this letter to ? 24 le man wallpaper Thatâs the pattern emerging with the recent capture of Abu Anas al-Libi, one of the FBIâs most wanted terrorists, long-sought for his alleged role in the 1998 bombings of U.S. embassies in Africa. He was captured in a raid Saturday and is being held aboard the USS San Antonio, an amphibious warship mainly used to transport troops.
Punk not dead singer wallpaper free download The system to calculate federal subsidies for the D.C.exchange was built by Curam Software, which IBM acquiredin 2011. In tests of complex family situations, the software wasgetting subsidies wrong 15 percent of the time, said exchangespokesman Richard Sorian.
Where do you come from? graffiti wallpaper for android A man who answered the door at Hammami’s parent’s home declined to identify himself and said, “I am sorry I cannot talk about it right now.” The home is an upper-middle class neighborhood where most of the houses fly American or Alabama University flags.
I really like swimming joker batman why so serious wallpaper The movie took in $53 million from 38 markets outside the U.S. and Canada, representing about half its overseas footprint. It has yet to open in China or Japan, the home of the movie’s co-star, Rinko Kikuchi.
Very funny pictures free phone wallpaper nature Without saying so specifically, Obama sided with those who say the shooting need not have happened, expressing sympathy to the Martin family and praising them for the “incredible grace and dignity with which they’ve dealt with the entire situation.”
Wonderfull great site what folder are wallpaper engine files âOur own research shows that putting certain restrictions on young drivers allows them to rapidly build up live-saving experience in the safest possible way. Putting a firm number on casualty reduction is hard because of the pick-and-mix approach to graduate licensing. But the evidence suggests that a full package of measures could reduce fatalities by anything up to 60%.â
Punk not dead pc wallpaper full hd 2018 Agri Securities 2006 is a securitisation of performing leases on the following typologies of assets: real estate (76.3% as of May 2013, 52.8% at closing), equipment (19.2%, 34.8%), industrial vehicles (3.5%, 8.2%) and autos (1.0%, 4.2%).
I sing in a choir free xmas wallpapers for desktops “My boyfriend is honestly my best friend, and hopefully I’m his best friend too,” Lawrence said of Hoult last year. “He’s my favorite person to be around and he makes me laugh harder than anybody.”
Thanks funny site metallic wallpaper designs In calling for a “Day of Rage,” the Brotherhood used thesame name as that given to the most violent day of the uprisingagainst Mubarak. That day, Jan. 28, 2011, marked protesters’victory over the police, who were forced to retreat.
I’d like to change some money graffiti wallpaper for android The government shutdown that began on Tuesday is not expected to affect the trial before U.S. District Judge Sidney Fitzwater in Dallas. The trial is expected to last eight to 10 days, possibly stretching into mid-October.
I’d like a phonecard, please wallpapers for g700 The Giants are the catastrophe. It is as if the Super Bowl clock really stopped running in February of 2012 in Indy. Coughlin is right when he talks about a team game, and all the parts of his team that have fallen down. The loss to the Bears was the first in the last eight Giantsâ losses going back to last season when they didnât give up 30 points or more. The guys rushing the passers make Giants fans envy the defensive front of the Jets, young and tough and exciting and athletic.
I’d like to cancel this standing order wallpapers for 360×480 The new set, called the Architecture Studio, includes 73 different kinds of bricks, all gleaming white or translucent lending even the most simple design a futuristic look. But, unlike traditional Lego sets, there is no instruction manual inside the box, requiring builders to think very much outside it.
Can you put it on the scales, please? relaxing live wallpapers android The Global Fund says that of the estimated 9 million cases of TB worldwide in 2012, only 6 million were diagnosed and treated – leaving an estimated 3 million people with TB who went undiagnosed, untreated or unreported.
Your account’s overdrawn pc wallpaper full hd 2018 The BBC's deputy political editor Gary O'Donaghue describes Sir John Major's calls for a windfall tax on energy companies as an “extraordinary intervention”. “This intervention is pilling on the pressure on the government,” he says. “This is not sniping from the sidelines, this is running into the middle of the pitch and sticking the boot into your own centre forward.”
I’m unemployed how to upload to steam workshop wallpaper engine But farmers in the cull zone are doing themselves a huge disservice with their silence. Country dwellers complain how city types are utterly ignorant of their way of life, but without farmers’ voices it is impossible for the public to understand their point of view â and the valid, persuasive reasons they may have for supporting a cull.
I’d like to order some foreign currency zebra wallpaper for iphone 4 Ariel Castro was not born a predator. He became one. I believe him when he says he himself was sexually abused. And, while most victims of sexual abuse harm no one later in life, Ariel Castro is an extreme example of what can happen in adulthood, when a child has been destroyed psychologically.
Good crew it’s cool 🙂 omega wallpapers fortnite Key to that will be a new hub that should be created in every hospital, called a clinical co-ordination centre, which would act as a central control room, helping to ensure information about patients is shared and their care planned properly.
Remove card fantasy scorpion wallpaper The Daily News has some of the most memorable photos in sports history. From legendary boxers and iconic tennis players to golfing greats and fabled Olympians, the Daily News has the photos you want of the once-in-a-lifetime sports moments. Find yours today and relive history.
Do you like it here? puja kumari wallpaper Last year, Christie, a Republican, vetoed a gay marriage bill passed by the Democratic-controlled Legislature. Lawmakers have until the end of the year to override the veto, but it is not clear the majority has enough votes.
I’d like to withdraw $100, please new wallpaper love “This whole issue of self-referral and imaging has a long history,” he said. “Every study that’s ever been done shows self-referring physicians are going to do more imaging than physicians who refer patients to hospitals or imaging centers.”
I’d like to cancel this standing order computer free wallpapers Bahrain’s government faced condemnation and accusations of brutality for its repression of protests led by the island’s Shia majority in early 2011, but still considers Britain one of its closest international allies.
I like watching TV moh airborne wallpaper Razmullah Khan, 27, a local resident who lives next to the mosque, said: “It’s terrifying to be around, this is a place of worship not a war zone and with what happened in Walsall things are becoming terrifying people are starting to not feel safe about walking down the streets.”
I don’t know what I want to do after university stock wallpaper nokia 7 plus The Directorâs Cut doesnât change the A.I. issues, but it does fix those boss fights. Each battle has been completely rebuilt, finally giving you the same options you have throughout the rest of the game and finally feeling fulfilling.
Withdraw cash trey burke iphone wallpaper The fact that the Jets have continued the quarterback competition into the third preseason game, especially after Smith missed the second game, suggests that a strong performance from the rookie against the Giants would likely net him the starting job heading into the season opener.
Stolen credit card modern wallpaper designs for bathroom Meshael Alayban, 42, was arrested on human trafficking charges at her apartment in suburban Irvine early on Wednesday after authorities say the alleged victim escaped from the residence and flagged down a bus driver.
Which team do you support? 3d clock live wallpaper apk LONDON, Oct 14 (Reuters) – The group which writes globalaccounting rules said the European Parliament was threateningits independence by calling for a fundamental change to the wayit sets standards, and linking it to future funding.
Free medical insurance daisy ridley wallpaper iphone 6 The move is aimed at repelling the advances of Apple and Amazon, which have wreaked havoc with Tescoâs profitable books and DVDs business in recent years. The supermarket is also hoping to find new ways to connect with shoppers who have become less loyal since the downturn put a strain on food budgets.
I’ll put her on wallpaper iphone bmw m Willie Walsh, chief executive of IAG, said more than 1,700 staff have so far left Iberia while remaining flight and cabin crew have accepted an 18pc pay cut. Other employees have seen their salaries reduced by 11pc.
I’d like to send this parcel to green wallpaper hd iphone According to Deutsche Bank analysts, trials in the third andlast phase of testing required for market approval account forover 35 percent of a drug company’s research and developmentspending on average.
Jonny was here hd computer wallpapers nature At innumerable parties, I have seen him not conversing with fellow guests, but huddled in a corner, hunched over his iPhone. Fry once even buttonholed the journalist Peter Hitchens and then tweeted a rude comment about him. It was at the memorial service for Hitchens’s brother, Christopher.
Get a job picsart wallpaper background change Baidu has been on an acquisition trail over the past year orso to diversify its business. In July, it said it would buy 91Wireless to beef up its presence in the mobile sector.(Reporting by Lee Chyen Yee; Editing by David Cowell)
I’m on holiday fairytail wallpaper The number of new homes sold in August was at a seasonally adjusted annual rate of 421,000, up from the revised rate of 390,000 homes in July. That figure is still below the rate of construction needed in a healthy market, according to analysts. Right now, it would take five months to run through the supply of new homes, according to the report. A six-month supply of homes is considered healthy, and the housing market is still facing a shortage of inventory.
Through friends download hritik roshan wallpapers Last month, Orr unveiled a highly controversial 134-page debt restructuring proposal as a prelude to negotiations with creditors. The report revealed Orrâs intention to halt payments on âunsecured debt,â including $530 million of general obligation bonds that traditionally were considered immune from such action.
I can’t get through at the moment world of warcraft wallpaper shaman “I recognise some will just concentrate on the salary, rather than the package as a whole, and say it’s too high; others that it’s too low. There is no easy way forward on this. We have put together a package of reform which we think is fair and which ends the anomalies of the past.
Which university are you at? night sky wallpapers for samsung For the latest Kashmir intrusion, the Indian army cited as proof of Pakistani involvement radio intercepts, weapons with Pakistani markings seized from the area of operation and covering fire provided by Pakistani troops while the insurgents breached the de facto border.
Another service? wallpaper free delivery uk Twitter clearly made no secret about the fact that it filed its first papers, but further information could be tough to come by in the coming weeks. Thanks to a provision in the 2012 JOBS Act, smaller firms, known as “emerging growth companies,” may file for their IPOs confidentially. That means the company can keep its SEC filings, with their bevies of financial data, secret until 21 days before the company goes hunting for investors in what is commonly called a “road show” (and once it does release that data, it will only have to release two years’ worth, instead of the standard three).
US dollars butterfly and flower wallpapers Some energy companies in the Gulf started shutting down production and evacuating workers from offshore platforms asTropical Storm Karen approached a region that produces nearly afifth of daily U.S. oil output.
On another call dhoom 3 wallpapers indiaglitz These investment assumptions matter – big time. A CRR reviewof 126 public plans found that they were 73 percent funded usingthe more optimistic 8 percent return assumption – but just 50percent using a more conservative 5 percent figure.
Hold the line, please wallpaper webkinz KANE, Pa. (AP) — An SUV crossed into oncoming traffic on a rural northwestern Pennsylvania highway and smashed head-on into another vehicle, killing six people, including two children, authorities said Sunday.
Best Site Good Work how to download wallpapers to your phone Film opens in limited released on Dec. 13, followed by a wide release on Christmas Day and is one of a handful of films Sony is releasing this year with Oscar potential. Those other possible contenders include “Captain Phillips” and “Monuments Men.”
Cool site goodluck 🙂 samurai champloo wallpaper 1680 After spending the first eight seasons of his career with the Magic, Howard talked his way out of Orlando and ended up the centerpiece of a four-team trade that saw the former first overall pick end up with the Lakers. But after a forgettable season in L.A., in which his desire to compete at the highest level was called into question, Howard is the big star in the NBA’s latest drama.
this is be cool 8) best friend good morning hd wallpaper Alex Lenkei had an ankle replacement at Epsom Hospital in Surrey, where consultant orthopaedic surgeon Dominic Neilsen said it was ânerve-rackingâ making the first incision, adding: âHe did amazingly well.
I’m from England wwe r truth wallpaper “I’m an old man … I never smoked marijuana, but I have come to notice what the life of young people is like,” Mujica said Thursday in a radio address defending the proposal that was approved late Wednesday by congress’ lower house. “The consumption is already happening â it’s around every corner, and it comes from a clandestine market that by nature has ferocious rules. It’s a monopoly of mafias.”
I don’t know what I want to do after university jay cutler ifbb pro bodybuilding wallpaper desktop She mentioned keys to the safe, they returned downstairs but she could not find them, and they returned upstairs and he held her with one arm while he tried to open the safe with a screwdriver with the other.
I’ve got a part-time job lord shiva angry images hd wallpapers While Goldman Sachs and Morgan Stanley appear to be the banks most clearly at risk of a regulatory crack-down on the trading of oil tankers and pallets of metal, BoA-ML also has a great deal at stake, with a $500 million a year global commodity business employing more than 200 traders.
I’m unemployed puja kumari wallpaper “We will end up not shutting the government down and we will not defund Obamacare. That’s how the movie ends,” Republican Senator John McCain, a former presidential candidate himself, told reporters. Only when Republicans control 67 votes in the Senate – enough to override any presidential vetoes – will the party dismantle the healthcare law, McCain added.
What company are you calling from? green wallpaper hd iphone “We have argued for some time that the agenda was likely tohave mixed success, but the government’s commitment to courtingprivate investment in infrastructure remains firm,” saidJefferson Finch, a political risk analyst with Eurasia Group.
What do you like doing in your spare time? ou football schedule 2012 wallpaper Analysts, however, were cautious about the outlook foremerging Asian currencies, saying that the Fed still seemslikely to start reducing its bond purchases later this year,even if the exact timing is unclear.
Gloomy tales wallpaper engine anime bar For the first nine months of this year, its oil productsimports had fallen 23 percent to 5.58 million tonnes from thesame period a year ago due to full runs at the 130,500 bpd DungQuat plant, government statistics showed.
I’m sorry, he’s wallpapers mickey minnie The overall exposure of European banks is unclear. Germanregulator Bafin said on July 29 that its banks and insurers had18.5 billion euros’ worth of exposure to U.S. municipalities.Italian banks have about 800 million euros’ worth, a sourcefamiliar with the matter told Reuters.
How many days will it take for the cheque to clear? brice wallpaper Maple Leaf, the maker of Dempster’s Bread and Klik luncheon meat, has been hit hard by low margins for hog production due to high prices of corn and wheat. It reported a surprising second-quarter loss on July 31.
bna casino online
Just over two years super tuning cars wallpapers Consumer confidence and home price data are due on Tuesday, but Wednesday brings the July ADP private sector employment report and the advance estimate of Q2 GDP, along with GDP benchmark revisions.
I’ve lost my bank card wallpaper akhil singer It’s time we all did more of the latter – sitting and gazing at the glorious prospects before us, whether they are of man-made cathedrals and elegant public buildings, of naturally sculpted countryside and meandering rivers or simply of trees and sky.
I’d like some euros free lil wayne wallpapers for phones Police said the riders attacked the vehicle and pulled the driver, Alexian Lien, from his car after he ran over a motorcyclist, leaving Edwin Mieses Jr. of Lawrence, Mass., severely injured with a broken spine and legs and, according to his family, unlikely to walk again.
Very exciting points you have observed, appreciate this for adding. Great may be the art regarding beginning, but greater will be the art of ending. by Henry Wadsworth Longfellow.
I’аve read some good stuff here. Certainly price bookmarking for revisiting. I surprise how a lot attempt you set to create one of these excellent informative site.
I used to be able to find good info from your content.
gamefly recently posted..gamefly
wow, awesome blog post.Much thanks again. Will read on
Good day I am so excited I found your site, I really found
you by accident, while I was researching on Bing for something else,
Anyhow I am here now and would just like to say many thanks for a tremendous post and a all round entertaining blog
(I also love the theme/design), I don’t have time to read through it all at the minute but I have bookmarked it and
also added in your RSS feeds, so when I have time I will be back to read more, Please do
keep up the fantastic job.
Lara recently posted..Lara
This is a excellent web site, would you be interested in doing an interview regarding just how you created it? If so e-mail me!
Very good info. Lucky me I found your website by chance (stumbleupon). I ave saved as a favorite for later!
Mr That his involvement will prompt Cheap Jerseys to set even higher standards that other international corporations will endorse.
kamagra oral jelly
Really appreciate you sharing this article post.Thanks Again.
web browsers and both show the same outcome.
Thank you for any other excellent article. Where else
may just anybody get that type of information in such
an ideal means of writing? I’ve a presentation next week, and I am
on the search for such info.
Linnie recently posted..Linnie
Really enjoyed this blog.Really thank you! Really Cool.
mnk casino game
Thanks for sharing this very good article. Very inspiring! (as always, btw)
I’ve been browsing online more than 4 hours today, yet I never found any interesting article like
yours. It is pretty worth enough for me.
In my view, if all web owners and bloggers made good content as you
did, the web will be a lot more useful than ever before.
Maddison recently posted..Maddison
Some really fantastic articles on this web site , regards for contribution.
I significantly appreciate your posts. Thank you
I’m not that much of a online reader to be honest but your
sites really nice, keep it up! I’ll go ahead and
bookmark your website to come back in the future.
Many thanks
gamefly recently posted..gamefly
izt cbd oil benefits
I’m interested in this position underage animal sex stories A new study by scientists at Penn State University finds caribou are affected by climate change indirectly due to the loss of sea-ice in the Arctic. The research paper is published in the Nature Communications journal.
What do you want to do when you’ve finished? nude lolitas at play Zach Johnson and PGA Championship winner Jason Dufner never trailed before beating South Africans Branden Grace and Richard Sterne 5&3 while Stricker and Jordan Spieth ended a birdie fest against South African Ernie Els and Zimbabwe’s Brendon de Jonge with a hard-fought 1-up win.
I want to report a lolitas top 100 toplist “Last week I organized an International multidisciplinary meeting on âAdvances on Infantile colic’ and the concluding remarks focused attention on the weakness in the present evidence-based literature,” Savino, of the City Hospital Health and Science of the City of Turin, Italy, wrote in an email to Reuters Health.
Could I make an appointment to see ? little nymphets tgp “Khloe is exactly how I am in the way she likes to nest and cook; the way she is with everything in her home-even the way she makes a bed and sets a table,” Jenner said. “With Kim, our personalities are very much alike. My son is identical to his father Robert-they look alike, act alike, and have the same mannerisms. It’s an amazing reminder of what an amazing dad Robert was.”
I’m from England hot little lolita nymphets Senate Majority Leader Harry Reid and Republican leaderSenator Mitch McConnell were discussing ways of avoidingprocedural hurdles that could slow down the measure, DemocraticSenator Heidi Heitkamp told CNN late Wednesday.
Spot on with this write-up, I really assume this website needs rather more consideration. I all most likely be again to learn rather more, thanks for that info.
Another year sweet nude lolita lolita He noted that said Nintendo Co.’s 3DS handheld videogame console, which was released in 2011 and then again with a newer larger model in 2012, hasn’t lived up to its predecessors. Combined, the 3DS and its predecessor the DS, which is still on store shelves, sold 14.4 million units in their first 29 months together on the market. The DS and its predecessor, the Game Boy Advanced, had sold 21.5 million units in the same respective time frame, he said.
Could you tell me the number for ? young world lolitas pussy Alitalia, which is 25 percent owned by Air France-KLM, was rescued from bankruptcy in 2008, when it wasbought by a consortium of Italian companies including bankIntesa Sanpaolo, road operator Atlantia andholding company IMMSI.
Just over two years nn model bbs The call came a day after Ryan said Smith had a “brutal” practice in what was his “worst day” of training camp as he threw four interceptions, including three in 11-on-11 team drills. And Ryan didn’t back off that blunt assessment Thursday.
Directory enquiries cute nn models It was impossible to say whether he was confident or not, as he chewed on his tobacco and walked like a beatnik. Surely there was to be plenty of emotion when he realised that he had become only the sixth player to shoot a 63 and go on to win the major.
What line of work are you in? naked tiny teen lolitas Defense lawyers argued both doctors were unaware of the conspiracy and were practicing medicine in line with state prescribed standards, which allows licensed physicians to distribute opioid pain pills without fear of punishment.
An estate agents underage models Likewise, if CCD is linked to the complex array of chemicals in pollen, it will make it vastly more difficult to protect bee colonies – not to mention the implications for other forms of life subjected to this complex set of chemicals that make their way into the food web or environment.
I’m doing an internship little miss nude lolita The slight progress came amid a late-night bargaining session in Geneva, with the U.S. indicating it could accept a United Nations enforcement resolution that didnât threaten military strikes â an apparent concession aimed at trying to broker a solution to the chemical weapons crisis.
Insufficient funds black pre teen lolitas Bonner said Joseph Michael Simpson, who was arrested Tuesday, was “never on our radar” until earlier this year, when a lab extracted “touch DNA” from the granite rocks used to crush the teen’s skull.
Which university are you at? kds pussy 0-62mph takes 2.8 seconds, 0-124mph takes 6.8 seconds and 0-186mph takes 16.5 seconds. On top of this, the P1 will complete a standing quarter mile in just 9.8 seconds at a speed of 152mph and flat out will hit a limited 217mph.
What do you do for a living? underage girl loli naked “Right now in front of your computer, there’s dead space. You’re only using your desktop, where your keyboard and mouse rest, and the surface of your monitor,” said Michael Zagorsek, vice president of product marketing for Leap Motion.
It’s a bad line child top models loloitas Wall Street stocks halted their longest losing streak in2013 as major retailers reported positive profits and outlooks,signaling resilience among U.S. consumers who are dealing withmeager wage growth and higher taxes this year.
Could I ask who’s calling? child lolita nonnude photo “While adding this technology to our list of safety features is important, I remain committed to implementing the rear visibility rule as well,” U.S. Transportation Secretary Anthony Foxx said in a statement.
We used to work together nonnude models The apprenticeship scheme would affect foreign nationals brought in under Tier 2 of the points-based immigration system – those offered a skilled job to fill a gap in the workforce that cannot be filled by a settled worker.
Could I make an appointment to see ? tiny angel lolita tgp The New Zealand-born Jack, 35, was found dead on Thursdayevening by “a loved one” at an apartment in San Francisco’s NobHill neighborhood, according to a police spokesman. He would notsay what caused Jack’s death but said police had ruled out foulplay.
I don’t like pubs toplist preteen Finance ministers and central bank leaders for the Group of 20 major economies wrapped up two days of discussions in Washington with a joint statement expressing concern about the ongoing budget stalemate between Congress and the Obama administration.
I’d like a phonecard, please lolas little girls bbs Michael Strahan and fiance Nicole Murphy held hands while taking a stroll on the beach in Hawaii on May 26, 2013. Murphy, who has five children, looked flawless in a skimpy purple and black lace bikini while on the Memorial Day getaway.
I’m at Liverpool University lolita 12yo free pics Before Kate and William left London, Harry rushed home from his RAF duties to meet his nephew. Harry is now said to be keen to follow up his brief visit with a big party to celebrate the arrival of George.
I do some voluntary work best free lolita sites “They still aren’t taking the blame,” said Christiane, awoman who lived near the blast site and declined to give herlast name. “First it’s the firemen, now the engineer, who willthey blame tomorrow?”
I quite like cooking kds flymentor 3d “But it’s happening every single day,” he said. “We fought a good fight earlier this year, but we came up short and that means we’ve got to get back up and go back at it because as long as there are those who fight to make it as easy as possible for dangerous people to get their hands on a gun, then we’ve got to work as hard as possible for the sake of our children. We’ve got to be ones who are willing to do more work to make it harder.”
I love the theatre young lolita nymphets cp Hoyer fretted about the possibility of a governmentshutdown, saying, “This is the highest risk I have seen becauseI see the least willingness to do what is absolutely essentialin democracy and that is to work together.”
How do you spell that? toplist The world’s three biggest shipping firms – A.P.Moller-Maersk’s Maersk Line unit, Switzerland-basedMSC Mediterranean Shipping Company S.A., and France’s CMA CGM – announced plans in June to share 255 ships and cut costs.
Canada>Canada beutiful lolitas naked art The Democracy Corps analysis also says, “Obamacare [the president’s health care law] is the end game for Republicans: Democrats have already built constituencies of dependence based on welfare, unemployment insurance, food stamps, and illegal immigrants. Now add to that the uninsured.”
When can you start? the all lolita site nude underage Still, they said, it would “appear very inconsistent for theFed to continue to purchase Treasuries in open market operations- or hold over $2 trillion of them, for that matter – and notaccept Treasuries as collateral at the discount window in theevent of a technical default.”
I’m a member of a gym young shy lolita videos Shares of Tesla Motors Inc jumped 13.5 percent to$152.30 a day after the electric car maker posted an unexpectedquarterly profit. The stock has been a major momentum favoritethis year, up almost 350 percent in 2013.
An envelope young teen toplist Right after unleashing a 100 mph fastball to Mark McGwire, the Cleveland flame-thrower got his comeuppance: Barry Bonds tagged him for a home run estimated at 451 feet, a real crowd pleaser at Coors Field.
What do you like doing in your spare time? kitty lolita posing nude That has led to a shift in the type of rail cars passingthrough small towns like Lac-Megantic. According to residents,the trains used to carry mainly lumber, but now they carryvarious hazardous materials. (Reporting by Julie Gordon; Editing by Richard Valdmanis andStacey Joyce)
What do you do for a living? underage boy Day was shot down on Aug. 26, 1967, over North Vietnam. His right arm was broken in three places and his knee was badly sprained. Day was captured, taken to a prison camp where he was interrogated and tortured, and then escaped. He made it across the demilitarized zone, wandered for days and was unable to signal U.S. aircraft. Day was recaptured by the Viet Cong and returned to prison in Hanoi, where he gave his captors false information when being questioned.
I’m self-employed sexy preeteen lolita models “Floridians should not have to wait several days for the results of a major presidential election to be tabulated because of the delays in a few counties when the majority of counties, including major metropolitan areas, have been counted,” Scott said in a statement.
Punk not dead nudes loli free gallery And â13â really does, to a nearly satiric degree. The opening track, âEnd of the Beginning,â has the creepy-crawly gait of the song that opened the bandâs self-titled debut 43 years ago. âThe first album was essentially a live album without the audience,â Osbourne says. This time âRick wouldnât let me do overdubs. He kept everything basic and raw.â
Can I take your number? kidz toplist Two days of riots two weeks ago, with dozens of cars set afire in Trappes, a suburb southwest of Paris, was a new reminder of the simmering anger. The unrest there was triggered by the arrest of a man who allegedly attacked a police officer for ticketing his wife for covering her face with an Islamic veil â banned in French streets. But urban experts and residents said the veil issue covered the deep concerns over unemployment, discrimination, poor integration of many residents and despair over the future.
I never went to university newsgroups hussyfan Egyptian soldiers entered the mosque on Saturday morning. The private Egyptian ONTV Live television channel showed the soldiers entering, while Al-Jazeera’s Egypt affiliate streamed footage on its website of the soldiers inside the mosque.
A staff restaurant little baby russian lolitas Every relationship requires some level of compromise and a type of training goes on with each other to allow a moulding of two people in a relationship to fit together perfectly. However, training comes with time, so donât expect miracles straight away, and how much someone compromises is totally up to them, so you may never be able to change someone to be what and how you want them to be. A blending of two people in a relationship happens over time as you teach each other what your personal boundaries are, and how to act and react together.
It’s a bad line loli anime Other prominent films to be shown include Joel and Ethan Coen’s “Inside Llewyn Davis” about a 1960’s Greenwich Village folk singer and Alexander Payne’s drama “Nebraska” about a father-and-son road trip. Both of the films played at Cannes Film Festival in France earlier this year.
I’d like to apply for this job teen lola top 100 He started working at General Motors Co in 1964 and laterjoined Volkswagen of America, where he became the head ofmanufacturing. In 1980, he was tapped by famed auto executiveLee Iacocca to overhaul Chrysler’s manufacturing operations asthe company struggled to survive.
I’ve only just arrived lolita model Stewart showed her lack of tech-repair knowledge and revealed that she had triggered the wrath of Apple’s public relations department with her tweets. Check out her hilarious iPad-Apple tweet rant below:
Jonny was here sandra model bbs (b) In the event that the Acquisition is implemented by way of a Takeover Offer, the Abbey Protection Shares acquired under such an offer will be acquired fully paid and free from all liens, equities, charges, encumbrances, options, rights of pre-emption and any other third party rights and interests of any nature and together with all rights attaching or accruing to them, including voting rights and the right to receive and retain in full all dividends and other distributions (if any) declared, made or paid on or after the date of this announcement (save for the Interim Dividend).
Could I order a new chequebook, please? loli gifs A-Rod is said to be resting that sore quad that prevented him from joining the Yankees in Texas this week, all the while painting himself as the victim in all of this to anyone who will listen. He wants everyone to believe that it is the Yankees who are going out of their way to keep him off the field, even though he was the one who brought up the quad issue last week.
Very interesting tale beutiful lolitas naked art “If you come forward as quickly as possible, everybody is gonna be better off,” Rose said. … “They will get yoy. They have the resources, they have the investigators. They will nail you.”
I want to make a withdrawal lolicon bbs “We will ask the Justice Ministry for a legal opinion toanalyze the proposal that was announced this morning and we willnot hesitate to go to court,” said Alexandre Cloutier, Quebecminister for intergovernmental affairs.
Thanks-a-mundo for the article post.Much thanks again. Much obliged.
I love the theatre preteen nudism Rising crude supply in the United States has also pressuredprices. U.S. crude output hit its highest since 1990 whileweekly crude inventories showed a much smaller fall than inprevious weeks in the week to July 19, data from the U.S. EnergyInformation Administration showed on Wednesday.
I was born in Australia but grew up in England top 100 nn teen With bills rising rapidly, however, the consensus betweenthe political parties and the industry over gradualdecarbonisation of the electricity industry has been comingunder strain, as everyone tries to blame everyone else forsoaring prices.
Yes, I play the guitar hot young lolita models However, we did find a higher quality risk for small contract manufacturers and those subject to less regulation. Given this, we were not altogether surprised that these lightly regulated, small compounding companies like NECC were found to operate with high quality risk.
A law firm cyberlolita lolita preteen underage There has been a steady rise in durable goods orders since the “end” of the recession, but it appears that the rise is over. Since the last quarter of 2011, durable goods sales have become stuck in a pretty tight range save for one outlier each to the upside and downside, as indicated by the red lines. While these numbers aren’t awful, they aren’t great either. Just like the rest of the economy, future performance in this sector will be meh.
Thankyou for all your efforts that you have put in this. very interesting information.
I’m happy very good site pretten lolitas nude portal But LightSquared had to file for bankruptcy protection inMay 2012 after the U.S. Federal Communications Commissionrevoked permission to build out a new high-speed wirelessnetwork after tests showed that its network would interfere withGPS systems.
Sorry, you must have the wrong number free underage lolitas passwords What the Obama administration saw as faster-than-anticipated North Korean progress on nuclear weapons and missiles prompted a March announcement that Washington would spend $1 billion to add 14 interceptors to the U.S.-based missile defense system.
sil zone online casino
von parx online casino
tuv what is cbd oil
[url=http://genericventolin2019.com/]generic ventolin[/url] [url=http://buykamagra24.us.com/]kamagra 100mg oral jelly[/url] [url=http://buykamagra24.us.org/]kamagra[/url] [url=http://buyeffexor.us.com/]buy effexor[/url] [url=http://buysildenafil247.com/]sildenafil pfizer[/url] [url=http://buytadalafil24.us.org/]tadalafil india pharmacy[/url] [url=http://cheapviagrapills.us.com/]Viagra Online[/url] [url=http://tadalafil18.us.org/]tadalafil online[/url] [url=http://buyviagra247.com/]viagra[/url] [url=http://generickamagra2019.com/]generic kamagra[/url] [url=http://genericprozac2019.com/]generic prozac[/url] [url=http://sildenafil2017.us.com/]sildenafil[/url] [url=http://buylisinopril24.com/]LISINOPRIL[/url] [url=http://genericvaltrex2019.com/]how to buy valtrex in korea[/url] [url=http://buyvaltrex24.us.org/]valtrex[/url] [url=http://genericviagraonline.us.com/]viagra over counter[/url] [url=http://generictetracycline2019.com/]tetracycline online[/url]
Stunning quest there. What occurred after? Thanks!
Bichara Previc recently posted..Bichara Previc
This article presents clear idea for the new viewers of blogging,
that truly how to do running a blog.
http://tinyurl.com/y3kbno3t recently posted..http://tinyurl.com/y3kbno3t
Hello to every one, since I am genuinely keen of reading this web site’s post to be updated
daily. It includes good information.
http://tinyurl.com recently posted..http://tinyurl.com
Normally I don’t learn article on blogs, however I would like to say that this write-up very compelled me to take a look at and do so! Your writing taste has been amazed me. Thank you, quite great post.
I definitely wanted to post a simple comment to express gratitude to you for those nice items you are giving out here. My incredibly long internet look up has now been recognized with sensible know-how to share with my family and friends. I ‘d claim that many of us readers actually are very much blessed to live in a really good place with so many marvellous people with insightful methods. I feel very much happy to have seen the webpage and look forward to some more exciting minutes reading here. Thanks a lot once again for all the details.
I have been reading out a few of your stories and i can claim pretty good stuff. I will make sure to bookmark your blog.
Hi there, You’ve done an incredible job. I will definitely digg it and personally suggest to my friends. I am confident they’ll be benefited from this web site.
vku hemp oil vs cbd oil
You can certainly see your expertise in the article you write.
The world hopes for even more passionate writers like you who aren’t afraid to say how they believe.
At all times go after your heart.
tinyurl.com recently posted..tinyurl.com
free cams
Please let me know if you’re looking for a article
writer for your site. You have some really good posts and I feel I would be a good asset.
If you ever want to take some of the load off, I’d really like to write
some material for your blog in exchange for a link back to mine.
Please shoot me an email if interested. Many thanks!
gamefly recently posted..gamefly
sildenafil
Cialis Generika In Deutschland Kaufen Cytotec En Ligne cialis for sale Strep Throat And Amoxicillin
[url=https://clck.ru/FkugB][/url]
hhj caesars slots
[url=http://buyviagra365.com/]buying viagra on line[/url] [url=http://buytadalafil247.com/]tadalafil 5mg[/url]
[url=http://buyalbuterol24.us.com/]Buy Albuterol[/url] [url=http://viagrasoft247.us.org/]viagra soft[/url] [url=http://genericviagra2019.com/]generic viagra[/url] [url=http://buyventolin24.com/]ventolin hfa 108[/url] [url=http://genericlasix2019.com/]generic lasix[/url] [url=http://generickamagra2019.com/]generic kamagra[/url] [url=http://buylisinopril24.us.com/]Buy Lisinopril[/url] [url=http://buyviagra247.us.org/]generic viagra[/url] [url=http://tadalafil18.us.org/]tadalafil[/url] [url=http://buytadalafil365.com/]cialis[/url] [url=http://buyviagra24.us.org/]generic viagra professional 100mg[/url]
I know this if off topic but I’m looking into starting my own blog and was wondering what
all is needed to get setup? I’m assuming having a
blog like yours would cost a pretty penny?
I’m not very web smart so I’m not 100% positive. Any suggestions or advice would be greatly appreciated.
Many thanks
tinyurl.com recently posted..tinyurl.com
I work for myself lolita bbs pics Industry sources say Qatar hopes that the spinoff will speedup decision making – something Qatar’s outgoing emir has askedfrom the new leadership in general when transferring power tohis son last month.
The United States loli girl hentai The Commons health select committee is going to review the operation of NHS 111. It must grasp the nettle and state plainly that applying the business approach to efficiency – substituting capital for labour, and substituting cheap labour for more expensive labour – can’t be done safely in healthcare. But the provision of NHS 111 has been outsourced to a variety of providers with contracts that could be costly to terminate. Unless the public gets angry enough to force a rethink we had better hope that at least the computer stays risk-averse. Otherwise we must expect a growing number of “serious untoward incidents”, in which some people will die.
I’m sorry, I’m not interested kds cumshot This is a type of cookie which is collected by Adobe Flash media player (it is also called a Local Shared Object) – a piece of software you may already have on your electronic device to help you watch online videos and listen to podcasts.
Just over two years young lolita girls masturbating “In recent months concern has been expressed at the suggested extent of the capabilities available to the intelligence agencies and the impact upon people’ s privacy as the agencies seek to find the needles in the haystacks that might be crucial to safeguarding national security.
Could I order a new chequebook, please? dorki loli nymphets sex Except, of course, for the kind of claim such as “american society is not vertically permissive”, one extreme example of this magnitude indeed dispels the entire idea, just as one falling apple dispels the notion that “there is no gravity”.
Thanks for calling viagra jelly Vitamin A, found in dairy, fortified fat spreads, carrots, sweet potatoes, swede, mangoes and dark green vegetables such as spinach, cabbage and broccoli is essential for strengthening the immune system, vision and maintaining healthy skin. Vitamin C, which boosts the immune system and helps the body absorb iron can be found in many fruits and some vegetables.
I’ve been made redundant 10yo lolitas in thongs Now, a team led by Prof Robin Franklin of the Cambridge Stem Cell Institute and Edinburgh University have discovered immune cells called macrophages can release activin-A, a compound which stimulates the production of more myelin, the substance from which the sheaths are made.
I’m in a band illegal nude lolita toplist In November, India ended what many human rights groups had interpreted as an undeclared moratorium on capital punishment when it executed a militant convicted for the 2008 militant attack on Mumbai. Three months later, it hanged a man from the Kashmir region for a 2001 militant attack on parliament.
I sing in a choir preteen sex rompl “With one obvious news story being discussed all the time,which is the progress towards, or lack of progress towards,tapering, there is an awful lot of opportunity for nervousinvestors to wait before choosing which side to bet on forgold,” Mitsui Precious Metals analyst David Jollie said.
I’m in a band lolita topless models 16 SADC leaders are also expected to endorse the poll but there has been some dissention in the ranks with member Botswana calling for an independent audit, saying evidence available so far meant the elections could not be considered acceptably free and fair.
I’m about to run out of credit model lolita bbs gallery The version uncovered by the archive was most likely ordered by someone who wanted to show it in Belgium but never collected it, so the reel survived the war, and Nazi occupation, in the Belgian customs office.
I like watching football preteen models bbs Police spokeswoman Martha Earnhardt said Monday that Monica Thomas of Montgomery was carrying the cremated remains of son Jamar Simmons Jr. when she was knocked down by a robber who took her handbag Friday night.
I’d like to apply for this job what are nizagara pills Reporters Without Borders on Monday called on Vietnam to end internet censorship and release 35 imprisoned bloggers. It said the motive of the authorities was to avert an uprising of the kind that toppled regimes in the Arab world.
Will I get travelling expenses? lolita nude pics In a series of nearly a dozen emails between the landlord and SCRIE, Vinocur was told the potential fraud was a âlandlord-tenantâ issue. When Vinocur protested in another email, he was told to send Director Ruth Bodie a letter.
I’m on business what is nizagara gold 120 The Draconids — expected to peak Monday around sunset — occur annually thanks to the ribbon of space dust left behind by Giacobini-Zinner, a comet that travels around the sun every 6½ years. In October, Earth passes through this dust, and as pieces of filament encounter our atmosphere, light streaks through the sky. What’s great about the Draconids is that, although generally more faint, they’re slower-moving meteors, so the light trails linger.
I’m at Liverpool University lolita nymphet bbs galls YPSILANTI TOWNSHIP, Mich. (AP) — The Detroit-area factory where Rosie the Riveter showed that a woman could do a “man’s work” by building World War II-era bombers, making her an enduring symbol of American female empowerment, will be demolished if money can’t be found to save it.
I’m sorry, she’s preteen loltia nude pic Two workers waiting for a bus at the end of their shift were found to be have been contaminated with radioactive particles, which were wiped off their bodies before they left the site, Tokyo Electric, also known as Tepco, said. Full body checks of the staff members showed no internal contamination.
I’ve lost my bank card free nymphet Cole disagrees with the idea of using a government shutdown threat to try to take aim at Obamacare but added, “the frustration is how do you keep fighting it without taking an action that is counterproductive.”
I’ve just started at hussyfan pics “Our transformation is ongoing and in no way easy,” he toldan auditorium packed with investors in the company’s hometown ofWaterloo, Ontario. “This is a long-term transition for thecompany but I can assure you that we are pushing very hard.”
This site is crazy 🙂 naked underage loli sluts Thwack goes the serve, 128.6mph. Bang goes the forehand, whippy and long. Screech goes the open-stance backhand, over and over again. Technically correct, perfectly balanced, immensely strong, she overpowers lesser beings from the moment she walks on court.
I think the admin of this web page is actually working hard in favor of
his web site, because here every stuff is quality based material.
Harriett recently posted..Harriett
A book of First Class stamps little lolita angel pics “But people are expecting them to play for a national championship, and that’s going to be real tough with some of the players they lost. … Once the expectations are there then the bull’s-eye is on your chest. So, I think people will look at this season as a disappointment for him, even though he was still great.”
We’ve got a joint account young naked lolitas pics Perhaps Grangemouth can survive by charging what areeuphemistically known as “premium prices” to customers in itscaptive markets in Scotland and the north of England – but thatjust means Scottish motorists will be subsidising the refineryevery time they fill up their cars and trucks with “premium”petrol when they could use cheaper fuel imported from elsewhere.
The National Gallery ls lola naked girl “We get around 100,000 entries a year worldwide,” a Miss World spokeswoman told ABC News in a statement. “Some countries hold auditions in order to find their finalists, some countries operate a reality-style program and others use a more traditional system of local heats leading to finals. Many of the competitions are nationally televised.”
I’m from England pil viagra That, coupled with stronger British data, is helpingdomestic-focused companies to perform more strongly than some oftheir exporting peers. Tuesday offered fresh data support, withstrong numbers on house prices, retail sales and businessconfidence, even if manufacturing was weak.
What’s the last date I can post this to to arrive in time for Christmas? naked underage preteen girls A lot of trainees are dropping out in the fourth or fifth year of their training because of the pressures it is putting on their home life and personal relationships, something which I also experienced.
We’d like to offer you the job prelolita little girlies nude But in March, police arrested four current and former Trinity Mirror journalists, and said they had identified a “suspected conspiracy to intercept telephone voice-mail messages at Mirror Group Newspapers,” which is a unit of Trinity Mirror. Police added that they “believed” the conspiracy mainly involved the Sunday Mirror in 2003 and 2004. Trinity Mirror also publishes the Daily Mirror and the Sunday People tabloids.
Languages naughty preteen lolita stories A Boeing spokesman said the company was glad the ASA haddismissed what it called “unfounded complaints”. An Airbusspokesman said the company maintained Boeing’s failure to usecomparable seat counts in its advert skewed the statistics.
tjw zilis cbd oil
Have you got a telephone directory? loli fedun years old Then itâs 12 hours earlier, and 22-year-old Oscar Grant (Michael B. Jordan) is reassuring his girlfriend Sophina (Melonie Diaz) that heâs there for her and their 4-year-old daughter, Tatiana (Ariana Neal). Oscar runs errands around his hometown of Hayward, Calif., gets food for the birthday celebration for his mother Wanda (Octavia Spencer) and texts the pals he and Sophina are planning to see New Yearâs fireworks with in San Francisco.
I wanted to live abroad best lolitas sites 2008 The 21-year-old Edwards, who made his pro debut with 20 scoreless innings in the Arizona League last year, is 8-2 with a 1.83 ERA and 122 strikeouts in 93 1-3 innings for Class-A Hickory. He hasn’t allowed a home run in 160 1-3 professional innings.
Do you know the number for ? young lolita pics vids The guidance was a major step, breaking with the ECB’stradition of not pre-committing on policy. At his August 1 newsconference, Draghi said expectations of rate hikes in moneymarkets were unwarranted – a clear warning to markets.
Sorry, I’m busy at the moment nude lolita toplist This photo provided by the Toledo, Ohio Fire and Rescue Department shows a car at the bottom of a sink hole caused by a broken water line in Toledo, Ohio Wednesday, July 3, 2013. Police say the driver, 60-year-old Pamela Knox of Toledo, was shaken up and didn’t appear hurt but was taken to a hospital as a precaution.
What’s the last date I can post this to to arrive in time for Christmas? young black lolitas nude House Speaker John Boehner, R-Ohio, has said he is committed to advancing immigration legislation in this Congress but there is virtually no interest among GOP lawmakers to vote for the kind of sweeping bill that Democrats are seeking.
Could you transfer $1000 from my current account to my deposit account? nude preteen lolitas pics The best deal is the Vanguard FTSE UK index fund, which costs 0.15pc a year. But there is a one-off initial charge of 0.5pc for first-time investors. In extreme cases, the fees for one tracker can be 10 times higher than on an identical fund. The average fee paid by tracker investors is 0.75pc.
We were at school together lolita kingdom free pics The balding 33-year-old from Wuerzburg, who took silver in the 10-km race and bronze over 5-km earlier in the week as well as gold in the 5-km team event, slapped the overhead finish marker to register a time of four hours, 47 minutes and 27 seconds after a marathon slog around the city’s picturesque harbor.
Did you go to university? great lolita free pics By the time he passed over the estate it was too dark to make out the house. He had planned for this contingency and flew on to the west coast, crossing at West Kilbride. The Firth of Clyde was like a mirror under the moon; ahead a hill rose sheer from the water glowing red with the last of the light – “a fabulous picture,” he recalled (it was no doubt Little Cumbrae Island). Turning south, he swung in over the land again at Ardrossan and picked up the pattern of railway lines he had memorised, following the silver threads to a bend near Dungavel. He made out a small lake he had noted on his map to the south of the estate, but not the house itself.
Could you transfer $1000 from my current account to my deposit account? kds 15 door gasket Jean Charest, the former premier of Quebec and one of themain drivers behind the deal, said while no Canadian provincecould veto the treaty, it could in theory refuse to take part inareas of provincial jurisdiction, such as procurement.
Please wait reviews for nizagara This past June, after 25 years of following people born at the height of the cityâs crack epidemic, Hurt unveiled the results of her study, which concluded that, in terms of overall negative health effects, a motherâs crack use was not as harmful as whether or not the child grew up in poverty.
Could I have , please? kauf viagra Furious demands are being made for an end to the dangerous trafficking of people across the Mediterranean. But it is hard to see how the flow could be curbed, with so many people so desperate for a chance to make a new life in Europe, and traffickers in so many ports ready to take their money.
magic story very thanks sun lolita top ssites ** Thailand’s CP Group has quit a consortium of investorsthat sought to buy a stake in the insurance unit of debt-riddenIDB Holding, a move that could hurt IDB chairman NochiDankner’s chances of keeping control of the conglomerate.
Can I take your number? nizagara gold “We’re tired of the bail outs, we’re tired of the amnesty, we’re tired of the votes against our 2nd Amendment rights, we’re tired of the votes that repeatedly allow the federal government to spy on law-abiding citizens, we’re tired of the pay increases for yourself,” Bevin says in an interview with U.S. News. “We’re just tired of it.”
that it can easily likewise remedy additional eye mark complications to ensure you can certainly get one
Get a job photos lolitas in panties He said it was still too early to provide details on thesize of the bonds. His comments were in line with previousremarks by government officials; the country faces increasingpressure on its state finances because of rising expenditure,which is expected to prompt it to return to the internationaldebt market for the first time since 1997.
What university do you go to? top nn models Wolf, a 19-year-old graduate of Great Oak High School in Temecula, won the Miss Teen USA crown Aug. 9. According to the criminal complaint that names her by initials, she was one of several female victims. The other victims were not identified.
International directory enquiries capsule viagra The Greens condition any future cooperation with the Left on “fundamental” foreign policy changes, having dropped their own pacifist principles to back NATO bombing operations on Serbia. The Left says this is a red line that they will not cross.
[url=https://samedayloan.us.org/]same day payday loans no credit check[/url] [url=https://personalloan.us.org]personal loan for bad credit[/url] [url=https://cashadvanceonline.us.org/]cash advance online[/url] [url=https://cashadvanceloan.us.com]cash advance loan[/url] [url=https://personalloansforbadcredit.us.com]loans for bad credit guaranteed[/url]
Please call back later nice lolas teen virgen Walmart U.S., the biggest unit of the world’s largestretailer Wal-Mart Stores Inc, expects its sales to improve inthe second half of the year after the chain posted declines insales at stores open at least a year – better known assame-store sales – in both the first and second quarters.
I’d like to transfer some money to this account nizagara kaufen PARIS, July 24 (Reuters) – French voucher and prepaid cardprovider Edenred posted a 7.7 percent rise inlike-for-like first-half operating income – boosted by LatinAmerica – and forecast full-year profit growth.
Could you tell me the dialing code for ? incest picture lolita fuck Heâs also starting to develop better chemistry with Geno Smith, who has spread the ball around. Only 53% of Smithâs completions have been to receivers. Cumberland is tied for the most catches (seven) and has the most receiving yards (138) in the past two games. âI look at him as another receiver,â Smith said. âHeâs fast enough where heâll run by you.â
Your cash is being counted nizagara for sale The administration, like McConnell, has also touted the lower deficit, but hardly attributes the sequester for the turnaround. Last Sunday, on NBC’s “Meet the Press,” Treasury Secretary Jack Lew said the sequester is “holding back the economy.”
I’m from England free young lollita toplist Tesla Motors tumbled 11.8 percent to $112.28 andweighed on the Nasdaq 100 after Goldman Sachs moved itsprice target for the luxury electric-car maker’s stock to $84from $61. The change, though higher, still undercut Tesla’scurrent price. Goldman’s most bullish case sets the stock’sprice near $113.
Pleased to meet you abercrombie model nude “Everybody’s cut differently,” he said. “He has his way of leading that he feels like will be most effective and work for him. Obviously, the way we’ve gone about it with this organization, the leaders we’ve had â myself, Magic (Johnson) and Kareem (Abdul-Jabbar) â we’ve done it a different way.”
Could you please repeat that? teens porno 14 years A source tells E! News that the popster arrived at South Pointe at around 2:42 a.m. with approximately 12 to 14 people that were part of his entourage. While there, he was given the VIP treatment all night, though he was adamant about drinking water.
Sorry, I’m busy at the moment skinny models photos This is a type of cookie which is collected by Adobe Flash media player (it is also called a Local Shared Object) – a piece of software you may already have on your electronic device to help you watch online videos and listen to podcasts.
I’d like to pay this in, please naughty family lolitas pics We need a scheme that is analogous to the government help currently given to child-care vouchers or cycle-to-work schemes. Employees should be allowed to pay for their season tickets from their pre-tax income.
Could I have a statement, please? kiddie porn pthc “I wanted to show people I can play an innings like that, that I'm not just a guy who will try and eat up time,” said the 35-year-old, who passed 20,000 first-class runs during his knock.
I’d like to withdraw $100, please pedo loli guestbook The Academy award-winning actress was seen shouting at photographers taking pictures of her family after arriving at Los Angeles International airport in April, with her partner Olivier Martinez and her daughter.
I’d like to cancel this standing order extreme euro preteens At a brief news conference following a closed-door meetingof House Republicans, Boehner warned that this 2013 fight overthe debt limit would be “no different” from his party’s effortsin 2011 to link a debt limit hike to deficit-reduction efforts.
Could I have a statement, please? wooden russian horse “If Apollo has found things which were not in line with whathave been represented to them, they are fully within theirrights to ask for the price to be reduced or even (seek)damages, depending on what was originally represented to them,”said Harish H.V., head of corporate finance practice at advisoryGrant Thornton in India.
Get a job little nn tgp A nine-man breakaway group, including sprint champion Peter Sagan and French veteran Sylvain Chavanel, led early in the race. Sagan picked up more valuable points in his quest to win the green jersey for the second straight year, extending his already massive lead over Brit Mark Cavendish, the 2011 Tour sprint champion.
I’m sorry, she’s 15 yo russian lolita Witnesses said the attack took place near where three people were killed last month when a car loaded with explosives rammed into an office housing Turkish embassy staff, killing three people. Al Shabaab claimed responsibility for that attack.
I’ve got a part-time job viedos loli FIRREA is a savings-and-loan-era law that has become a keytool in efforts to pursue institutions over the financialcrisis. Among other provisions, the 1989 law hasa 10-year statute of limitations, longer than the limit of otherlaws used in financial fraud cases.
I’m retired russian underage model lolita “As soon as the show was finished he called me,” she explained. “He said, ‘Isn’t it amazing that…we were both single and we both found our love of our lives and we both got the longest marriages in Hollywood?'”
We’d like to invite you for an interview forced pre-teen Yes, but when people from salvage companies talk about tons they mean the British “long ton” which has always been used in ship measurement. That is 2,240 pounds, slightly more than a metric ton.
How many are there in a book? newsgroup child preteen The president reiterated that the program was key to thwarting terrorist plots and did not allow the government to listen to any phone calls without a warrant, but he acknowledged Americans had a right to be wary of abuse.
Looking for work diecast models I couldn’t figure out how to open Air Command on my own. During a presentation beamed into the New York hotel’s TV sets from Berlin, where Samsung unveiled the device, a company executive said pointing the pen to the screen was all it took to open Air Command. That wasn’t the case. A Samsung representative in New York showed me how to use it. I learned that I had to click the S Pen’s button while hovering over the screen to get to Air Command.
I’m unemployed diecast models It’s quite difficult trying to get sponsors when you’re injured. I had a great year last year but it’s a vicious cycle: if you don’t achieve what you want then you’re not going to get the interest.
How do you know each other? underground pedo portal Engel said, in response to the letter, that he remains “deeply unsatisfied” with the current strategy, “as we stand on the sidelines when the turmoil in that country continues to claim thousands of lives and sow instability throughout the region.”
When do you want me to start? free boy models Several supermarkets began to clear the shelves of Dumex products while some market stalls marked down the price of other Fonterra-linked products. The price of Japanese baby formula has quadrupled, according to one dealer.
I want to make a withdrawal lolitas nude gallerytop list The word news most often conjures up visions of U.S. troops in Afghanistan, the troubled global economy, a political crisis in Washington, erupting volcanoes and devastating earthquakes. But as we all know, there is far more to news than that. Indeed, it’s often the wacky, weird, offbeat and sometimes off-color stories that can most intrigue and fascinate us. Those stories can range from changing astrological signs to lost pyramids in Egypt but in their essence they all cast new light on the shared human condition in all of its wild diversity.
i’m fine good work chemal toplist He also dismissed claims the weapon in fact belonged to his housemate, another SAS soldier identified only as soldier N. Soldier N recently finished a two year sentence after admitting possessing a similar pistol and an array of ammunition in the house.
I do some voluntary work lolita nude tiny “Unicom has the fastest earnings momentum,” said Vincent Lam, managing director of VL Asset Management Ltd, who invested in China Unicom, but not China Mobile. “It will depend on how iPhones fare in China from now on. My feeling is the iPhone may be losing popularity to some Android phones, so even if China Mobile gets an Apple deal, we will have to see how positive the impact is.”
Another year nude pedo pix “Paul is leading based on his appeal to the furthest right segment of the GOP,” said Tom Jensen, PPP’s polling director in a memo accompanying the results. “With ‘very conservative’ voters he’s at 25 percent with no one else polling above 13 percent. Paul is also particularly strong with men and younger voters. Christie has a big advantage with moderates, Bush leads with seniors and Ryan is up with women.”
Could I ask who’s calling? young lolitas upskirt pix Wang is best-known for her wedding gown collections, having dressed Victoria Beckham, Chelsea Clinton and Mariah Carey on their respective ‘big days’. A former ice-skating starlet, she has also designed competition costumes for figure-skating stars like Nancy Kerrigan and Michelle Kwan.
Hello good day russian nude nastya On Sunday, Paul hosted a viewing party of the final episode at the Hollywood Forever cemetery in Los Angeles. Paul joined cast members including RJ Mitte, who plays Walt Jr., driving onto the stage in the rusty RV that Walt and Jesse first cooked meth in, and emerged wearing yellow Hazmat suits, welcomed by hundreds of excited fans, attendee Terri Schwartz told Reuters.
I’d like to speak to someone about a mortgage free preteen chat The problem with public clouds as they currently exist, Drumgoole explains, is that they tend to be “one-size-fits-all.” The thrust of the new Verizon Cloud is that organizations will be able to decide exactly the performance of the processors, storage, network performance, IOPS and so forth required by each application they push to the cloud, and pay only for that. This, Drumgoole says, gives organizations far greater flexibility while only paying for what they need.
Have you got any qualifications? russian underage model lolita The American College of Physicians and the American Pain Society recommend that people with low back pain consider treatment with Tylenol or non-steroidal anti-inflammatory drugs (NSAIDs), as well as heating pads and exercise.
I’ll put him on preteen nubiles Google is hoping that the Chromecast will be third-time lucky in its attempts to crack the TV market. It’s certainly a much better piece of kit than the Q, and at the $35 price point it could be a very attractive buy for a lot of people. ®
This site is crazy 🙂 secret teen porn Rescue crews worked overnight to access the smouldering wreckage of twisted metal and free survivors. Images of the disaster site showed dozens of bodies laid out on the ground covered with blankets.
We work together upskirt lolita modeling A Liberal Democrat source said: “The Conservatives have putno properly worked-up policies in front of us. (We) will notallow the Conservatives to undermine our commitment to theenvironment, hurt the fuel poor, or destroy our renewable energyindustry.”
I’m not interested in football hot young cunts Just three days after Wang showcased his collection Rihanna steped out in London with the statement sweater, coated jeans by J Brand and white pumps by Manolo Blahnik… but she wasn't the first to rock the trend however. Oh no, it was Alexander's cute as a button niece Aila Wang that stole the show with her miniature Parental Advisory T-shirt, black skirt and socks with sandals combination- a true 90s baby!
I work with computers 15 yo russian lolita Like wars that are fought until both sides tremble with exhaustion, our economic destiny will always be based on how each of us abuse the system. The only law that really prevails is the law of “survival of the fittest”.
We’d like to offer you the job asian child lolita preteen Compiled from the work of hundreds of scientists, the report faces extra scrutiny this year after its 2007 edition included an error that exaggerated the rate of melting of Himalayan glaciers. An outside review later found that the mistake did not affect its main conclusions.
I’m happy very good site legal preteen nonude To say BlackBerry has been struggling over the last few years would be an understatement. Once the smartphone king, the company fell behind when it failed to cater for the social crowd as well as the businessman. The company has made a lot of progress with BlackBerry 10, but many are worried that it’s too little too late. However, if the latest rumors are to be believed, the company may not be very concerned with what everyone else thinks for much longer.
I’m sorry, I didn’t catch your name today teen model SEOUL, South Korea – Asiana Airlines said Sunday its reputation was damaged by a report on a San Francisco TV station that used bogus and racially offensive names for four pilots on its plane that crashed earlier this month and is considering legal action.
Very Good Site collection free preteen Meena Kumari fled as soon as the children began falling ill after eating the lunch cooked at the school in Bihar state. Twenty-three children between the ages of 5 and 12 died after eating the meal and many others fell ill.
I’m sorry, he’s lolita teen sexe Sources close to the matter have told Reuters thatBlackBerry is in talks with Cisco Systems Inc, Googleand Germany’s SAP AG among others, about selling themall, or parts of itself. The potential buyers have declined tocomment.
One moment, please teen pantyhose lolita A resident of Falmouth, Hulit was a senior vice president for commercial lending at Citizens Bank before joining the SBA, and was a deputy director in the Maine Department of Economic and Community Development.
It’s a bad line upskirt lolita modeling “But if the new law tightens rules as suggested by the ministry of home affairs, which disallows surrogacy for same-sex couples and single parents, then it will clearly impact the industry and put off clients coming from overseas.”
Could you ask him to call me? russian girl lolitas bbs A townhouse around the corner, on Fifth Ave., is going for close to $3.5 million. In Harlemâs northwestern corner, on Riverside Dr. near W. 150th St., a three-bedroom apartment is listed for just over $1 million.
How do you know each other? 12 year old fuck With interns unlikely to rebel against working “all-nighters”, Professor Andre Spicer from London’s Cass Business School said the banks themselves needed to impose limits and question just how productive and healthy long hours are.
What sort of music do you listen to? hot preteen forum While an early decision application can give you a slight advantage in the admissions process because you will be among the first applicants to be reviewed, it will not make or break the decision.
Jonny was here teen nymphet russian topsite That’s why Colletti gave Uribe a three-year, $21-million contract after Uribe helped the Giants win the 2010 World Series. Uribe has been hurt and ineffective for much of the pact, hitting .204 and then a career-worst .191 his first two seasons in L.A. before rebounding this year. Colletti heard plenty of criticism for that contract, though not Monday night.
Have you got a current driving licence? teen golf porn “There is obviously an element of trust from consumers in what supermarkets are providing,” said Neil Mason, head of UK retail research at Mintel. “Supermarkets are trying to bring down prices but they need to be much more transparent – the Which? research shows there is a difficulty in like-for-like comparisons.”
I enjoy travelling lolita movie sexe Hereâs the catch: Walton claimed she owed no gift tax when she set up the trusts, because, under the IRSâs valuation formula, nothing would remain for her daughters. She claimed, in essence, she was just shifting money out of one pocket and into another, with no tax consequences.
We were at school together nude pedo pix Emma Stone and Andrew Garfield are definitely feeling the love on set of “The Amazing Spider-Man 2.” The reel-to-real life couple were spotted sharing a smooch while filming in New York City on June 2, 2013.
We’ll need to take up references hot preteens fucking
The researchers found that people with non-melanoma skin cancer had a 4 per cent lower risk of suffering a heart attack, compared with people without cancer. They also had a 48 per cent lower risk of dying from any cause. Risk of hip fracture in people aged under 90 was also reduced.
I’m not interested in football premodels teen The claims of abuse came as a blow to Mr Rudd’s “hard-line” pledge last week to transfer all boat people to offshore island detention centres. The plan was embraced by the opposition but dismissed by aid groups as cruel and by legal experts as a breach of international law.
Can I take your number? junior teen nude lolitas Instead he was true to his word that his family was the priority in making a decision, as he didnât want to take his three kids out of schools in Westchester after six years here and start over somewhere else, even if it was in his native Chicago.
I’d like to change some money pedo cp lolitas In a scandal now known in San Diego as “Grope-gate,” Filner is alleged to have sexually harassed three women. One is a city employee — presumably McCormack Jackson — one is an unnamed campaign volunteer and one is an unnamed constituent supporter. They claim Filner groped, forcibly kissed and inappropriately touched them. The alleged incidents took place in the mayor’s office, on the street and in a car.
Could you send me an application form? pedo sites russian The opening skit referred directly to that Twittered-over event while depicting a post-apocalyptic New York. When asked what brought about the downfall of America, cast member Kenan Thompson deadpanned, “the MTV Video Music Awards.”
Gloomy tales teen power porn Ecclestone was savvy in building his power base in F1 from the 1970s and helped to create the Formula One Constructors’ Association that controlled the business side of the sport, including selling the TV rights.
Another service? images of pedo “Telstra has been a darling stock for the last two and halfyears…Today’s product figures coupled with the slight beat onearnings look like justification for this darling label,” saidIG analyst Evan Lucas in a note.
Your account’s overdrawn youngest porn bbs Pelosi said if Boehner did so, they would agree to theRepublicans’ government funding level for the next six weeks,more stringent than the Democratic level, which has already beenapproved by the Senate.
Where are you calling from? portal heaven preteen The SEC’s vote took place a week after Harbinger Capital’sbankrupt wireless communications firm LightSquared Inc announcedplans to go to trial with its lenders over whether Dish Network Chairman Charlie Ergen’s acquisition of big chunks ofits loan debt violated an agreement pertaining to howLightSquared can restructure.
I’d like , please lolitas sites top In response EE said: “Our coverage checker is regulated by Ofcom and offers a prediction of our network coverage across the UK. In this instance, we deemed coverage to be Excellent in the postcode as confirmed by testing that found over 98% of the postcode had an excellent signal.”
Best Site good looking preteen candid photos “If you travel to Yemen against our advice, you should regularly reassess your security and plan any movements around the country carefully. The provision of close security protection and/or a military escort is extremely important for those working and moving around in Yemen.”
i’m fine good work nude lolita china The Liberty honored Smith before the game. Smith announced earlier this year that she would retire at the end of the season. The 15-year veteran, who is the league’s No. 2 all-time leading scorer, was given a framed USA basketball jersey, a collage of photos of her playing career among her gifts.
How much does the job pay? dak lolitas net “The ground is verging on good, good to soft and if there’s minimal rain it could be beautiful ground by Sunday,” Lady Lloyd-Webber’s racing manager, Simon Marsh, said. “It is €16,000 [£13,500] to take her out on Friday but at the moment she is a runner.”
Could you please repeat that? pink lolita links “What we are thinking through is, what is it that would give us some confidence today, would put some time on the clock, stop their nuclear program from moving forward, while we get to that comprehensive agreement that would allow the full sanctions relief they are looking for,” Sherman said.
Where do you live? youngest porno models Considering his inability to stay healthy in recent seasons, the Knicks arenât going to rush their former All-Star performer back on the floor. When they have an open practice Sunday at Columbia University, he will be limited after the team sees how he responds to Saturdayâs workload.
Can you hear me OK? mature young boy “This is a Normandy invasion of the health system,” said UweReinhardt, a healthcare economist at Princeton University.”Eventually, lower-income people will be pleasantly surprised athow little health insurance will cost them with the subsidies.”
I’m afraid that number’s ex-directory pthc img pic gold * “The results of the upper house election were in line withexpectations, so there was no surprise. The bond marketparticipants were waiting for any fresh reaction from equitiesor FX markets,” said Naomi Muguruma, senior fixed-incomestrategist at Mitsubishi UFJ Morgan Stanley Securities.
I can’t get through at the moment young naked cheerleaders If Peavy can deliver a start like this in Game 4 of the next two rounds pitching behind Jon Lester, John Lackey and Clay Buchholz, the Red Sox are going to be tough to beat, especially now that theyâll be able to set up their rotation while the A’s and Tigers burn a top starter in Thursdayâs Game 5.
The National Gallery bbs renos kdz Apart from the improvement to bottom lines, the games are a morale booster for a country unnerved by more than 20 years of economic stagnation following the bursting of its 1980s financial bubble. As the population ages and shrinks, companies have even less incentive to make the sorts of substantial investments needed to spur sustained growth.
I want to report a tiny litte lolita cp The U.S. and China introduced a new round of sanctions against North Korea at the United Nations that the U.S. said would significantly impede the development of Pyongyang’s nuclear and missile programs, in response to its test last month of an atomic bomb.
I’m from England bbs renos kdz A combination of rising wealth, lower fertility rates and asmaller working-age population in developed countries willdepress economic growth. Fewer younger people in the workforceand more older, retired people could translate into lower stockreturns.
Where do you come from? preteen modeling underware A what? It sounded horrendous. No, it certainly wasn’t OK. I grabbed the kit and told them I was confiscating it. I had no idea what a ‘Harlem Shake’ was – but it sounded as if it would certainly lead to mayhem in a packed dining hall.
No, I’m not particularly sporty youngest porn bbs Apple is expected to sell 33 million to 36 million iPhonesin its fiscal fourth quarter, rising to over 50 million in thetypically strong holiday quarter, which will mark the first fullquarter of sales of the new iPhones.
I’m at Liverpool University yung lolita porno In a research note, Credit Suisse said Pepsi bottler Cultiba would suffer the most from the levy given its cheaper price point. Banorte highlighted Arca as the biggest loser as 84 percent of the company’s volume is potentially affected.
The United States lolitas 69 “It was something people could have found out about. Like no one knew at the show for years, and Johnny held the secret the whole time. And I always felt so scared. If it came out, what could happen? Could I lose my career? Will I ever be able to play a straight role again?”
How much were you paid in your last job? young little lolita pussy Forecasters say there is a prospect of more flooding, particularly in urban areas, although the worst of the weather is expected to give way to dry spells by Tuesday, and temperatures around 23C (73.4F) in London.
I’m happy very good site preteen thumb pics The sweetened offer, which Michael Dell and Silver Lake called their best and final proposal, comes after the group refused for months to consider a raised bid despite growing opposition from Icahn and other shareholders.
How much were you paid in your last job? russia sandra teenmodel “There was some anecdotal evidence of people who came downwith MERS after contact with sick camels, but this is the firsthard evidence that camels may be a missing link in the chain oftransmission,” he said. (Additional reporting by Stephanie Nebehay in Geneva, editingby Andrew Roche/Mark Heinrich)
Have you got any qualifications? free sexy lolita video The legislation is part of a broader attempt by Putin to win over Russians in the mostly conservative country following protests against his rule among urban and often middle-class voters over his return to the Kremlin in May 2012.
Special Delivery hardcore amature lolita teenies Like I already said the screen is very good. The contrast is awesome and the colors are very shiny â but typical for an AMOLED also a bit oversaturated, even after configuring it with Nokia Color Profile. The sharpness is great too, but not as great as on the Lumia 920 because the Lumia 1020 has PenTile-Matrix. This is normal for most AMOLED screen but means the pixels contain only two sub pixels (red and green, green and blue) unlike the 920 which has three (red, green and blue). The screen is a little less sharp and pixels are noticeable. Itâs not as bad as I sounds, though. Another points the 920 does better than the 1020 are the viewing angles. While the 920 has very stable viewing angles with the colors not getting washed out the 1020âs display really doesnât do that good. When watching from the side the colors get pallid.
Some First Class stamps preteen model lolita samples “Ofcom will prevent rampant price rises, it is suggested but so too will market forces. It is argued by some that the future of the Royal Mail is in the delivery of parcels and packages, as internet shopping replaces the high street. But that means Royal Mail will have to compete with the established courier and parcel market. The adoption by taxpayers of the Royal Mail pension liabilities, will give the float a chance, but the price has to be right, if this is going to succeed.”
I’ve lost my bank card secret teen porn For all those defending Manning/Snowden, if their leaks lead to a weakening of the effectiveness of the intelligent services and this leads to the deaths of soldiers or another 7/7 or 9/11, on who’s conscience will it be?
What line of work are you in? free hot lolitas pic âIf you look at him this time last year, the same questions were coming. Then all of a sudden after a few weeks off he wins the PGA,â McGinley says. âHe is never going to be a Nick Faldo who is going to flatline. We just have to accept that and let him get on with it.â
I’ve lost my bank card nymphets lolita sex video None of the dinner guests had ever regressed into past lives, but everybody was curious, and four people offered to be subjects. We all crammed into Hwin’s doll house. There was a couch, and some crude seating, and a bed framed in red velvet curtains. The lights were off, and so we lit some candles. The subjects lay on the bed or on the floor. “Should we decide who’s going to be the one I converse with if someone does go under?” Serge asked.
A First Class stamp free preteen chat “One of the first things I do with a client is to have them imagine someone who is dependent on them and it can be a real motivation to act,” says Arden Rodgers, a financial advisor who owns Arbus Capital Management. “A proud parent who pictures their child at graduation has something to save for.”
I like watching TV collection free preteen This is largely because of accounting conventions, whichrequired Lloyds to deduct the embedded value of the insurancecompany from its assessment of its core Tier 1 equity, adeduction that will no longer have to be made.
Punk not dead underage sex toons But heavyweight mining stocks were the top gainers inEurope, after data showed Chinese factory output rose 9.7percent in July from a year earlier. That was the fastest pacesince the start of the year and added to recent data suggestingthe world’s biggest metals consumer may be stabilising aftermore than two years of slowing growth.
What part of do you come from? young russion lolita pics The debt offering that garnered the most criticism was aprivately placed $3 billion 10-year bond in late March, whichdebt capital market banking sources said made its debt moreexpensive and netted the U.S. investment bank $700 million inprofits, according to IFR.
We used to work together bbs renos kdz The findings showed that women rated kissing as generally more important in relationships than men. Plus, men and women who rated themselves as being attractive, or who tended to have more short-term relationships and casual encounters, also rated kissing as being more important.
How many weeks’ holiday a year are there? sexe nymphette teens Perhaps the biggest risk to the value of mortgage REITS is asharp rise in interest rates. Kieffer sold about 40 percent ofhis mortgage REIT holdings after rates went to all-time lows andseemed likely to him to reverse course. He was right, althoughhe said the extent of the decline caught him off guard, and heacknowledged increasing his positions, which he did early thissummer, too soon.
US dollars frfree teen porn gallery Consolidated net profit for the three months ended Sept. 30rose to 19.32 billion rupees ($314.15 million) from 15.04billion rupees a year earlier, Wipro said in a statement afterthe close of markets on Tuesday.
I’m about to run out of credit pedo loli guestbook With help from her children and grandchildren, Pazâs staff makes $2.50 tacos and heaping platters of $8 chiles rellenos or chicken mole poblano with rice and beans, plus weekend extras like tamales and $7.99 posole, or chicken and hominy soup.
What part of do you come from? underage fuck tgp Diplomats were allowed to board the Arctic Sunrise for two hours to meet with activists from their countries. Late Tuesday, the activists were driven to the Investigative Committee’s headquarters in Murmansk for several hours of questioning, and after 2 a.m. local time Wednesday (2200 GMT Tuesday) Associated Press reporters saw them bused to a detention facility.
What’s the last date I can post this to to arrive in time for Christmas? underage erotica videos Bigger Indian carriers such as Bharti Airtel Ltd,Vodafone Group Plc’s local unit and Idea have raisedprices by cutting discounts in the highly-competitive mobilephone market after a court order invalidated the permits ofseveral smaller rivals, forcing them to shut or scale back.
I’m in my first year at university premodels teen As University of Delaware physicist Bakhtiyar Ruzybayev, the study’s corresponding author, points out in the scientific figure (above) submitted to the journal, the cosmic-ray energy spectrum does not follow a simple power law between the “knee” around 4 PeV (peta-electron volts) and the “ankle” around 4 EeV (exa-electron volts), as previously thought, but exhibits features like hardening around 20 PeV and steepening around 130 PeV.
I’ve just graduated girls hunting model Investment-grade was mostly unchanged and the Asia ex-JapaniTraxx IG Index closed at a similar level as it had yesterday,quoted at 143bp-146bp. The wider-than-usual bid-offer spreadindicated the illiquidity of the market.
Directory enquiries youngest porn bbs It’s a position endorsed by the Federalists, who envisioned America’s future as a commercial republic, and by the anti-Federalists, or at least James Madison, who wrote approvingly of Congress’ power in this regard in Federalist 43. In short, there was virtual unanimity on this point, not just for commercial purposes, but because copyrights were a partial guarantor of the right of free expression later made explicit in the First Amendment of the Bill of Rights.
Are you a student? bbs flash When I moved there in 2004, I walked into the stadium and felt the history and expectation. I walked into the trophy room and was reminded of Real’s great history. I went into the dressing room and saw all these famous players, my new team-mates. It is special. Gareth will love it.
When do you want me to start? youngest girl rape The couple's children died in the blaze at their home in Scott Court, Helensburgh, Argyll and Bute, on July 24 2011, while 55-year-old Mr Sharkey Snr died of his injuries in hospital six days later.
I read this piece of writing fully on the topic of
the comparison of most recent and earlier technologies, it’s amazing article.
https://tinyurl.com/ recently posted..https://tinyurl.com/
Thank you for sharing your thoughts. I truly appreciate your efforts and I will be
waiting for your further write ups thank you once again.
gamefly free trial recently posted..gamefly free trial
Heya just wanted to give you a quick heads up and let you know a few of the images aren’t loading correctly.
I’m not sure why but I think its a linking issue. I’ve tried it
in two different browsers and both show the same results.
Chassidy recently posted..Chassidy
[url=http://buyalbuterol24.us.com/]discover more here[/url]
Quality articles or reviews is the crucial to attract the people to pay a visit
the site, that’s what this web site is providing.
http://tinyurl.com/y3xqlb4g recently posted..http://tinyurl.com/y3xqlb4g
Just wish to say your article is as amazing. The clearness in your
post is simply spectacular and i can assume you are an expert on this subject.
Fine with your permission let me to grab your feed to keep
up to date with forthcoming post. Thanks a million and please keep up the rewarding work.
Bichara Previc recently posted..Bichara Previc
whoah this blog is great i love studying your articles.
Keep up the good work! You already know, lots of individuals are looking around for this information, you
can help them greatly.
Grupo Coral recently posted..Grupo Coral
Appreciate the recommendation. Will try it out.
Marcus recently posted..Marcus
[url=http://buysildenafil24.us.org/]sildenafil online canada[/url]
Your means of describing all in this post is genuinely fastidious,
all can easily be aware of it, Thanks a lot.
http://tinyurl.com/y5k3qv6m recently posted..http://tinyurl.com/y5k3qv6m
I’m very pleased to find this site. I wanted to thank you for your time for this particularly
wonderful read!! I definitely savored every bit of it and I have you bookmarked to look at new
things in your site.
Bruce recently posted..Bruce
Heya i’m for the first time here. I found this
board and I find It truly useful & it helped me out a
lot. I am hoping to provide something again and aid
others such as you aided me.
http://tinyurl.com/yyj6uzhm recently posted..http://tinyurl.com/yyj6uzhm
What line of work are you in? xnxx tube The $300,000 in Extell cash given to Cuomo since 2012 does not include $100,000 that The News reported Barnett gave to a state Democratic Party campaign account the governor was tapping to push his agenda. That contribution came on Feb. 19, less than three weeks after he signed the bill.
Incorrect PIN wallpaper jbj Kerry’s remarks differed as he condemned violence on all sides of the Syrian civil war. The short joint statement Friday morning followed news that the Assad regime had agreed to a U.N. chemical weapons treaty on Thursday.
Have you got a current driving licence? levitra vs cialis vs viagra cost 143 Days after Devinâs death, John Hover, who worked as a foreman at Collins Lumber in Troy, was killed after his truck hit another vehicle head-on as he returned from surveying his charred home, the paper reported.
I’m not working at the moment cialis narucivanje The crisis over the July 28 election is Hun Sen’s biggest political challenge in two decades and threatens to destabilize the small, fast-growing Southeast Asian nation that has built strong economic and political ties with China in recent years.
What part of do you come from? lolitas pedo cp underage As well as publishing the Marriage and Civil Partnership (Scotland) Bill, the Scottish Government published details of an agreement with the UK Government on changes to be made to the Equality Act to protect individual celebrants who may not want to conduct same-sex ceremonies even if their church, as an organisation, backs them.
Stolen credit card yuvutu tube videos “Managers may be pushed into smaller, less liquid credits since those loans are likely to have covenants”, said Justin Plouffe, principal at The Carlyle Group. Since these loans tend to be smaller, panelists agreed that credit selection becomes critical for limiting potential losses if an issuer runs into trouble.
I enjoy travelling viagra available over the counter in canada Late Thursday night, First Manhattan won what had become anincreasingly bitter proxy battle at Vivus, where it is thelargest shareholder with a 9.9 percent stake. First Manhattangained a six-person majority on a newly reconstituted board andthe right to bring in a new chief executive to run thedrugmaker.
I’d like to order some foreign currency wallpaper kgf yash photos hd “He argued that the prolonged shutdown is having adverse consequences on consumer confidence and businesses, and is hurting local economies across the country that rely on tourism at national parks and monuments,” the White House said.
US dollars the all lolita site underage nude The impasse makes it more likely there will be no agreement when markets reopen Monday morning. If an agreement is not soon reached, it may be impossible to pass anything before October 17, the day the Treasury Department says the government risks default if Congress does not extend the government’s ability to borrow money.
I’m on holiday 12yr lolita bbs preteen America, we have made it through the worst of yesterdayâs winds. And if we find the courage to keep moving forward; if we set our eyes on the horizon, we too will find an ocean of tomorrows, a sky of tomorrows â for Americaâs people, and for this great country that we love.
I have not checked in here for a while since I thought it was getting boring, but the last several posts are great quality so I guess I will add you back to my everyday bloglist. You deserve it my friend 🙂
There is evidently a bunch to realize about this. I assume you made various nice points in features also.
I have recently started a web site, the information you offer on this site has helped me tremendously. Thanks for all of your time & work.
I’ll text you later banana viagra The company last year also named Timothy Dattels, a senior partner at private equity firm TPG Capital LP, to its board of directors, sparking a flurry of speculation that BlackBerry may consider a leveraged buyout, or going private.
Will I have to work on Saturdays? buy viagra over the counter in sydney Messages seeking comment from Sen. McCain, R-Ariz., were not immediately returned early Wednesday, but Killmeyer, who survived the fire as a 20-year-old sailor, told FoxNews.com that the sale marked a âsad dayâ for all Americans.
What sort of music do you like? nizagara india The rulings, taken together, raise broad issues for the nearly 38 million taxpayers who claim charitable writeoffs. The charitable writeoff is one of the largest, worth some $175 billion in tax year 2011, according to Internal Revenue Service data. (Americans give away far more than that, but only those who itemize on their tax returns are allowed to take the charitable deduction.)
Do you like it here? yuvutu tube mobile
Alstom is already testing a 1-MW turbine in Scottish waters.Britain has 12 large-scale prototype sea turbines in operationwith a generating capacity of 9 MW of clean electricity, morethan the rest of the world combined.
A First Class stamp al4a General manager Sandy Alderson said the Mets think they can get Harvey and Wheeler to the end of the season with scheduled off days and maybe a skip in the rotation here and there. Collins also is planning to pull the young pitchers earlier than he has.
I’ll call back later vad oar nizagara After the event it felt like a sudden drop. You gear yourself up for the moment, you aim towards it, and then it’s just all gone. It was quite a drastic shift. There was a bit of a sense of anti-climax, but in a good way. We breathed in and we needed to breath out.
On another call super nizagara forte tab Emerging market bond funds had $200 million in outflows inthe latest week, reversing inflows of $600 million the priorweek. Investors showed appetite for high-yield junk bond funds,however, which pulled in $1.3 billion in new cash in the latestweek. The inflows marked their fourth straight week of newdemand.
Will I get travelling expenses? can you buy viagra online without prescription They have been doing things with each update to reduce lag (for example, the draw distance in the game has been shortened significantly since I first started playing); but each update also adds more stuff and more demands on the system… so, lag still remains an issue.
good material thanks cialis anglais With the shutdown dragging on, Obama, who canceled a trip to Asia to focus on the domestic crisis, appeared in public for the third day in a row to urge congressional Republicans to allow votes to re-open government and raise the nation’s borrowing limit.
An accountancy practice yuvutu tube “This study confirms what we have already sensed, that there is a family history of tobacco use among many smokers,” Spangler said. “We know that people are more likely to uses substances like alcohol based on family history, the same holds true for tobacco use.”
I sing in a choir xnxx mobile
“I still struggle with anorexia on a day-to-day basis and probably will for a long time,” she said, “but the important thing is I don’t have to look thin for my job anymore and I’m happy with myself whatever I size I am.”
I’d like to order some foreign currency al4a tube âGenetics does play a part,â Campbell said. âEven though you can be the healthiest person in the world, you still may have high cholesterol or you may have a family history of heart disease. Heâs doing everything right in overcoming any genetic predisposition, but a lot of heredity goes into it.â
We were at school together al4a my roomate’s sister makes $80 every hour on the laptop. She has been out of a job for 6 months but last month her payment was $13200 just working on the laptop for a few hours. Read more on this web site……WWW.Rush64.COM
Is this a temporary or permanent position? yuvutu videos “It was important to me to get back as soon as possible and get in some games before the postseason starts,” Ellsbury said. “I know I’m pleased, the team is pleased, and the docs were on board that I could go and play. It was nice getting back. Felt pretty good out there.”
Best Site Good Work expres cialis But food and compound nouns have a long history. The word “brunch” first appeared in Punch in 1895, and there's no reason why the trend shouldn't extend to elevenses, says food writer Nigel Barden.
Until August xnxx tube “In the face of this awfulness, many of us will at least always remember him as we last saw him: outrageously, uproariously happy, looking forward to his next adventure with the biggest grin his face could hold,” Matthew Rorie, product manager at Giant Bomb, said in a message posted on the site.
When can you start? kazz310 pthc models BEIJING â Popular but controversial Chinese politician Bo Xilai was sentenced to life imprisonment by a Chinese court Sunday. Disgraced by his wife’s murder scandal, and his police chief’s attempted defection to the USA, Bo was found guilty of bribery, embezzlement and abuse of power, according to the court’s microblog.
Incorrect PIN cialis c800 Fox Sports 1, the company’s new cable channel, launches Aug. 17. Fox has been aggressively chasing rights to bolster its content, but there weren’t a lot of options in the immediate future because of the increasing length of sports deals.
Where did you go to university? wallpaper rick and morty Japan posted the strongest growth among the Group of Seven powers in the first half, expanding at an annualized 3.8 percent rate in the second quarter after a 4.1 percent surge in the first. Abe chose Tuesday for the announcement as it should give him the final economic justification he needs: the release of the “tankan” survey from the Bank of Japan.
I’d like , please yuvutu videos The Treasury Department and the IRS ruled Thursday that all legally married same-sex couples will be allowed to file joint federal taxes even if they live in states they do not recognize same-sex marriage.
I’ve been made redundant yuvutu tube videos Its French unit is the main part of the remaining business and could be worth over 4 billion euros based on current earnings before interest, taxes, depreciation and amortization (EBITDA) of 360-380 million euros and sector multiples of 10.5-11.5 times EBITDA, the sources said.
Go travelling al4a mobile
âJane Austen seems to be all over the place,â he says. But like many die-hard Janiacs, he fears that the overbranding of Austen â with big-hit parodies like âPride and Prejudice and Zombiesâ and trendy tote bags emblazoned with Austen quotes â belittles her work. âIt trivializes her and it diminishes the fact that she really was a subversive writer,â he says.
i’m fine good work lookig cialis This year’s anniversary comes amid heightened tensions over disputed East China Sea islands controlled by Japan but claimed by China. Tokyo’s purchase of the islands from their private owners in September sparked violent anti-Japanese protests in a number of Chinese cities.
I can’t get a dialling tone al4a videos The research follows a 2010 study from the UK’s University of Sheffield that found that in societies with high birth rates, neurotic women and extraverted men are likely to have more children. That study was published in the journal Proceedings of the National Academy of Sciences.
Directory enquiries dee desi pink lolita Melissa Allen, who lives nearby, said her 18-year-old daughter called her Friday morning, saying she had heard a violent argument from a nearby house and had seen the homeowner with propane tanks. Allen said she told her daughter to hide in a back room with her younger brother.
I’m on a course at the moment al4a As it will be for millions more. Not long ago, the Congressional Budget Office announced that a key promise of the law could not be delivered. The president had pledged that if you wanted to keep your current employer-provided health insurance, you could under Obamacare. But according to the CBO, that will not be true for at least 7 million workers who currently receive coverage. Thanks to one detail or another of the law, they will be thrown out in the cold.
hln benefits of hemp oil
[url=http://buyviagra365.com/]buying viagra with mastercard[/url] [url=http://buyvaltrex24.us.com/]valtrex without prescription[/url] [url=http://buyventolin24.us.org/]no prescription proventil inhaler[/url] [url=http://buypropecia24.com/]generic propecia prescription[/url] [url=http://buycialis247.us.org/]Order Cialis[/url] [url=http://cheapviagrapills.us.com/]cheap viagra pills[/url] [url=http://sildenafil03.us.org/]sildenafil citrate[/url] [url=http://genericlasix2019.com/]no prescription lasix[/url] [url=http://buy-propecia.us.org/]buy propecia[/url] [url=http://sildenafil01.us.com/]homepage[/url] [url=http://buycialis247.us.com/]generic cialis[/url] [url=http://buyviagra247.us.com/]cheap viagra[/url] [url=http://buyalbuterol24.us.org/]albuterol 90 mcg inhaler[/url] [url=http://genericventolin2019.com/]ventolin tablets[/url]
[url=http://genericlasix2019.com/]Lasix Without A Rx[/url] [url=http://buyviagra247.us.org/]generic viagra[/url] [url=http://genericpropecia2019.com/]propecia hair growth[/url] [url=http://buyalbuterol24.com/]albuterol[/url]
This post is priceless. Where can I find out
more?
Jack recently posted..Jack
With havin so much content and articles do you ever
run into any issues of plagorism or copyright violation? My blog has a lot of exclusive content I’ve either authored myself or outsourced but it appears
a lot of it is popping it up all over the web without
my agreement. Do you know any solutions to help prevent content from
being stolen? I’d certainly appreciate it.
Shelton recently posted..Shelton
Why people still use to read news papers when in this technological world the
whole thing is presented on web?
http://tinyurl.com/y653qxsd recently posted..http://tinyurl.com/y653qxsd
seb gsn casino
Yes! Finally someone writes about ig.
Shoshana recently posted..Shoshana
rqg [url=https://onlinecasinoss24.us/#]bovada casino[/url]
oyr slots online
[url=http://sildenafil01.us.com/]buy sildenafil[/url] [url=http://genericlevitra2019.com/]levitra super force[/url] [url=http://generickamagra2019.com/]Generic Kamagra[/url] [url=http://levitra20mgprice.us.com/]levitra 20mg price[/url] [url=http://buylisinopril24.com/]Lisinopril No Prescription[/url]
moj casino online
[url=https://cheapprednisolone.com/]prednisolone 10 mg[/url] [url=https://buydoxycyclinewithoutprescription.com/]doxycycline prescription[/url] [url=https://ventolinhfainhalers.com/]buy ventolin online[/url] [url=https://buyacyclovirnoprescription.com/]buy valacyclovir online[/url] [url=https://femaleviagra5.com/]female viagra[/url] [url=https://buysildenafil50.com/]sildenafil[/url] [url=https://valtrex500mg.com/]where to buy valtrex[/url] [url=https://tadalafilgeneric20.com/]generic cialis tadalafil[/url] [url=https://viagrasoftonline.com/]viagra soft[/url] [url=https://metformin1000.com/]buy metformin[/url]
qmd cbd oil in canada
[url=http://buysildenafil247.us.org/]sildenafil 50 mg[/url] [url=http://buylisinopril24.com/]lisinopril[/url] [url=http://genericlexapro2019.com/]generic lexapro[/url] [url=http://genericsildenafil2019.com/]generic sildenafil[/url] [url=http://buykamagra24.com/]cheap kamagra[/url] [url=http://buyneurontin.us.com/]Price Of Neurontin[/url] [url=http://buytrazodone.us.com/]Trazodone No Script Needed[/url] [url=http://cheapviagrapills.us.com/]order viagra[/url] [url=http://buytadalafil247.com/]tadalafil online canada[/url]
jiz free casino games no download
This is one awesome blog article.Really thank you! Want more.
They want to change their current location into seeking a foreign husband to finance them with this country. New Zealand Appeal Judges will apply the law fitnessmodel i can appreciate constructive criticism but “Abandon short story writing”?
I reckon something really special in this internet site.
What’s Happening i am new to this, I stumbled upon this I’ve discovered It positively useful and it has helped me out loads.
I am hoping to give a contribution & assist different
customers like its aided me. Great job.
Corina recently posted..Corina
jxl casino online
lph hemp oil cbd
We need someone with experience imitrex 25 mg dosage VUL’s problems lie in its complexity — comparison-shopping is difficult — and fees, which Consumer Federation of America actuary James H. Hunt says can cut up to three percentage points from annual returns.
International directory enquiries zithromax tri pack Fiat started accumulating Chrysler stock in June 2009 as part of the government and labor-union bailout of the U.S. carmaker, which was losing as much as $100 million a day. Rather than paying cash for the initial 20 percent holding and subsequent 15 percent stake, Fiat provided management and technology and helped Chrysler meet performance milestones.
I’d like to take the job imitrex cheap Steven Salzberg, a professor of medicine and biostatistics from John Hopkins School of Medicine, accused them of “an outrageous display of chutzpah” and says Fouchier “is deeply confused about the possible benefits of this work”, which Salzberg argues are marginal at best.
What do you do for a living? paxil weight gain omega 3 vitamin e Morgan Stanley & Co won the competitive sale, which had atop yield of 3.05 percent for a bond maturing in 2022 with a 3percent coupon. The debt was rated Aa2 by Moody’s InvestorsService and AA by Standard & Poor’s Ratings Services. OnTuesday, top-rated nine-year bonds yielded 2.63 percent onMunicipal Market Data’s benchmark scale.
Looking for work is there a generic paxil cr “Wirathu’s rhetoric is flush with conspiracy and paranoia. He claims that Muslim merchants receive cash injections from Middle East oil state brethren and use these funds to undercut Buddhist rivals. He claims Muslims have infiltrated the camp of Aung San Suu Kyi, the nation’s widely revered Nobel Peace Laureate and parliamentarian, along with other respected freedom icons.”
I’m a housewife eriacta information One effect is that fewer young doctors choose to go into primary care. Another is that existing primary care docs cram more and more patients into their schedules to make up cost on volume and, as a result, have only a few minutes to consult with each one (see Candice Chen, “A Day in the Life of a Primary Care Doctor,” page 42). “If you run a practice and have bills to pay—that’s going to weigh on you,” says Kavita Patel, a primary care internist at Johns Hopkins Medicine and former health care adviser at the White House. “I see twenty-eight patients in a day. I spend seven to eight minutes with a patient. That’s unrealistic—it’s crazy.”
Can I take your number? how much does retin-a cost in canada Georgiou said: “Mushrooms are essentially nature’s recyclers in the outdoors. They break down organisms and matter, and turn it back into nutrients for other organisms to use. So, in that sense, it’s breaking down the coffee and then using it as a food for which to grow food for us.”
I’d like to open a business account zithromax z pac Aug 16 (Reuters) – Speculators increased their bearish betson U.S. 10-year Treasury note futures in the latest week amidworries the Federal Reserve might pare its monthly bondpurchases, according to Commodity Futures Trading Commissiondata released on Friday.
I was born in Australia but grew up in England purchase zithromax no prescription Families waste an average of £700 a year on food that is thrown away in the home, according to the Waste and Resources Action programme (WRAP), which worked with Tesco to bring in the changes.
Which university are you at? escitalopram 20 mg reviews Look, I think it’s very important we get this straight. The impending royal birth will be a cause for great celebration up and down the country. I don’t know what the Duke and Duchess of Cambridge plan to call their baby, but I’m reasonably sure they won’t name it after Len McCluskey, the deeply sinister figure who dictates all Labour party policy and who has yet to respond to very serious allegations that he once snatched a lollipop from the hands of a frightened little girl and threw it into the path of an oncoming bus while cackling very loudly indeed.
I work for myself legitimate online pharmacy priligy Despite government assurances that the discovery is huge andlow risk, many major world oil companies that had shown stronginterest in previous auctions, such as Exxon Mobil Corp,Chevron Corp and BP Plc, stayed away.
I work with computers wann wirkt tadacip Google was a relative latecomer to the game of capturing dangling value by offering free email, of course, but it did come to dominate this game. When it comes to documents, whatever one might say about the functional limitations or collaborative advantages of Google Docs, the fact is that for users, they are free. And a growing number of users are happy to let someone else pay for our use of these tools, as long as all that’s asked of us is that we give that someone access to our information when we press “I accept.
I work for a publishers is it legal to buy paxil online Federal regulations require employers to receive permission from job candidates before running credit checks and to disclose that a negative credit report factored into any decision to deny an applicant. But these rules are difficult to enforce, since employers can always cite other reasons for declining a job applicant.
I don’t know what I want to do after university sumatriptan succinate 100 mg oral tab SINGAPORE, Oct 24 (Reuters) – Singapore’s central bank andstock market operator are conducting an extensive review ofrecent share price volatility in three inter-linked Singaporecompanies, which wiped out billions of dollars in combinedmarket value from the firms.
I’d like some euros adcirca mg A big reason for the decline is the growth in part-time jobs, which have surged as more women entered the workforce and the number of restaurants, shopping malls, and other establishments that employ part-time workers have exploded.
I came here to study canadian pharmacy tadacip Joseph Robert Patterson, the 27-year-old boyfriend of the childâs mother, was arrested and charged with felony counts of aggravated battery of an infant and aggravated assault, and Lincoln County, S.D., Stateâs Attorney Thomas Wollman told the Daily News Friday that in the wake of the childâs death, his office would be âlooking at additional charges.â
We’d like to invite you for an interview sumatriptan succinate 100 mg oral tab âWe plan to honor these victims (of Newtown) by doing everything within our power to prevent misguided gun control laws from leaving Americans defenseless or worse victims,â the Second Amendment Foundation wrote on its site.
Who would I report to? priligy fda approval 2014 That is just one of the many inspirational stories of Vested Interest in K-9s donors. In September, 10-year-old Allison Henry from Holyoke, Mass., asked for donations for her birthday instead of presents. She raised $1,000 for a local K-9 named Ryker to get a vest.
I don’t know what I want to do after university where can i buy celexa 7. Acknowledge your gut feeling about which option to choose, but make sure you subject it to the same objective analysis as the other possible options to ensure that it still stacks up. Subject each possible option to a SWOT analysis, listing its strengths, weaknesses, opportunities and threats.
Canada>Canada adcirca pah Once every 11 years, something unusual happens on the sun: The sunâs polar magnetic field weakens, bottoming out at nothing. the magnetic field appears again, it will be reversed. The sunâs north pole will go from negative to positive, and the south pole will switch from positive to negative.
Free medical insurance tadacip manufacturers india The long list of victims include financial firms CitigroupInc, Nasdaq OMX Group Inc, PNC Financial ServicesGroup Inc and a Visa Inc licensee, Visa Jordan.Others include retailers Carrefour SA and J.C. PenneyCo along with JetBlue Airways Corp, prosecutorssaid as they announced indictments.
How many weeks’ holiday a year are there? sildenafil eriacta 100 Fisher also said he had high regard for all those who have been named as potential contenders, including former Fed vice chairs Don Kohn and Roger Ferguson, and would be “honored” to serve under any of them.
Recorded Delivery revatio vs adcirca Obama’s announcement – made just before Obama heads for summer vacation on Martha’s Vineyard – may be greeted as a partial victory for supporters of ex-NSA contractor Edward Snowden who is now in Russia, where he was granted asylum last week.
I’ve been made redundant tadacip legit âLast year, even at the beginning of this year, I would have folded. I would have given up more runs or whatever the case may be,â Hefner said about the early runs. âI am proud of that. I have been able to bounce back and turn the page and still give quality innings after that.â
Where’s the nearest cash machine? sildalis As trading in the three-biggest credit ETFs surged tounprecedented levels last month amid the marketâs biggest lossessince 2008, the fundsâ shares dropped as much as 1.1 percentagepoints more than the net value of the less-traded securitiesthey hold. The two largest high-yield bond ETFs have lost about6 percent since reaching a five-year high May 8. Thatâs about 2percentage points more than the loss for the Bank of AmericaMerrill Lynch U.S. High Yield Index.
Can you put it on the scales, please? buy azithromycin 500mg All through Swabia (south Germany) in late winter the Narrensprung – Fool’s Leap – parades bring monsters and witches on to the streets to throw sweets and chant threatening unholy songs. Small summer festivals abound, don’t bother to plan: walk out of your front door and follow the scent of cooking to find the nearest feast – a sausage-dog contest where the owner of the longest dog gets its length in sausage; dumpling festivals; swimming festivals; trout-eating festivals; medieval pageants. All have three things in common: plentiful beer, excellent sausages and a great atmosphere.
I’m unemployed obagi tretinoin cream usp 0.1 reviews A spokesman for Zvyozdochka told a Russian news agency it had worked on the refit from June 2010 until completion in January this year. “During the repairs, we fitted a new Club rocket complex and a number of foreign systems on the ship, including Indian ones,” he said. The submarine’s navigation and communication systems and power generator were also upgraded.
Looking for work is celexa cheaper than lexapro The 24-year-old winger is coming off a monster season with Tottenham that saw him score 26 goals and win every possible accolade in England. Baleâs blazing speed, devastating technique and brilliant left foot will be on display once again in Britain, unless a long-rumored transfer to Real Madrid goes through.
Have you got any qualifications? tretinoin cream 1.0 BEIJING/HONG KONG – China reiterated its opposition on Thursday to a European Union plan to limit airline carbon dioxide emissions and called for talks to resolve the issue a day after its major airlines refused to pay any carbon costs under the new law.
Where are you calling from? zithromax j code Canadians bemoan the popularity of the iPhone. They recall the day Steve Jobs, a marketing genius, stepped onto a stage in jeans and black turtleneck holding the most remarkable of wireless devices, with killer apps to come. He said it was five years ahead of any other mobile phone and would use the ultimate pointing device, our fingers, âto create the most revolutionary user interface since the mouse.â
Children with disabilities tretinoin cream coupon The AIDS Healthcare Foundation (AHF) announced on Tuesday to several media outlets that an unnamed male performer told the organization that he tested positive for the virus. It is not known if he contracted the disease through his work, and the organization did not specify the timeline in order to protect the actor’s privacy.
http://buysildenafil247.us.com/ – generic viagra
I can’t get a dialling tone what are eriacta tablets The rising real estate market has helped Lehman lately. Earlier this year, the estate sold its stake in apartment building operator Archstone for $6.5 billion. The valuation was still a far cry from the $22 billion price tag that Archstone was valued at in 2007, but much higher than estimates since the credit crisis.
[url=http://genericsildenafil2019.com/]additional info[/url] [url=http://buytadalafil247.us.org/]Tadalafil Soft Tabs[/url] [url=http://buyeffexor.us.com/]75 mg effexor[/url] [url=http://genericcialis2019.com/]buy cialis online with mastercard[/url] [url=http://buypropecia24.us.org/]BUY PROPECIA[/url] [url=http://buycialis247.us.com/]Generic Cialis[/url] [url=http://buyindocin.us.com/]BUY INDOCIN[/url] [url=http://buyviagra365.com/]discount viagra[/url]
[url=http://buytadalafil24.us.org/]tadalafil 5 mg[/url]
Hello to every body, it’s my first visit of this website; this
blog consists of awesome and truly excellent material in support of readers.
http://tinyurl.com/ recently posted..http://tinyurl.com/
Sildenafil
1xbet зеркало ios : . . ? . $ ( – . . : ) ! . + . – > & : – . . . \ : $ 1xbet официальный скачать . < ( : < . – & . . * – : ) . \ ^ ? ^ : . * +
Do you mind if I quote a few of your articles as long as I provide credit and sources back to your website?
My blog is in the exact same niche as yours and my visitors would genuinely benefit from some of the information you present here.
Please let me know if this okay with you. Thanks!
Sofia recently posted..Sofia
Thanks for sharing excellent informations. Your website is very cool. I’m impressed by the details that you¡¦ve on this website. It reveals how nicely you understand this subject. Bookmarked this website page, will come back for extra articles. You, my pal, ROCK! I found just the info I already searched everywhere and just couldn’t come across. What a great site.
rest аА аБТf the аАабТаite аАабТТаАабТа also reаА аЂаlly
Wow! Thank you! I constantly needed to write on my blog something like that. Can I implement a part of your post to my blog?
viagra canadian pharmacy
[url=http://genericxenical2019.com/]generic xenical[/url] [url=http://sildenafil01.us.com/]buy sildenafil online[/url] [url=http://genericprednisone2019.com/]predisone no rx[/url] [url=http://buytadacip.us.com/]buy tadacip[/url] [url=http://buytadalafil247.us.org/]cheap tadalafil[/url] [url=http://genericlasix2019.com/]buy lasix no prescription[/url] [url=http://buysildenafil247.com/]Sildenafil[/url] [url=http://buylisinopril24.us.org/]full article[/url] [url=http://buyalbuterol24.us.com/]albuterol tablets[/url] [url=http://tadalafil18.us.org/]tadalafil professional[/url] [url=http://levitra20mgprice.us.com/]levitra 20mg price[/url] [url=http://genericcialis2019.com/]generic cialis[/url]
[url=http://genericprozac2019.com/]Generic Prozac[/url] [url=http://retin-a.us.com/]cheap retin-a[/url] [url=http://buysildenafil24.us.org/]sildenafil citrate india[/url] [url=http://buyvaltrex24.us.com/]Valtrex Generic Cost[/url] [url=http://genericlexapro2019.com/]Generic Lexapro[/url] [url=http://genericventolin2019.com/]proventil inhaler for sale[/url] [url=http://genericvaltrex2019.com/]Generic Valtrex[/url] [url=http://buyviagra247.us.com/]genuine viagra[/url] [url=http://buycialis24.com/]buy cialis[/url] [url=http://buytadalafil24.us.org/]Buy Tadalafil[/url] [url=http://sildenafil01.us.com/]Sildenafil[/url] [url=http://buycialis247.us.org/]how do i get cialis[/url] [url=http://cialisgeneric24.us.org/]cialis generic[/url] [url=http://genericviagra2019.com/]order viagra online canada[/url] [url=http://buykamagra24.us.com/]kamagra 100mg oral jelly[/url] [url=http://buysildenafil365.com/]Over The Counter Sildenafil[/url]
rew hemp oil cbd
Looking forward to reading more. Great post.Really thank you! Want more.
jse where to buy cbd oil
[url=http://buycialis247.us.com/]Generic Cialis[/url] [url=http://buyvaltrex24.us.com/]Valtrex Online[/url] [url=http://retin-a.us.com/]buy retin-a[/url] [url=http://genericalbuterol2019.com/]albuterol drug[/url] [url=http://genericsildenafil2019.com/]Generic Sildenafil[/url] [url=http://buysildenafil247.us.org/]cheap sildenafil citrate[/url]
It’s a pity you don’t have a donate button! I’d most
certainly donate to this excellent blog! I suppose for now i’ll settle for bookmarking
and adding your RSS feed to my Google account.
I look forward to brand new updates and will share this blog with my Facebook group.
Talk soon!
Louie recently posted..Louie
Your style is really unique in comparison to other people I have read stuff from. I appreciate you for posting when you have the opportunity, Guess I will just book mark this blog.
Please visit my website too and let me know what
Sorry, I ran out of credit sildenafil Pentecostal pastor Stevo Atanasio, from the East London Christian Church, said that among his congregation, blind people had recovered sight, deaf people had heard again, and what were considered terminal illnesses had been cured.
[url=http://genericprednisone2019.com/]prednisone 5mg tablets[/url] [url=http://buyventolin24.com/]albuterol ventolin[/url]
It’s going to be end of mine day, but before end I am reading this
fantastic article to increase my experience.
tinyurl.com recently posted..tinyurl.com
Please let me know if you’re looking for a writer for your blog.
You have some really great posts and I think I would be a good asset.
If you ever want to take some of the load off, I’d absolutely love to write
some material for your blog in exchange for a link back to mine.
Please send me an email if interested. Thank you!
http://tinyurl.com/y2t9s229 http://tinyurl.com/yytnmdbe http://tinyurl.com/y6d6h6tk http://tinyurl.com/y3pxn23p http://tinyurl.com/yyt9hz8v http://tinyurl.com/y4ujuktd http://tinyurl.com/y3gx3szt http://tinyurl.com/y6gc5sfv Americo Amadeu Filho recently posted..http://tinyurl.com/y2t9s229 http://tinyurl.com/yytnmdbe http://tinyurl.com/y6d6h6tk http://tinyurl.com/y3pxn23p http://tinyurl.com/yyt9hz8v http://tinyurl.com/y4ujuktd http://tinyurl.com/y3gx3szt http://tinyurl.com/y6gc5sfv Americo Amadeu Filho
Woman of Alien Great do the job you ave carried out, this website is de facto interesting with amazing information. Time is God as method of preserving everything from occurring at once.
My searches seem total.. thanks. Is not it great once you get a very good submit? Great ideas you have here.. Enjoying the publish.. best wishes
I’m really enjoying the design and layout of your site. It’s
a very easy on the eyes which makes it much more enjoyable for me to come here and visit more often. Did you hire out
a developer to create your theme? Fantastic work!
tinyurl.com recently posted..tinyurl.com
I will right away grasp your rss as I can not find your email subscription hyperlink or e-newsletter service. Do you have any? Please allow me recognize so that I may subscribe. Thanks.
What’s up Dear, are you genuinely visiting this web page regularly, if
so after that you will without doubt take pleasant knowledge.
Krystle recently posted..Krystle
I every time used to study paragraph in news papers but now as I
am a user of web therefore from now I am using net for articles or reviews, thanks to web.
Lydia recently posted..Lydia
Sorry for the huge review, but I am really loving the new Zune, and hope this, as well as the excellent reviews some other people have written, will help you decide if it as the right choice for you.
[url=https://amoxicillin250.com/]amoxicillin 250[/url]
Well I sincerely liked reading it. This information offered by you is very helpful for good planning.
Great info and right to the point. I don’t know if this is truly the best place to ask but do you guys have any ideea where to get some professional writers? Thanks 🙂
Hey There. I found your blog using msn. This is a very well written article. I’ll be sure to bookmark it and return to read more of your useful info. Thanks for the post. I’ll certainly return.
When someone writes an post he/she retains the thought of a user in his/her mind that
how a user can know it. Therefore that’s why this post is amazing.
Thanks!
tinyurl.com recently posted..tinyurl.com
My husband and i have been quite glad when Peter managed to deal with his investigation via the precious recommendations he had from your own web site. It’s not at all simplistic just to continually be releasing tricks which most people may have been selling. And we fully understand we have you to be grateful to because of that. All the illustrations you have made, the easy web site menu, the relationships you can help create – it’s many extraordinary, and it’s really leading our son and the family feel that this matter is fun, and that is unbelievably serious. Thank you for all!
wxq [url=https://buycbdoil.us.com/#]plus cbd oil[/url]
This website was how do I say it? Relevant!! Finally I have found something that helped me. Thanks!
I am sure this article has touched all the internet users, its really really nice post on building
up new weblog.
minecraft pc download recently posted..minecraft pc download
Yesterday, while I was at work, my sister stole my iphone and tested to
see if it can survive a twenty five foot drop, just so she
can be a youtube sensation. My apple ipad is now broken and she has 83 views.
I know this is completely off topic but I had to share it with someone!
Margot recently posted..Margot
[url=http://buyalbuterol24.com/]albuterol no prescription[/url] [url=http://buyxenical24.us.com/]xenical orlistat[/url] [url=http://sildenafil02.us.com/]Sildenafil Citrate[/url] [url=http://buytadalafil365.com/]Order Tadalafil Online[/url] [url=http://buysildenafil365.com/]sildenafil generic canada[/url] [url=http://buycialis24.us.org/]cheap cialis pills online[/url] [url=http://buykamagra24.com/]buy kamagra online[/url] [url=http://buycialis247.us.com/]generic cialis safe[/url] [url=http://buytadalafil247.com/]tadalafil[/url] [url=http://genericxenical2019.com/]generic generic xenical[/url]
[url=http://buyxenical24.us.org/]order xenical[/url] [url=http://buysildenafil24.us.org/]sildenafil price[/url] [url=http://buycialis247.us.com/]Generic Cialis[/url] [url=http://sildenafil03.us.org/]sildenafil[/url] [url=http://genericvaltrex2019.com/]CHEAP GENERIC VALTREX[/url] [url=http://buylisinopril24.us.org/]where to buy lisinopril[/url]
[url=http://buycialis24.us.org/]Generic Cialis[/url]
This blog was how do you say it? Relevant!! Finally I ave found something that helped me. Thank you!
zqe cbd oil side effects
You have brought up a very wonderful details , appreciate it for the post.
dft hemp oil for pain
generic viagra
Hello i am kavin, its my first occasion to commenting anywhere, when i read this article i thought i could also create comment due to this brilliant post.
minecraft free download pc recently posted..minecraft free download pc
[url=http://buyventolin24.us.org/]salbutamol ventolin[/url] [url=http://buytadacip.us.com/]buy tadacip[/url] [url=http://buytadalafil247.com/]read full report[/url] [url=http://buytadalafil247.us.com/]tadalafil[/url] [url=http://buytadalafil24.us.org/]BUY TADALAFIL[/url] [url=http://buykamagra24.com/]additional info[/url] [url=http://buyviagra247.com/]cheap viagra.com[/url]
veu [url=https://mycbdoil.us.org/#]hemp oil side effects[/url]
Wow, great blog post.Much thanks again. Great.
Wow, great article.Much thanks again. Awesome.
[url=http://buyventolin24.us.org/]full report[/url]
Very neat article post.Really looking forward to read more. Really Great.
[url=http://buyviagra24.us.org/]buy viagra[/url] [url=http://buyviagra365.com/]Viagra No Prescription[/url] [url=http://buysildenafil247.us.com/]Sildenafil No Prescription[/url] [url=http://buyvaltrex24.us.org/]valtrex order online[/url] [url=http://buycialis24.us.com/]cialis[/url] [url=http://cheapcialisgeneric.us.com/]non prescription cialis[/url] [url=http://buykamagra24.us.org/]kamagra[/url] [url=http://sildenafil03.us.org/]sildenafil 50 mg[/url]
[url=http://generictadalafil2019.com/]cialis tadalafil[/url] [url=http://buysildenafil24.us.org/]Buy Sildenafil[/url] [url=http://buycialis24.us.com/]cialis black[/url]
[url=https://amoxicillin911.com/]amoxicillin 500mg capsules antibiotic[/url] [url=https://zoloft75.com/]zoloft buy[/url] [url=https://cheapprednisolone.com/]prednisolone[/url] [url=https://metformin1000.com/]buy metformin[/url] [url=https://genericcialis20mg.com/]buy cialis viagra[/url] [url=https://buylasixfurosemide.com/]buy furosemide 40 mg[/url] [url=https://albuterol24.com/]buy albuterol online without prescription[/url] [url=https://buyacyclovirnoprescription.com/]buy acyclovir[/url] [url=https://buysildenafil50.com/]buy sildenafil citrate[/url] [url=https://tadalafilgeneric20.com/]cheapest tadalafil[/url]
I’d like to open a personal account pt nn  Mr Sissling said three major issues had dominated the previous 12 months: the Francis Inquiry into patient safety in England; controversial health board reforms of regional services; and unprecedented demand on urgent and emergency care which led to the re-direction of NHS resources.
How much will it cost to send this letter to ? naked hot women “Although Russia and Iran will remain the main lifeline forthe Syrian regime, the increasingly fragmented war economycontinues allow a wide range of local and international actorsto conclude ad-hoc commodity deals,” Maplecroft’s Soltvedt said.
I was born in Australia but grew up in England preteen angels Yellen is viewed as somewhat more dovish in her monetary policy preferences than Summers, in terms of how she would weigh the need to keep inflation in check versus run a relatively looser monetary policy that would generate more employment.
Incorrect PIN plus size women nude Researchers observed that snakes flicked their tongue more when searching for animals already loaded with the poison, suggesting that whatever was tipping the snakes off to their prey’s location was in their venom. The rattlers also responded more to one venom fraction than the others (and even more than the whole venom), flicking their tongues with more frequency as they sought out the injected mouse.
Sorry, I’m busy at the moment girls panties (Reporting and writing by Gabriel Debenedetti in Washington; Reporting by James B. Kelleher in Chicago; Additional reporting by Jason Lange and Jeff Mason in Washington and Patricia Kranz in New York; Editing by Claudia Parsons and Tim Dobbyn)
Some First Class stamps nude teen pageant For all those reasons, a joint venture or other cooperation is looking more likely than an outright takeover at this point. This wouldnât be the first time that Lenovo is looking for business partners in Taiwan: In 2011, Lenovo formed a $300 million dollar joint venture with Taiwanese contract manufacturer Compal Electronics Inc. to make computers in China.
I stay at home and look after the children young naked girl Currency weakness particularly reduces the attractiveness of Indian Oil Corporation (IOC). Sales of shares in IOCand Coal India Limited were expected to raise the bulkof the total stake sale target for this year.
What do you study? partes de la flor “He was like a brother and a son to me,â Dino Spadaccini told the Daily News. âHe flew with me as a teen. Itâs just an unfortunate event that someone so young, so full of life, enjoying something is gone.â
I like watching football preteen Caroline Rancourt, a 37-year-old single mother, said she wasat work at the Musi-Café, a favorite local hangout, hours beforeit was leveled by the runaway train. Eyewitnesses said the barwas packed when the train hit and burst into flames.
I’d like to cancel this standing order hot nude girl The Asiana crash also highlights long-standing complaints by the NTSB that the U.S. Federal Aviation Administration, which must implement any recommendations from the safety board, is not moving fast enough to address emerging weaknesses in airline safety. In particular, the NTSB has advocated for better low-airspeed warnings in the cockpit and improved pilot training, but action has been slow.
This is a topic which is near to my heart Take care! Where are your contact details though?
Are you a student? banadores 2019 There were some bright spots: real estate and health caredeals rose 42 percent and 30 percent from last year,respectively. Private equity-backed deals were up 16 percentyear over year with $238.2 billion of transactions, includingBerkshire Hathaway Inc and 3G Capital Partners’ $27billion takeover of HJ Heinz Co.
I’d like to pay this cheque in, please school girls nude It has been shown that in the time of the hunter gatherers, there was conflict and it was violent, but quite often this violence did not result in death, that bones from the people of this time, showed injuries that had healed after conflict. This suggests that intertribal war was about justice, but not neccasarily a death sentence. Perhaps the first recognised rules of war.
If you are going for finest contents like me, only visit
this web site everyday for the reason that it gives feature contents, thanks
tinyurl.com recently posted..tinyurl.com
Withdraw cash niftyarchive org “The Kingdom of Saudi Arabia, its people and governmentstood and stand by today with its brothers in Egypt againstterrorism,” King Abdullah said in an uncompromising message readout on Saudi television.
I’d like to transfer some money to this account little girl incest Swedish high jumper Emma Green Tregaro, who won a bronze medal at the 2005 worlds, and sprinter Mao Hjelmer sported rainbow colors on their fingernails for events at Luzhniki Stadium, which also hosted the 1980 Moscow Olympics.
I’m sorry, he’s huge boobs The general’s body was being flown to his home region for burial. And, en route to the airport, hundreds of thousands of people lined the streets of Hanoi for an emotional, ultimate glimpse at the man who masterminded military victories over colonial power France and over the Americans.
Could I ask who’s calling? modelos Despite initial criticism that overshadowed the start of U.S.-EU free-trade talks that month, France’s politicians have until now remained relatively subdued as the scale of the NSA’s alleged spying efforts became apparent.
I’m in a band tween swimsuit pictures Spears hit the big time in the 1990s, and was one of the biggest pop stars of the 2000s. But her early fame was followed by troubled years during which she lost custody of her two young sons and spent time in rehab.
I’d like , please gay naked boys The Department for Energy and Climate Change has issued 176 licences to explore for both conventional and unconventional oil and gas onshore. Companies with a licence have only to apply for planning permission to start drilling.
I like it a lot asian school girls In the wake of the tragedies, the Democratic-controlled Colorado state legislatures passed new laws banning ammunition magazines with more than 15 rounds and beefed up background checks on private gun sales – an effort in which Mr Morse played a leading role.
Get a job female fitness models “Will we manage to convince Assad or not? I don't know,” Putin said. “But so far everything looks as if Syria has fully agreed with our proposal and is ready to act according to the plan that is being developed by the international community at the United Nations.”
Lost credit card lingerie girls âI donât know if Iâd say people have warmed up to him,â Henderson of the Free Press told The Fiscal Times. âI think people are used to it now. And at least they can say he didnât come here and sell everything that wasnât nailed down â at least in the first 90 days.â
I’m a trainee young boy fuck “We have some really big moments coming up and the questionis, who is going to blink on the (budget) and who is going toblink on the debt limit?” said Patrick Griffin, assistantdirector for the Center for Congressional and Presidentialstudies at American University, who worked as a legislative aidefor Democratic President Bill Clinton and for Senate Democratsin years past.
How do you spell that? https //180chan.al/ Prince Fielder grounded into a double play, but Hunter raced home to make it 2-0. Victor Martinez lined an opposite-field double to left center, keeping the inning going. Then Avila grounded an RBI single to right that went under first baseman Daric Barton’s glove and got past a diving Eric Sogard.
Get a job femjoy Even though the Federal Reserve deferred the start of arising rate era when it held policy steady last week, “thenarrative still holds,” said Matt Tucker, head of fixed incomestrategy at BlackRock’s iShares.
Wonderfull great site little nn cuties On Aug. 30, a federal appeals court in New York upheld theconvictions of both men but said they needed to be resentencedbecause their punishments, including prison terms of nine yearsfor Vilar and five years for Tanaka plus financial penalties,were based in part on transactions that should not have counted.
I’d like to apply for this job naturist pics The Dow Jones Industrial Average fell 58.56 points, or 0.4 per cent, at 15,133.14. The Standard & Poor’s 500 Index was down 1.13 points, or 0.1 per cent, at 1,693.87. The Nasdaq Composite Index was down 2.96 points, or 0.1 per cent, at 3815.02.
Could I ask who’s calling? chan mir “We’re making some progress, getting people aware of these issues,” says Tony Thorpe, the chairman of the Partnership to Fight Chronic Disease, a national coalition committed to raising awareness about chronic illnesses.”We need to continue developing effective programs that allow people to change.”
This is your employment contract very young sex videos “Overall, this study speaks to the efficacy of bystander intervention in improving patient survival after out-of-hospital cardiac arrest,” Ong said. “It is worthwhile to consider a similar effort in this country.”
Have you got any qualifications? beautiful naked breasts Hussain is a key lieutenant of GSK’s chief executive,reflecting the importance that Witty places on emerging marketsas future driver of sales for GSK. He joined in June 2008 and isa member of the corporate executive team.
It is super blog, I would like to be like you
I’d like to pay this in, please stringbikini While the hormones in the ear wax gave scientists a look at the whale’s personal biography, the chemical contaminants found — from flame retardants, pesticides and other pollutants — also opened a porthole onto humans’ long-term effects on the ocean.
How do you do? librechan 155 mir “A leader who slaughtered his citizens and gassed children to death cannot regain the legitimacy to lead a badly fractured country. The notion that Syria can somehow return to a pre-war status quo is a fantasy. It’s time for Russia and Iran to realize that insisting on Assad’s rule will lead directly to the outcome that they fear: an increasingly violent space for extremists to operate,” Obama said.
I’m sorry, I didn’t catch your name degrassi cast “We must be brothers,” he said. “The problem is lobbying by this orientation, or lobbies of greedy people, political lobbies, Masonic lobbies, so many lobbies. This is the worse problem.”
How do you know each other? brazil model show “If you feel like you know how to handle a situation, whether it be a boss at work who is a pain in the butt or now I’m upside down in a car and water’s coming in, if you feel confident, this thing is going work a lot better than, ‘oh gee, now what, what do I do?'”
I’ve lost my bank card darkweb porn “If I had a son, he’d look like Trayvon,” Obama said during a press conference in the Rose Garden, directing his comments towards Martin’s parents. “And I think they are right to expect that all of us as Americans are going to take this with the seriousness it deserves, and that we’re going to get to the bottom of exactly what happened.”
Sorry, I ran out of credit sexy teen models “We're investing more money now than we were at that point and, from a Balcombe Tunnel perspective in particular, I'm now satisfied that we have an inspection regime and a re-engineered tunnel to make sure that risk has now been removed.”
Your account’s overdrawn young teen The NIHR’s own research programmes may involve “hard-to-reach” areas of limited commercial interest, pointed out Dr Jonathan Sheffield, chief executive of the NIHR Clinical Research Network, at the same meeting,
A First Class stamp teenie fuck The jury did speak- but like the OJ verdict – lots of questions remain. In my mind GZ was very wrong in what he did. Had he waited for the police – all this would not be being discussed. And Trayvon would be alive.
A book of First Class stamps anime child porn For his career, the former 1st-round pick (17th overall) in the 2009 NFL draft has a 24-35 record while completing over 58% of his attempts with 80 TDs against 66 picks. Freeman’s best season came during his sophomore campaign when he led the Bucs to a 10-6 record. That season he threw 25 touchdowns while only throwing a career-low six interceptions.
We need someone with experience beachbunnyswimwear.com It was harder to employ such perspective last season. Williams had just signed a $100 million contract to be the face of the franchise. Then-coach Avery Johnson was on an expiring contract, lobbying for an extension. Williams was under heavy criticism, the most of his career.
I was born in Australia but grew up in England russian preteen models The possibilities for a young core comprised of two third-year players (Wilkerson and Ellis), two second-year players (Coples and Harrison) and a rookie (Richardson) make it tempting to wonder whether they can ultimately become the best defensive front in team history.
It as nearly impossible to find educated people in this particular topic, but you sound like you know what you are talking about! Thanks
I was made redundant two months ago psehealthyenergy.org As for the “Sea Grass” that was before the origional 25 imported Manatees mulitplied into over 4000, stressing the whole system! When I was a kid, the waters around Miami were clear like that. Now we have too many people. And over 84% of Fla is “preserve land” off limits to the taxpayers, a private park for the environmental elite ONLY!
I’d like to apply for this job prix du viagra pfizer Abbas has said that, for new talks to be held, IsraeliPresident Benjamin Netanyahu must freeze the settlements andrecognize the West Bank’s boundary before its capture by Israelin the 1967 Middle East war as the basis for the border of afuture Palestine.
I’d like to open a personal account red-viagra.com It’s Dan Straily starting for the A’s today, and he’s shown a knack for saving his best starts for the biggest games. He had one brilliant start against Texas in May, allowing two hits in seven scoreless innings in Oakland’s 1-0 win over Yu Darivish, and he had a teal stinker against the Rangers in June, allowing eight hits and six runs on June 17. Twice this year he hasn’t made it out of the fifth inning against Texas.
Languages global-meds.webs.com But the actor, who is also a writer and director, has ambition and a little nerve. And with his crafty debut feature, “Don Jon,” Gordon-Levitt has written himself a comfortable yet disarming change of pace — that of a smooth, calculating Don Juan type re-imagined for today, but it’s a version of modern times existing in a heightened fablelike or theatrical state, as if presented on an Elizabethan stage.
Is there ? razor sharp abs âI got him on the phone probably around 11:15, 11:30 as I was driving home,â Cashman said. âAll I had to hear from him was, âHey, Iâm ready.â And he said that. I said, âAll right, well, head on back.â â
How many more years do you have to go? kroger gwinnett pharmacy hours Silbert has a Wall Street background, and SecondMarket is a registered and fully regulated broker-dealer. As such, it really should be bending over backwards to be as conservative and sober as it can — no one wants their broker-dealer to be some risky fly-by-night operation offering investments with massive downside. If you’re a broker-dealer, job one is always to be as trustworthy as possible. And getting involved in bitcoins is not a great way of demonstrating trustworthiness.
A staff restaurant lopressor cvs HHS, which is running all or part of the marketplaces in 36 states, has repeatedly declined to answer specific questions about its handling of the rollout, including specific glitches, enrollment figures, or its plans to fix the problems.
We’d like to invite you for an interview aldactone rxlist So when can soldiers expect to see a flightless Iron Man fighting next to them? SOCOM says it wants to test the first-generation version of TALOS within a year and a more advanced one by 2016, so it might not be that far off.
Incorrect PIN peak vitamin d test Alexander Khramchikhin, an independent Moscow-based military analyst, said that “the land part of the exercise is directed at China, while the sea and island part of it is aimed at Japan.''
I’d like to withdraw $100, please vigorex 50 mg+prix au maroc A controversial Ivy League academic stirred the pot on the 12th anniversary of 9/11 by defending the so-called “truthers,” who claim the U.S. government was behind the single biggest terror attack ever committed on American soil.
Do you like it here? finasterid 1 mg ratiopharm rezeptfrei The Dow Jones industrial average was up 103.95points, or 0.67 percent, at 15,603.49. The Standard & Poor’s 500Index was up 17.76 points, or 1.05 percent, at 1,703.49.The Nasdaq Composite Index was up 41.80 points, or 1.15percent, at 3,668.18.
I’m doing a masters in law huawei fit 2 pro As part of the Northern Ireland peace process, there has been a drive to remove the guns from Belfast's streetscapes by replacing paramilitary murals with less controversial images, reflecting the city's cultural heritage.
History aarppharmacy.com But if I have one regret, it is the way that I am leaving. It is only natural that I would be disappointed that the Liverpool management agreed to loan me to Napoli without telling me first, I thought that I deserved better than that even though I understand that difficult decisions have to be taken in football.
How long are you planning to stay here? vigor care plano texas Mrs Heazell’s parents, Arthur and Muffet Harrison, were personal friends of the composer Benjamin Britten and Mrs Harrison was heavily involved in the early years of the area’s Aldeburgh Festival. Mr and Mrs Heazell met at the festival and helped out there often.
Do you need a work permit? duckdose.org coupons Some of Berlin’s partners, including big neighbor France, are holding out hope that the entry of the SPD into her government could lead to changes in Merkel’s European policy, but if there is a shift, it is likely to be more rhetorical than substantive.
I value the blog article.Really looking forward to read more. Fantastic.
I’ve been made redundant ventolin mdi cmi Oracle shares closed up 56 cents, or 1.9 percent, at $30.07in regular trading on the New York Stock Exchange. (Reporting by Jeremy Pelofsky in Washington and Jim Finkle inBoston, editing by Carol Bishopric, Gary Hill)
Sorry, I ran out of credit tretinoin gel 0.025 buy online “Diatoms are actually relatively advanced life forms on Earth and developed most likely sometime at the beginning of the Mesozoic (probably Jurassic time period), thus very late during evolution (probably at least 3 billion years after the origin of life on Earth),” Schulze-Makuch said, adding that diatoms are typically aquatic and there is no liquid water on a comet, except during the brief periods when the icy objects approach the sun.
Could you send me an application form? amoxicillin dosage for cats ear infection In an unusually public discourse on a secret spying program, James Clapper, the director of national intelligence, joinedthe White House and senior Republican lawmakers who oversee theintelligence agencies in cautioning against cutting funding forNSA’s data collection.
I work with computers evolve biosystems stock The plan assumes Stockton’s voters will approve a proposedsales tax increase next month to help restructure the city’sfinances. To repair its finances, Stockton has also slashedspending and payrolls and is eliminating its health program forits retired employees.
Get a job spark naturals coupon code The transfer of power to an interim Iraq government in June 2004, and seven months later, Iraq's first multi-party elections in 50 years, which brought an overwhelmingly Shia-dominated coalition to power, failed to stem the violence.
Excellent work, Nice Design getting clomid prescribed In the interview, Zeman suggested he would back a minoritycabinet of Social Democrats supported by the Communist party.The president has a largely ceremonial role but has powers toappoint prime ministers and central bankers, and past actionshave shown he is willing to use his powers.
We’re at university together ray sahelian ashwagandha Eurozone banks have already shrunk their balance sheets by2.9 trillion euros ($4 trillion) since May 2012 – by renewingfewer loans, repurchase and derivatives contracts and sellingnon-core businesses – according to data from the ECB.
I’m interested in this position voltaren emulgel 1 gel foglietto illustrativo Unless you want the other person to sit down, stand up (or at least make like you would like to, were your lap not filled with food particles of varying sizes), and ask if you can get back to them when you’re finished.
Could I take your name and number, please? millingtonpharmacy.com “We’re not going to be disrespected,” Indiana Republican Representative Marlin Stutzman told The Washington Examiner newspaper. “We have to get something out of this. And I don’t know what that even is.”
I like watching football irbesartan hydrochlorothiazide side effects Still, the lines are the longest at the cartâs original location on the southwest corner of 53rd and 6th. Even though the cart on the southeast corner is selling the same food, there are rarely any lines on that side of the street.
Jonny was here sveapharma.bloggagratis.se In Senegal, El Zein, for 30 years the leading Shi’ite figure in the country, said the U.S. charges had no foundation: “I have never heard of there being a Hezbollah group here in Senegal,” he said at his Islamic Social Institution, which runs a mosque, health clinics and a network of religious schools.
Have you read any good books lately? al abeer medical center aziziyah A year ago Seculert, working with Russia’s Kaspersky Lab,identified a cyber espionage campaign, dubbed Mahdi, targetingIran and other Middle Eastern countries that stood out becauseit was the first such operating using communications toolswritten in Persian.
I can’t get a dialling tone chemist warehouse discount pharmacy NEW YORK, Oct 7 (Reuters) – U.S. stocks dropped on Monday asthe partial U.S. government shutdown dragged on with no signspoliticians were willing to relax positions over thedebt-ceiling limit or budget impasse.
I’m self-employed footmates wally Four sources familiar with the matter said Reckitt was alsoconsidering options for its Scholl footwear business, whichsells sandals outside the United States and had about 80 millionpounds of sales in 2012, mostly in western and southern Europe.
I’m sorry, he’s http://www.ohanahealthplan.com/provider/resources This is a reported blog dedicated to highlighting these basic human rights, how they are defined, why they are needed and who are the people struggling to uphold them. The blog is also a way for us to provide GlobalPost’s in-depth reporting and foundation-supported Special Reports — on rights relating to labor, gender, sexuality, the environment, the Internet, children, speech and assembly, and more — with steady updates, insights and analysis worth sharing. This is a blog called RIGHTS, but the story telling here about those rights are not intended as advocacy and will always stay true to GlobalPost’s reporting standards of fairness, accuracy and independence.
When do you want me to start? what is virility on facebook The vacation of such an important position — Mrs Napolitano will head the University of California — sets up another potentially bruising nomination fight over the third-largest US government department which has broad responsibilities that include immigration and disaster response.
About a year proto whey power crunch review But the fact that an ex-Pope and his successor wrote letters dealing with similar issues within days of each other underlined the peculiarity of a situation in which for the first time in centuries, two Popes are living virtually under the same roof.
I can’t get through at the moment nfpharma.kz In a large new study of women on HRT, slim and normal-weight women with dense breast tissue saw a nearly 50 percent increase in breast cancer risk, while women who were black or overweight with less-dense breast tissue showed no risk increase at all.
I want to make a withdrawal be wholesome vitamins reviews As part of the agreement, a collaborative consortium will be set up consisting of Forma Therapeutics and up to 10 Forma ADDCos (Asset Discovery and Development Company) subsidiaries, as well as CRT-DL and (initially) five principal investigators from the Universities of Liverpool and Oxford in the UK; the Medical Research Council’s Laboratory of Molecular Biology in Cambridge, UK; and the Chemical Biology Laboratory, Netherlands Cancer Institute.
The National Gallery lotemax 0 5 krople do oczu cena “I’ve got a little over 1,200 days left in office. I am going to spend every waking minute of every one of those days thinking about and then acting upon any good ideas out there that are going to help ordinary Americans succeed… That’s how I’m going to spend my time. I hope that’s how you’re going to spend your time,” he said, before asking the crowd one final, familiar question.
The United States obat generik trihexyphenidyl The little boy is now cared for by his maternal grandmother but the court was told it was “inevitable” that if they had another baby it would be taken into care, causing significant psychological distress and likely resulting in the breakdown of their relationship.
I’m interested in niacin and viagra interaction Oversized bottles of Chanel No. 5 under Plexiglas, huge canvasses bearing the ubiquitous double C logo and the iconic purse with gold chain strap provided a visual crash course in Chanel’s enduring consumer appeal and the sense of humor of its artistic director, Karl Lagerfeld.
What part of do you come from? clomiphene cena Keeping the wraps on the deal means investors for now gain little insight into a corporation that grew in seven years from a notoriously unreliable novelty into one of the world’s most influential media, communications and advertising services.
An estate agents collagen restore boots They broke the squad down into two teams and held a scrimmage, which was officiated and even included media timeouts. Bino Ranson coached the red team and Dalonte Hill coached the black team, and Bino’s squad won, 38-36.
I’m afraid that number’s ex-directory differin acne worse before better SIR – If the object of the outrageously expensive HS2 scheme is “not vanity but capacity”, as Douglas E Oakervee declares (Letters, July 6), wouldn’t longer trains with fewer empty first-class carriages be a more effective and infinitely cheaper alternative?
Thanks funny site requip rxlist Check to see if the fund has insurance on bonds in high-risk areas, such as Illinois, which has well-documented budget problems, Dalewitz says. But then take that protection with a grain of salt, because this insurance could not always be relied upon in past crises.
Get a job modafinilcat.com coupon On TV they live large â in a 10,000-square-foot McMansion full of garish baubles and expensive toys in an ode to the bad taste and excessive spending that has made âThe Real Housewives of New Jerseyâ a Bravo hit.
I’d like to open a business account genf20 plus triple advantage system That marked a launch-day record for the Grand Theft Auto franchise which is Take Two’s most lucrative and allows players to cruise around a make-believe gameworld based on real-life locations such as Los Angeles.
Not in at the moment prix cetirizine eg But this year, the school was thrown into turmoil after the building was ravaged by Hurricane Sandy. The Jamaica, Queens, resident worked tirelessly â sometimes 18 hours a day â to clean up the mess wreaked by 6 feet of water.
What sort of music do you listen to? promethazine theoclate 25mg for morning sickness Marlon Byrd, Wilmer Flores and Andrew Brown drove in the Mets runs. Brownâs seventh-inning go-ahead RBI double gave Harvey (9-4) a chance at the win, but also came as he pinch0hit for Harvey. That forced the pitcher out of the game after six innings.
I will immediately seize your rss feed as I can not in finding your e-mail subscription link or e-newsletter service. Do you have any? Please allow me realize so that I may just subscribe. Thanks.
Free medical insurance newcrosshealthcare.com/dundee The 787 is Boeing’s biggest bet on new technology in nearly 20 years. It cost an estimated $32 billion to develop and Boeing plans to use hundreds of innovations such as its carbon-fiber composite skin and electrical system to enhance other jets.
We need someone with qualifications clomipramine dose in dogs Under Senate rules, Cruz must yield the floor for aprocedural vote on Wednesday when Democrats and many Republicansare expected to band together to begin moving the must-dospending bill toward passage, likely on Sunday.
Did you go to university? lek lamisil cena Several relatives and loved ones of Mr Duggan attended the hearing, and his mother, Pamela Duggan, left in tears during the afternoon session. Judge Cutler said the jury would have to answer a number of questions, including whether Mr Duggan was lawfully killed.
Will I get travelling expenses? cardizem cd rxlist “We’ve seen this type of rhetoric from North Korea before,” State Department spokeswoman Jen Psaki said. “Such comments from North Korea will do nothing to end (its) isolation or reduce the costs (it) pays for defying the international community.”
Will I have to work on Saturdays? acti labs toothpaste before and after The 37-year-old sat expressionless as Justice Megan Latham delivered a scathing sentence for the November 2011 crime at the Quakers Hill nursing home which left both the local community, and the city more broadly, in a state of shock.
I really like swimming gorilla bow hanger “Spending on the high street is holding up nicely, housing market transactions are beginning to gather pace and, perhaps most significantly, the global economy also appears to be on the mend. In fact, it’s the first time in many months where we can see balanced growth in the economy.”
I’ve been made redundant buy hypertension drugs online Sander thinks the egg originally belonged to a noble Italian family. âIn that time period, the ostrich was quite the animal, and it was a big thing for the noble people to have ostriches in their back gardens,â Sander said.
A Second Class stamp bright la mirada pharmacy la mirada ca The campus itself had the feel of the interior of a very new high school — gleaming floors, classrooms that doubled as lab spaces, and kitschy street signs, one of which read âNew Start Boulevard.â In one hall there was a piece of paper stuck to the wall that boasted about a 53.36 percent hiring ratio for nursing students out on externships.
My battery’s about to run out noise studies tractor-trailer trucks viagra United, wisely given the vulnerability of their defence, were attempting to keep Sunderland back – but that was no easy task against a side bristling with energy and making a complete nonsense of their early season struggles.
We’d like to invite you for an interview metformin hydrochloride side effects pregnancy Shane French, the host of the syndicated talk radio show Roverâs Morning Glory on WMMS in Cleveland, told The Associated Press in a telephone interview Sunday that he was surprised when Berry showed up at the annual festival. French, who goes by the name Rover on radio, said he had issued an impromptu invitation on his show a few weeks ago but didnât know she was listening.
I’m a housewife can prescription drugs fail a drug test Private-equity owned Jack Wolfskin saw sales stagnate at351 million euros in 2012, compared with growth of almost 23percent the previous year. A lack of investment in new productsduring its sale meant it lost ground, some experts said.
very best job priceline pharmacy hurstville westfield The 180-acre park, where the palace once stood and includes the original terraced steps, is currently home to an amphitheatre that once hosted reggae singer Bob Marley, a national sports centre and a collection of giant dinosaur sculptures, which also date from the 1850s.
I like reading through an article that can make
men and women think. Also, many thanks for allowing for me to comment!
g recently posted..g
Could I order a new chequebook, please? ketoconazole gel achat en ligne Now he has to find a way to whip into shape a lumbering conglomerate with 78 billion euros ($105 billion) of annual sales and products ranging from gas turbines to high-speed trains and ultrasound machines.
One moment, please wellbutrin xl generic manufacturers MLS has sent letters to all three Red Bulls supporters sections and other organized fan groups threatening to revoke special privileges such as the rights to flags, smoke bombs, drums and banners, as well as parking passes and additional credentials.
How do you do? generic avapro picture It’s an impressive tale that encapsulates the way SiliconValley likes to think of itself: a pure meritocracy; a placewhere talent rises to the top regardless of social class,educational pedigree, race, nationality or anything else.
Where did you go to university? pristiq vs cymbalta webmd That and the Bombersâ improved lineup against lefthanders like Bostonâs Felix Doubront â they now have righties Alex Rodriguez, Alfonso Soriano and Mark Reynolds â ushered him back into victory lane.
I really like swimming how many mg of maca in a teaspoon Aronson said “Turbo” had “very strong openings”internationally, and an A-plus Cinemascore rating frommoviegoers under age 25, which he said “bodes very well for itsplayability,” or future box office prospects.
What do you like doing in your spare time? biaxin price list RENO, Nev. — A Reno police officer who sold a personal gun while on duty last week to a 19-year-old man might have violated state and federal laws because the young man had been committed to a mental hospital while suicidal last year, which could prohibit him from possessing a firearm, a Reno Gazette-Journal investigation has found.
Where do you come from? venus treatments.nl When they were pooled in a meta-analysis the results showed a small (0.8%) increase in bone density using vitamin D measured at the femoral neck only (weighted mean difference 0.8%, 95% CI 0.2â1.4). However, the characteristics of the underlying studies feeding into this result differed significantly (this is known as significant heterogeneity). For example, participants in the various studies were of different ages, ethnic groups or had different underlying conditions. This means that pooling the results may not be the most appropriate thing to do. No statistically significant effect at any other site was reported, including the total hip.
I do some voluntary work ciprofloxacin hcl-ciprofloxacin betaine Marilyn moved from Northern California two summers ago when a couple of accidents indicated she needed help – the utilities were shut off in her mobile home after she forgot to pay the bill, and she got lost on a walk in Anne’s neighborhood. Anne, the middle of Marilyn’s five children, was selected to tell her mom she could no longer live on her own.
Have you read any good books lately? foreign-trade.com With shock from that disaster still raw, the lower half of the Dodger order taunted St. Louis starter Joe Kelly in the bottom of the second. Gonzalez led off with a single, moved to second on Yasiel Puigâs one-out hit and scored the gameâs first run when Juan Uribe drove him in.
I love the theatre astellas pharma europe ltd companies house After insisting that the House pursue “regular order” on budget legislation, House Speaker John Boehner on Thursday publicly acknowledged for the first time that the 12 spending bills would not be passed by September 30 and said a short-term funding extension “would probably be in the nation’s interest.”
I’d like to open a personal account ibuprofen 400mg kosten Typically, these products were sold with a new debit or credit card. The plastic was adorned with a sticker compelling the customer to call CPP to “activate” the account. On the telephone a salesmen would exaggerate the threat of fraud and cajole the customer into paying up to £84 a year for a protection policy.
Where’s the nearest cash machine? kinstonhealth.org [LeBron is seemingly done, winding down his thought. But then he pipes up, realizing there’s more he wants to say. He gets louder, more animated.] And then also to hear him talk about me. I would like to know what he thinks about my game and ways I can get better. He probably thinks he can beat me one-on-one right now [laughing]. I know he probably thinks that. I know MJ definitely thinks he can beat me one-on-one right now.
I’m about to run out of credit where to buy proxeed plus in philippines To prepare for the test in the meantime, I decided to take the practice exam provided by the book publisher. I thought that would be a helpful exercise, kind of like the online chapter quizzes, which would tell me what questions I answered incorrectly and explain the correct answer.
I believe that is among the most significant information for
me. And i’m glad studying your article. But wanna commentary on some basic issues, The site style
is ideal, the articles is actually great : D.
Good job, cheers
Matt recently posted..Matt
I study here generico ou similar viagra Smithen advised clients to hold on to the stock until a deal is concluded, noting that the company’s intellectual property, its secure network and its service contracts, could be of value to rivals and software companies that have so far struggled to break into enterprise mobility market.
good material thanks turmeric curcumin for boils His Cabinet should be his main asset – after all, he has picked them and we are not riven like Labour, who are still in a simmering Blair/Brown civil war. Yet when he was under fire, and it looked as though gay marriage might even do for him, some spun out of control. Michael Gove, Philip Hammond and, in particular, Theresa May began to take liberties.
What do you want to do when you’ve finished? nolvadex and clomid for pct dosage How do we know? Well, for one thing Attorney General Eric Holder told us so in 2012, testifying before Congress that: “I am concerned that the size of some of these institutions becomes so large that it does become difficult for us to prosecute them when we are hit with indications that if you do prosecute, if you do bring a criminal charge, it will have a negative impact on the national economy, perhaps even the world economy.
Accountant supermarket manager harga obat aspirin untuk jerawat He said he may exit Penney, where he owns 39 million shares and is the company’s biggest investor, but would not say when. At Target, he stuck it out for 19 months after losing a bitter and expensive proxy fight, he reminded investors.
What’s the current interest rate for personal loans? is tylenol like ibuprofen The kingdom has informed the United States of its actions inSyria, and diplomats say it has respected U.S. requests not tosupply the groups with advanced weaponry that the West fearscould fall into the hands of al Qaeda-aligned groups.
I’ve got a part-time job buy vigrx plus stores canada “The head of the baby was already out when she went to the floor,” Vargas said. “The baby came out really, really fast. Fortunately, the emergency service people got here really fast.”
I work for a publishers testoripped reviews side effects With these criteria and metrics that measure success and provide accountability for results, we could gradually see this investment produce returns in the form of well prepared young people able to take the jobs of tomorrow. This modest change in Perkins Act funding, which currently is distributed with no criteria and no metrics for performance, would be step one.
Gloomy tales skelaxin wiki StarMine’s models take into account analyst estimates forgrowth, usually over five years, and then models the typicalgrowth trajectory of companies over a longer period of time. (Reporting by Siddharth Cavale in Bangalore; Editing by JoyjeetDas)
I’ll put him on arimidex desconto He argued that HS2 was needed âas a heart bypass for the clogged arteries of our transport systemâ so that existing main lines could provide more local and freight trains rather than long-distance travel.
We need someone with qualifications doxazosinum cena Britain’s Times newspaper reported on Saturday that thearrested Briton was part of a swoop in Beijing and Shanghai inthe past week which had seen at least 10 corporate intelligenceconsultants detained or arrested.
I’m retired onde comprar aldara no brasil His comments contrast with a more optimistic tone from Spain's central bank earlier this week. On Tuesday, it forecast that the country's economy shrank by 0.1 percent in the second quarter,quarter-on-quarter, following a contraction of 0.5 percent in the first three months of the year. Spain's preliminary second-quarter gross domestic product (GDP) data is due on Tuesday.
Can I take your number? nha pharmacy technician study guide For metastatic brain tumors, the risk factors are those associated with the original cancer. âFor instance, the cancer that most frequently spreads to the brain is lung cancer,â says Yong. âSince smoking is the main risk factor for lung cancer, it can also increase your risk of going on to develop a malignant brain tumor.â
I saw your advert in the paper envisionrx north canton oh âEliâs a tough guy,â Rolle said. âI think a lot of people really donât understand him as a person or even as a player. But heâs a tough guy. He can handle constructive criticism. Heâs a guy that can deal with pressure. Obviously, heâs the quarterback of the New York Giants. There isnât much more pressure than that. We have to be hard on Eli. At the same time, we love and respect Eli. We know what he brings to this game. We know what he brings to this team. Realistically speaking, we donât win without Eli.
Normally I do not learn article on blogs, however I wish to say that this write-up
very pressured me to take a look at and do so! Your writing taste has been amazed
me. Thanks, quite great post.
g recently posted..g
How much will it cost to send this letter to ? mk-selfmedication.jp A trainer walked out to Backstrom, who skated slowly to the bench before going to the locker room. Backstrom tied for the NHL lead with 24 wins last season and is Minnesota’s franchise leader in wins, shutouts, shutout streak, games played, starts and minutes played.
Would you like a receipt? cialis 20 mg benefits Originally filed in April 2010, the SEC’s lawsuit accuses Tourre of misleading investors in the Ababus synthetic collateralized debt obligation (CDO) in 2007 by failing to disclose that billionaire John Paulson’s hedge fund company helped pick its assets and planned to bet against – or short – the transaction.
I sing in a choir buy bimatoprost eye drops uk âHe is grateful to the skilled medical professionals who have cared for him. He thanks his family, friends, and fellow citizens for their prayers and well wishes. And he encourages us all to get our regular check-ups,” Ford said in a written statement.
How do you spell that? olio di neem insetticida prezzo Tencent’s popular messaging app WeChat has 236 million active users, more than half of all China’s smartphone users, and micro-blogging service Sina Weibo had more than 500 million registered accounts last year.
I’d like to pay this in, please familydoctor.org cholesterol The stock market went for so long without a serious pullback this year that many strategists thought what it needed most was a vicious whipping. That problem has been solved in just a few days as a steep decline erased a third of the year’s gains.
Enter your PIN brainplus iq in south africa “When I first launched the website, it was in English,” said Ms Khouri. “But traffic and user engagement is much stronger, more active and loyal since switching to Arabic.” Indeed, Google announced in December 2012 that Arabic was set to be the fourth most important language on the web by 2015, after English, Chinese and Spanish. “If you’re selling online in the Middle East, it’s really important to have an Arabic website,” she said.
What do you like doing in your spare time? http://www.pharmed.in “The odds that there won’t be a deal over the next month arenear zero, but there is some chance we won’t see something bythe 17th. If that happens … we could easily correct 3-5percent,” said Jim McDonald, who helps oversee $803 billion aschief investment strategist at Chicago-based Northern TrustGlobal Investments.
acyclovir
Do you know each other? man up now herbal.com But some worry that Abe’s resolve for economic reform could weaken in the face of a resurgent LDP. A landslide victory could bolster opposition to regulatory reform from LDP lawmakers with close ties to industries that would suffer from change.
About a year dynamichealthservices.com This covers an individual’s socioeconomic position as well as other factors such as the weather and access to sport facilities. The research found almost 80% of people did not carry out moderate exercise at least 12 times in a four-week period.
Not available at the moment drugusers.cc “If it’s an emergency band-aid to stop the bleeding, so beit. But we’ll need to have a serious think about a plan in themedium and long term once and for all,” said Giorgio Squinzi,the head of business lobby Confindustria.
Get a job amitriptyline hydrochloride 10mg price The three men and two women on trial knew Madoffâssecurities firm didnât conduct real trades and used money fromearlier investors to pay off new ones, the U.S. alleges. Whenthe fraud collapsed on Dec. 11, 2008, thousands of customerslost at least $17 billion in principal and $48 billion in fakeprofit they believed was being held in their accounts.
Please call back later ipratropium bromide and albuterol sulfate uses The analysis looked at eight select goals. It showed that Virginia is meeting five â improving sewage treatment plants, fencing cattle out of streams, restoring urban streams, planting trees along streams, and building traditional stormwater ponds. But the groups say the state is behind in:
I came here to work best anti cancer fruits Despite most weather forecasters predicting rain until at least tea on Monday, a dry spell allowed play to begin only 30 minutes behind schedule at 11:30, with Clarke declaring on Australia's overnight score.
I’m unemployed healthydiscount.co.uk When asked by a reader about how difficult it is to film nude love scenes like the ones in his car-racing flick âRush,â Hemsworth answered, âTheyâre rather intimidating, to be honest. You have a hundred people standing around with lights and cameras, and itâs a fairly unnatural setting to be getting your kit off.â
Which university are you at? generic-doctor.com “Among people who have been clean and sober, if they go back into the habit, they will usually start at the same dose that they had before,” says John Brown, an attending physician at San Francisco General Hospital’s emergency room. “Their body is now sensitive to it. They’ve essentially reset their body.”
Will I get travelling expenses? collagen restore beauty But a gaping divide between rich and poor, and allegationsthat the authorities carried out a pre-election crackdown ondissent that doubled the country’s number of politicalprisoners, have attracted criticism at home and abroad.
I have my own business trend micro internet security free download 2011 Set within lush bush mangroves on the tributary Makasutu is a privately owned ecotourist reserve. It combines ecotourism and responsible travel with sustainable economic development in line with the ethics of the two owners – James English and Lawrence Williams.
I like it a lot mail order pharmacy safety Prosecutors hoped that the testimony of Martin’s mother and brother may have an emotional and convincing impact on the jury and that the jurors would tie their words to the opinion of FBI audio expert Hirotaka Nakasone who testified earlier in the trial that it was not possible to definitively identify the voice using available acceptable technology.
I’d like to order some foreign currency deadlift belt width The reduction in its holding marks the latest development in a months-long contest waged between Michael Dell, who wants to take the company he founded in 1984 private to restructure it, and investors who say his offer undervalues the world’s No. 3 PC maker.
Please call back later flonase sensimist walmart She made the comments as she went into a meeting of Senate Republicans in which they will discuss the deal hatched by Senate majority leader Harry Reid and the Republican leader in the Senate, Mitch McConnell.
I need to charge up my phone dilantin drug side effects It’s a game that requires constant lateral thinking and a keen aptitude for multi-tasking to win and I really think many people are going to relish the challenge, and the picturesque world that frames it all. If that sounds like you then there’s no reason to doubt that Pikmin 3 will yield much enjoyment.
I went to lexapro 10 mg common side effects Two teenage Chinese girls on their way to summer camp in the United States were killed and more than 180 people injured in the San Francisco crash, the first fatal accident involving the Boeing 777 since it entered service in 1995..
I’m a member of a gym pharmacist directed protocol The government frame the EU migration debate in terms of fear, with Romanians and other Europeans coming to the UK to make use of the NHS and to live off benefit payments – but evidence for these claims is notoriously light.
It’s serious kamagra nyiregyhaza One new feature that makes Siri a lot more like a real assistant is her ability to not only look through your email, but actually read messages back to you. While thatâs probably not something youâd want while on a crowded subway, it could come in handy the next time you find yourself behind the wheel.
I’m unemployed hi tec hi anabol protein 1000g opinie Pera bought the rights to the mine in 2004 for one euro fromhis former employer Outokumpu, which had thought the nickelcontent at the mine’s deposits to be too small to turn a profit,while Pera believed large-scale bioheap leaching would make itviable.
I’m in my first year at university northbrook pharmacy opening hours When comparing policy prices, be sure to compare similar policies, cautions Phil Reed, senior consumer advice editor at Edmunds.com. Auto policies vary by length of time, level of service and an array of add-ons, he says. Instead of just searching the Internet to compare quotes, Reed recommends getting on the phone with companies and asking questions, too. Certain car safety features, such as alarm systems or anti-lock breaks, can help lower your rate.
How much does the job pay? what is sumatriptan succinate tablets used for “They never left each other’s sides,” an eyewitness reportedly told Life & Style. “They were with a few people and spent a few minutes at the VIP DJ stage table. They then headed back to a more private VIP bungalow cabana near the pool.”
Will I get paid for overtime? swedish flower pollen webmd Polio is a highly infectious disease that invades the nervous system and can cause irreversible paralysis in a matter of hours. A $5.5 billion global eradication plan was launched in April with the aim of vaccinating 250 million children multiple times each year to stop the virus finding new footholds, and stepping up surveillance in more than 70 countries.
Where are you calling from? harga pilocarpine Since Brian Moynihan became chief executive in 2010, one ofthe bank’s primary areas of focus has been slashing costs. In2011, it announced its Project New BAC initiative, an effort tosave $8 billion per year by the end of 2014. The bank said it ison track to achieve its goal of saving $1.5 billion per quarterby the end of this year.
Could you send me an application form? lexapro low dose side effects In the past, Ponder got a pass for being young and not having much in terms of weapons at the wide receiver position, but this offseason the Vikings picked up some weapons, and Ponder has improved. The Vikings only win this season comes with Matt Cassel under center. That’s right, Matt Cassel.
I love this site 2000 mg of flagyl for bv BOGOTA, Colombia â The twin-engine turboprop plane that crashed in northern Colombia on a U.S. counter-drug mission, killing three American contractors and a Panamanian aboard, had been tracking a suspected smuggling vessel over the western Caribbean when it lost radio contact, the U.S. military said.
Where are you from? customcare compounding pharmacy adelaide A granary, where wheat and barley were stored on raised plinths to protect them from floods, revealed its good governance — provision was made to feed the city in lean times. Excavators found a water cooler area in the citadel — a square platform dented by the impressions from giant earthenware pots — where its officials could gather and gossip.
Sorry, you must have the wrong number bootybox reviews Votes typically last 15 minutes, but Democrats who control the Senate required much longer to confirm Jones. To reach a 60-vote threshold to end debate, they needed Democratic Senator Heidi Heitkamp of North Dakota to fly to Washington.
A few months rx-canada-365.com Meanwhile, the Government says it will help support potential buyers by giving advice on the environmental and financial benefits of buying an E.V. And electric car owners will soon benefit from discounted ferry fares on all routes to Mull and Bute.
My battery’s about to run out free prescription drugs discount card Unlike Sprinkle, whose no-holes-barred play remained unfettered by his reputation, Suh is under the microscope. He is considered a repeat offender and the last thing the image-conscious NFL wants or needs at this time.
An accountancy practice erectzan in uk We have called the Hall of Famer a show killer. His ponderous, often predictable analysis, was a detriment. He slowed things down. The rest of the cast (Bill Simmons, Jalen Rose and Wilbon) deferred to him, short-circuiting debate. The result was a bland concoction of forgettable opinions.
I’d like to cancel a cheque vente privee intimax When other regional conservative parties joined to form theCDU, the CSU remained separate, reflecting Bavaria’s strongregional identity. CSU lawmakers make up nearly a quarter ofMerkel’s conservative bloc.
very best job hospital pharmacies in abu dhabi “While there are no furloughs, it’s not just business as usual,” she said. “And there are programs certainly that are affected, and which all could be up and running again if Congress could get some business done.”
real beauty page viagra how long till works Sterling fell to $1.5297 after UK gross domesticproduct data, from $1.5371 beforehand – a shade away from aone-month peak of $1.5393. The British economy grew 0.6 percentin the second quarter, picking up from the previous quarter foran a 1.4 percent annual pace.
psw cashman casino slots
I can’t hear you very well petmd.com dogs names Regulated commercial banks had long been permitted to tradein commodity derivatives such as futures, but at the time didnot enjoy the same freedom in physical markets, unlikeinvestment banks like Goldman Sachs and Morgan Stanley.
Can I call you back? torrance pharmacy & compounding center torrance ca âA grandparent might want to know if the child is in fact theirs, and if they are entitled to rights under the law to see that child,â she said, adding that potential siblings have faced off in her court as well.
It’s a bad line fildena canada On Friday the storm broke. Conflicting reports emerged as to the exact course of events, but officials claimed the Muslim Brotherhood supporters had tried to move away from the mosque, along the airport road towards the military parade ground where President Anwar Sadat was assassinated in 1981.
I’m about to run out of credit http://www.powerplanthealth.com But right now, it’s all about the Tigers. On Friday night,the 17th sell-out crowd of the season packed into 41,782-seatComerica Park to watch Detroit beat the Philadelphia Phillies bya 2-1 score. So far this season, the Tigers have drawn 1.8million fans downtown for games.
I work here healthworld pharmacy penang “The American people don’t want a government shutdown, and they don’t want Obamacare,” House Republican leaders said in a statement. “We will do our job and send this bill over, and then it’s up to the Senate to pass it and stop a government shutdown.” Earlier in the day, Mr Obama had used his weekly address to the nation to warn Republicans against trying to use the budget fight to extract concessions over health reforms.
Canadian 25 Mg Viagra Acheter Du Cialis generic cialis canada Keflex Baldder Infection
We went to university together vendita kamagra in italia “It’s important to negotiate, and even more important for negotiations to be predicated on realism and not illusions,” Lieberman wrote on Facebook. “There is no solution to the Israeli-Palestinian conflict, at least not in the coming years, and what’s possible and important to do is conflict-management.”
Not available at the moment flagyl online free shipping When your child is a little older, it’s time to introduce her to the stock market. The intricacies of risk and return will probably be over her head (the same is true for most adults), but this will get her comfortable with the idea of investment accounts and encourage her to ask questions. Set up a custodial account with yourself as the guardian. You’ll run the account until she turns 18, at which point she gains full control.
It’s serious advocare spark energy packets In a letter published on Twitter, the prince calls rising American shale gas production “an inevitable threat.” Saudi Arabia, he warns, “is almost entirely dependent on oil, and this reality is becoming a source of concern for all.”
How do you do? nitro focus no3 black ingredients Federal Reserve Board Governor Sarah Bloom Raskin delivers a speech entitled ”Mortgage Servicing Issues” before the National Consumer Law Center conference in Boston, Massachusetts November 12, 2010.
Can I use your phone? mexitil preco “I used to have 10 credit cards,” Mr Park said. “I had to use them for a variety of things: day-to-day stuff at home, office supplies for work, and then there are those big purchases for thousands of dollars, like a refrigerator or home appliances.”
Could I borrow your phone, please? buy hemogenin “For the past several years, Congress has used unobligated balances as a means to reduce our budgets,” Pentagon’s comptroller Robert Hale and undersecretary of acquisitions Frank Kendall wrote. “The threat that funding will be taken away or that future budgets will be reduced unless funds are obligated is a strong and perverse motivator.”
Can you hear me OK? side effects of nutrex vitrix “It’s not just England. Look what’s happened to Scottish football. Look at the Republic of Ireland. Roy Keane, Niall Quinn, Steve Staunton, Paul McGrath and Kevin Moran always played on English soil and in the Premier League.
I can’t get a signal kamagra 100 bijwerkingen There has been a surge in Islamist militant attacks over the past two weeks in the North African country, and on Friday security forces launched heavy air and artillery strikes on militant hideouts in the Mount Chaambi area near the Algerian border.
I can’t stand football magna rx uk • PROBIOTIC drinks and supplements are better than yoghurts as they contain more friendly bacteria. But beware, some probiotic drinks are full of sugar. More than 10g per 100g is considered high, so if you’re diabetic or watching your sugar intake, it’s best to opt for a pill.
History symmetrel medscape Monteith was public about his struggles with substance abuse. In April, he completed voluntary treatment for unspecified substance addiction at a rehab facility. He had also been treated in a facility at age 19.
I’m in my first year at university titan pharma share price The two biggest rivals are Nestlé, which describes itself as ‘the world’s leading nutrition, health and wellness company’ (but is still recovering from being pilloried after being accused of encouraging nursing mothers to buy its powdered milk and give up breastfeeding), and Kraft, which says it is taking steps to reduce its environmental footprint and ‘enhance our contribution to society’.
I’ve got a full-time job prostate health nutrition Six people have already been convicted of war crimes by the tribunal. Four of them are currently top officials of the country’s main Islamic party, Jamaat-e-Islami, while one is a former party chief and another is an expelled member of the party. Those verdicts led to widespread violence.
We’ve got a joint account thetreatmentcenter.com “If you want to invent, if you want to do any innovation, anything new, you’re going to have failures because you need to experiment,” Bezos said at the Utah Tech Council Hall of Fame. “And I think the amount of useful invention that you have is directly proportional to the number of experiments that you can do per week, per month, per year.
I’m doing an internship nathan hale pharmacy ct “In combination with increased oral sex behaviors among young people, this means that adolescents may be more likely than those in previous time periods to genitally acquire HSV-1,” the researchers concluded.
Please wait 50 mg fentanyl patch high Bodenheimer, at the age of 55, is manager chairman of The Walt Disney Company (NYSE:DIS)’s ESPN and was president of the sports network for regarding 15 years before he stepped down in January 2012.
I’d like to send this letter by finasteride buy online canada “But this guy saved us from liquidation and administration and it's his club. I will still say 'I'm going to watch City', 'I'm going to watch the Tigers', 'I'm going to watch Hull'. I will still say that and so will many other people.
I was born in Australia but grew up in England buyuksteroids.com “We would also ask them to reach out to their legislators and demand the right to vote on this issue,” said Donald Sico, a New Jersey lobbyist for the National Organization for Marriage, who said he also represents the New Jersey Catholic Conference.
I love this site malegra 25 side effects âIâm just trying to get through the next two days,â said Pete Hartney, 64, who makes a daily two-hour commute from Guilford, Conn., to New York City that has been extended by 90 minutes. âIâm going to try to put up with whatever they throw our way … then formulate a plan over the weekend.â
I’m in a band lymedisease.org The broader search began last Sunday, when firefighters battled a fire at DiMaggio’s home and eventually found the bodies of Hannah’s mother, Christina, 44, and brother, Ethan, 8. Christina Anderson died of blunt force trauma and may have been hit with a crowbar, a source close to the investigation told The Times.
I’m retired scfammed.com Investment bank Evercore Partners raised its valuation on Alibaba to $120bn, that is more than $100bn than Facebook was thought to be worth before it first listed on the stock exchange in May last year.
Special Delivery buy cialis professional uk Those homes in WUI areas accounted for two-thirds of all homes built in the United States during that time, according to research jointly conducted by the U.S. Forest Service, University of Wisconsin and Oregon State University.
I’d like to send this to depo testosterone online The idea behind the project is a simple one: use a standard 1/8-inch headphone jack (but without the headphones) to create a diminutive but easy to find button. When installed, Pressy can perform a number of straightforward operations such as launching a phone’s camera app, starting a voice recording, opening up settings, activating the flashlight, or any other number of other options. Each action is assigned to the button in an a Pressy app. According to Back and Mendel’s Kickstarter page, Pressy can even be set to perform multiple functions by defining what happens with single or double short or long clicks — basically, the inputs are morse code.
[url=https://paydayadvance2018.com/]advance payday loan[/url] [url=https://cashloans.us.com]payday loan apr[/url] [url=https://onlinepaydayloan.us.org/]online payday loans no credit check[/url] [url=https://samedayloan.us.org/]no credit check payday loans online[/url] [url=https://onlinepaydayloans.us.org/]payday loans direct lenders[/url] [url=https://paydayloanonline.us.org/]debt relief[/url] [url=https://loans1000.com/]loans with low interest[/url] [url=https://quickloan.us.org/]loans short term[/url] [url=https://fastpaydayloan.us.org/]personal loan calculator payment[/url] [url=https://paydayloansnocreditcheck.us.com]payday advance online[/url]
dkq casino game
personal loan
On another call spring of life daily energy supplement Jaguar Land Rover spokesman Nick OâDonnell confirmed that the Defender would halt in its current format at the end of 2015 â but stressed a new replacement vehicle would join the Land Rover model range.
I’m self-employed avelox precio mexico The AP zeroed in on the Douglass bridge and others that fit both criteria â structurally deficient and fracture critical. Together, they carry more than 29 million drivers a day, and many were built more than 60 years ago. Those bridges are located in all 50 states, plus Puerto Rico and the District of Columbia, and include the Brooklyn Bridge in New York, a bridge on the New Jersey highway that leads to the Lincoln Tunnel, and the Main Avenue Bridge in Cleveland.
How long have you lived here? misoprostol cena apteka A West Mercia force spokesman said: “There have been a number of recent tragedies in Shropshire and neighbouring counties where people have got into difficulties after entering rivers or quarry pools.
Where do you live? zofran 4 mg tablet price These initiatives represent a long-term gamble on thepromise of a novel kind of medicine that uses electricalimpulses rather than the chemicals or biological molecules foundin today’s drugs. GSK believes it is ahead of rivals in thearea.
Could you ask him to call me? medspa1064.com Cost was a key factor for Cailin Heinze, a veterinary nutritionist and professor at Tufts University who closed on a home in Northborough, Mass., in May. “My rent was already ridiculous for a two-bedroom, and it was going to go up another $200,” she says. “I thought, if I buy now, this is probably the lowest interest rate that is probably going to be around for the foreseeable future.”
Are you a student? number one best drugstore foundation What about the people who were there before the Jews? I mean serisously, if you are going to go back to Roman times to decide who should own the land, why not go back further? The reality is that arabs have lived there for centuries, under the rule of various people, Ottomans, British, Jordan and Egypt. Yes, the Jews were dispersed by the romans a couple thousand years ago or so, but so what?
I’d like some euros cialis-medik.com David Albright, of the Institute for Science and International Security think-tank, told a U.S. Senate committee in early October, referring to machines used to refine uranium: “Any future nuclear agreement must include a limit on the number and type of centrifuges Iran can install.”
Can I use your phone? rush-health.com The Daily News has some of the most memorable photos in sports history. From legendary boxers and iconic tennis players to golfing greats and fabled Olympians, the Daily News has the photos you want of the once-in-a-lifetime sports moments. Find yours today and relive history.
It’s remarkable to pay a quick visit this website and reading the views of all mates about this
post, while I am also keen of getting knowledge.
Charissa recently posted..Charissa
I enjoy travelling tenoretic medscape They noted that while this problem often resolves over time, it will persist in almost one in 10 boys. Furthermore, while most who are overweight or obese will simply be told to lose weight, this will not solve the problem for those with certain types of enlargement – such as enlarged breast glands – or those with a large amount of excess skin.
I enjoy travelling sell viagra on craigslist West Nile virus is transmitted through a mosquito bite, and mosquitoes pick up the virus by feeding on infected birds. People with West Nile virus often don’t show symptoms, but symptoms can include fever, nausea, headache and muscle aches.
US dollars comprar viagra online usa finlandia kakkonen Mr Blunkett, who was home secretary between 2002 and 2005, was in expansive mood at the Demos fringe, in front of an audience who felt the last Labour government had not done enough to protect civil liberties (there was a show of hands).
Can you hear me OK? kamagra illegaal thailand Islamic militants, long active in the area, have intensified their attacks against security forces since the ouster of Islamist President Mohammed Morsi on July 3. The almost daily attacks have targeted the El-Arish airport, checkpoints and police stations.
[url=http://genericprozac2019.com/]GENERIC PROZAC WITHOUT A PRESCRIPTION[/url] [url=http://buytadalafil247.com/]tadalafil[/url]
What are the hours of work? ambrosia overtraining solution In LA, you can visit top-notch museums, explore vibrant, quirky neighbourhoods, cycle beside golden sands, dine at a star chef’s table and stay up into the small hours in Hollywood – all in one day.
Hi, Neat post. There is a problem along with
your site in internet explorer, could check
this? IE nonetheless is the market leader and a huge
part of other people will omit your magnificent writing due
to this problem.
Tasha recently posted..Tasha
[url=http://buycrestor.us.com/]generic crestor[/url]
pretty valuable stuff, overall I believe this is really worth a bookmark, thanks
My family members all the time say that I am killing my
time here at net, but I know I am getting experience all the time by reading such good
articles or reviews.
g recently posted..g
Hi there! Do you know if they make any plugins to protect against hackers?
I’m kinda paranoid about losing everything I’ve
worked hard on. Any tips?
g recently posted..g
hbe cbd oil for pain
[url=http://genericlasix2019.com/]generic lasix[/url]
This particular blog is really interesting additionally amusing. I have discovered a bunch of helpful advices out of this blog. I ad love to come back again soon. Thanks!
gpy casino play
uuy cbd oil side effects
Amoxicillin Dosage Infection Sinus Propecia Generic Finasteride Hair Loss Buy Pain Meds Online With E Check cheapest cialis 20mg Meinungen Zu Priligy
Amazing! Its truly amazing article, I have got much clear
idea regarding from this article.
g recently posted..g
gwd cbd oil prices
advance payday loan
Interesting article, thanks. Could you explain the second paragraph in more detail please?
Investors do pay direct and indirect costs.
Aaliyah recently posted..Aaliyah
Really informative article post.Really looking forward to read more.
I’d like to cancel this standing order xyngular ignite plus kit During Wednesday’s retail order period for the notes, whichcover short-term cash needs, individual investors snapped up$1.65 billion of the debt. The yield range quoted to retailbuyers for the May maturity was 0.18 percent to 0.23 percent andthe range for the June maturity was 0.20 percent to 0.27percent, according to the state treasurer’s office.
oon cbd oil for dogs
[url=http://buyventolin24.us.org/]ventolin nebules[/url]
where can i get propecia
[url=http://buyventolin24.us.org/]Salbutamol Ventolin[/url] [url=http://cheapcialisgeneric.us.com/]cialis generic[/url] [url=http://cheapviagrapills.us.com/]example here[/url] [url=http://genericvaltrex2019.com/]prescription for valtrex[/url] [url=http://genericviagra2019.com/]GENERIC VIAGRA[/url] [url=http://buycialis24.us.com/]check this out[/url] [url=http://buyneurontin.us.com/]neurontin 600 mg[/url]
I visited a lot of website but I believe this one holds something special in it in it
I think that you can do with some pics to drive the message home a bit,
brv [url=https://mycbdoil.us.org/#]cbd oil florida[/url]
Way cool! Some extremely valid points! I appreciate you penning this write-up plus the rest of the website is very good.
fpd cbd oil stores near me
ojm casino play
It as really a nice and helpful piece of info. I am glad that you shared this helpful info with us. Please keep us informed like this. Thanks for sharing.
syr cbd oil canada online
I really liked your article.Thanks Again. Awesome.
[url=http://loans1000.com/]loans[/url] [url=http://paydayadvance2018.com/]advance payday loan[/url]
[url=http://sildenafil2017.us.com/]sildenafil no rx[/url] [url=http://buyalbuterol24.us.org/]albuterol inhaler[/url] [url=http://genericlevitra2019.com/]Levitra Super Force[/url]
Way cool! Some very valid points! I appreciate you writing this post and also the rest of the website is also really good.
Really enjoyed this blog article.Thanks Again. Really Great.
Thanks for the information.